Kaseya SIEM integration with SaaS Alerts
Follow a step-by-step guide outlining essential tasks and considerations necessary for successfully deploying Kaseya's SIEM capabilities via SaaS Alerts.
Getting started
Before integrating Kaseya SIEM with SaaS Alerts, ensure you have provider access to SaaS Alerts and the appropriate administrative permissions for the products you plan to connect.
Step 1: Complete SaaS Alerts onboarding prerequisites
Confirm the following SaaS Alerts setup steps are completed:
This is the initial step where you create an account on the SaaS platform. You’ll need to provide basic information such as your organization's name, contact details, and your billing information. This registration sets the stage for all subsequent configurations and integrations. For detailed information, refer to Getting started with SaaS Alerts.
After registering, you need to create an organizational structure within your tenant. This helps in managing and segregating data for different departments or subsidiaries. Each organization can have its own set of users, policies, and reports that cater to its specific needs. For detailed information, refer to this article.
Allowlisting is a crucial security measure that allows you to specify which countries or IP addresses are permitted to access your system. This helps in minimizing unauthorized access and potential attacks from untrusted sources. Defining these whitelists tailored to your organization's operational needs strengthens security. For detailed information, refer to Power Filters whitelisting logic and explanation.
This step involves entering your organization's domain and choosing the type of license that aligns with your operational needs. The license type may depend on the number of devices monitored, the features you require, or the scale of your operation. For more information, refer to this article.
Integrating your Software as a Service (SaaS) applications is crucial for centralized monitoring. You will need to authenticate these applications using appropriate administrative credentials, allowing Saas Alerts to collect and analyze data related to events and incidents occurring within those applications. For more information, refer to this article.
Please refer to this section below.
Detailed information on connecting Respond to desired customers is available in Managing Respond connections. This article explains how to manage Respond connections in a monitoring system. It highlights that if the global admin account used to create a connection experiences issues such as permission changes or a blocked sign-in, the connection will break and need to be re-established. The Manage Connections page allows users to check the status of connections, add or remove them, and export records.
Fortify is a platform designed to help MSPs secure Microsoft tenants for small businesses. It offers an intuitive interface that enables MSPs to implement Microsoft’s recommended security protocols quickly and efficiently. Key features include customizable recommended actions, comprehensive reporting on security posture, and the ability to deploy actions across multiple organizations simultaneously. By leveraging Fortify, MSPs can enhance security, save time, improve customer communication, and potentially increase sales of new security services. To access detailed information on how to connect Fortify to desired customers, including requirements and best practices, refer to Fortify overview.
Reviewing alert severity is important because changing alert severity allows organizations to tailor notifications based on specific customer needs and behavioral patterns, ensuring that alerts are relevant and appropriate. Also, with the introduction of the Quiet Mode default, reviewing alert severities helps to reduce unnecessary notifications and system noise. This enables teams to focus on more critical issues without being overwhelmed by alerts. Adjusting the severity of alerts can prevent insignificant events from generating tickets, streamlining operations and helping teams prioritize their responses more effectively. With a growing library of alerts, regular reviews ensure that organizations are aligned with the latest best practices and alert configurations that optimize their alert management strategy. Overall, regularly reviewing and adjusting alert severity contributes to more effective monitoring, responsiveness, and management of potential incidents. For more detailed information on how to review alert severity, refer to Customizing alert severity.
Below are the relevant instructions for integrating your RMM tool with SaaS Alerts:
-
Connect Datto RMM
For detailed instructions on how to connect Datto RMM and SaaS Alerts, refer to Datto RMM Integration. This article outlines the integration process between SaaS Alerts and Datto RMM, highlighting a recent change in security requirements. Previously, a read-only permission was sufficient, but with the introduction of activity monitoring, the SaaS Alerts API user now needs Administrator access in Datto RMM. It also provides instructions for enabling API access, creating a dedicated user for SaaS Alerts with the necessary permissions, and connecting the two platforms. Additionally, it details the steps for mapping organizations between SaaS Alerts and Datto RMM, ensuring proper configuration for enhanced functionality.
-
Connect Kaseya VSA 9
Detailed information on integrating SaaS Alerts with VSA 9 is available on the VSA 9 Integration article. Here, you can find a comprehensive guide on integrating SaaS Alerts with VSA 9, detailing the necessary steps and prerequisites for a successful connection. It specifies that only VSA 9 is supported, highlights required IP addresses for firewall configurations, and outlines permissions needed for API access. Additionally, it explains how to create an OAuth client within VSA 9, including the necessary credentials and settings. The article further covers the process of connecting SaaS Alerts to VSA 9, addressing potential issues such as automatic credential population by password managers, and clarifying that SaaS Alerts does not store user credentials. Overall, it acts as a resource for users looking to leverage SaaS Alerts with their VSA 9 instance for enhanced functionality.
-
Connect ConnectWise Automate
For comprehensive information on integrating ConnectWise Automate with Saas Alerts, refer to ConnectWise Automate Integration. This guide outlines the prerequisites, provides step-by-step instructions for creating a dedicated user class and account, explains how to set permissions, and details the process for connecting the two services to enable alert functionality.
-
Connect N-Able N-Central RMM
If you are using N-Able N-Central, refer to N-Able N-Central RMM Integration. This article outlines the steps necessary to integrate N-Able N-Central with SaaS Alerts. It covers creating roles and API-only users, scheduling automation policies to store public IP addresses, and connecting the two systems. Key actions include setting up appropriate user roles, configuring custom properties for public IP addresses, and ensuring proper access permissions. Finally, it guides the user through connecting SaaS Alerts to N-Central, including handling potential integration duplicates.
-
Connect NinjaOne RMM
Connect your NinjaOne application by the specific integration instructions outlined in NinjaOne Integration. This article outlines the user requirements, including the need for System Administrator credentials and the generation of a Client ID and Client Secret within NinjaOne. The instructions cover the steps to create these credentials, configure the integration settings in SaaS Alerts, and connect the NinjaOne application. It also highlights important considerations, such as avoiding duplicate events when adding connections for multiple customers, and mentions the sync timing for data between Ninja RMM and SaaS Alerts.
-
Connect Syncro RMM
For comprehensive information on integrating Syncro RMM with SaaS Alerts, refer to Syncro RMM Integration. This article outlines prerequisites for creating a SaaS Alerts API key with specific permissions essential for the integration. The article details the steps to set up the API key, configure Microsoft Entra ID for enhanced functionality, and connect SaaS Alerts to Syncro RMM. Additionally, it notes that the current integration does not generate event alerts and emphasizes caution to avoid duplicate integrations.
If you need to establish an API connection to EDR, please follow the steps detailed in Datto EDR Integration.
Setting up automatic device mapping allows SaaS Alerts to continuously discover and categorize devices in your environment. This enables real-time monitoring and ensures that all devices are accounted for in your security strategy, providing better insights and incident response capabilities. For more information, refer to this article.
Step 2: Establish RocketCyber connection
After completing SaaS Alerts prerequisites, establish a connection to RocketCyber.
Make sure the registration for a RocketCyber tenant is complete. For detailed information on how to do so, refer to this article, which provides a guide for new users getting started with Kaseya 365 and RocketCyber. It outlines the process for accessing RocketCyber depending on whether you are a standalone customer or part of a Kaseya 365 subscription.
RocketCyber does not currently maintain static IPs for whitelisting. All whitelisting must be performed by hostname and port. By limiting data access to designated hostnames and ports, you reduce the risk of unauthorized access and potential breaches. This minimizes the attack surface for cyber threats and maintains data integrity, security, and compliance in a structured manner. Refer to Required ports and endpoints.
To ensure a seamless integration with RocketCyber, please follow the checklist below for configuring your respective PSA systems:
-
Configure Autotask
If you use Autotask, make sure to configure it for integration with RocketCyber. Refer to the Configuring Autotask article, which provides a step-by-step guide on how to do so. It outlines the necessary API credentials, how to set up and update the Autotask integration, the process for importing organizations, mapping those organizations, and configuring ticket statuses for effective two-way syncing.
-
Configure Kaseya BMS
If you are using BMS, ensure that it is configured for integration with RocketCyber. For detailed instructions, refer to Configuring BMS. The article provides a step-by-step guide on configuring BMS. It outlines how to import organizations, create tickets automatically, and set up necessary API credentials.
-
Configure ConnectWise PSA
If you are using ConnectWise PSA, please refer to the guide on Configuring ConnectWise Manage. This article provides a comprehensive guide on how to configure ConnectWise Manage to facilitate the import of organizations and the automatic creation of tickets. It emphasizes the importance of avoiding the import of already manually created organizations to prevent duplicate accounts.
-
Connect Syncro PSA
If your PSA system is Syncro PSA, please refer to the instructions detailed in Configuring Syncro. This article provides a step-by-step guide on configuring Syncro PSA to import organizations and automate ticket creation. It outlines the necessary API credentials, the integration setup process, and the importance of avoiding duplicate accounts. -
Establish notification contact methods
To access a step-by-step guide on how to enable incident email notifications at the organization level in addition to the default provider settings, please refer to Configuring incident email notifications. This guide outlines the necessary actions to be taken within the Provider Settings and Organization Settings to ensure that email recipients receive notifications for incident tickets. Once configured, both providers and organizations will receive notifications for incident tickets, facilitating better communication and response.
To make sure you have deployed the RocketCyber Agent using Datto RMM, please refer to Deploying the RocketCyber Agent via Datto RMM. Here, you will learn about the steps involved in the process. The article begins by describing how to copy the RocketCyber organization license key and add it to the corresponding Datto RMM site. Then, it guides users on creating a job for the RocketCyber Agent deployment, including adding the necessary components and configuring user-defined fields if desired. Finally, it outlines how to confirm the successful deployment of the agent by checking the job results.
RocketCyber developer integrations enable users to aggregate the security stack, providing insight, quicker detection and response to the RocketCyber SOC. To browse the RocketCyber list of developer integrations, refer to RocketCyber Integrations Guide.
If appropriate, select the following check boxes:
-
I am not enabling M365 in RocketCyber
-
I am not connecting SaaS Alerts to RocketCyber
To make sure you have successfully established an API connection to EDR, please refer to Configuring Datto EDR and Datto AV. This guide provides instructions for configuring the integration between Datto EDR/Datto AV and RocketCyber. It involves creating an API token in Datto EDR/AV, configuring settings in RocketCyber, and mapping organizations. Key steps include logging into Datto EDR/AV to generate an API token, inputting the token and base URL into RocketCyber, and testing the connection. Once set up, RocketCyber will receive events from Datto EDR/AV, allowing the SOC to monitor incidents.
Establishing connection with RocketCyber
Once you have signed up for Kaseya SIEM, you will be recognized in our database as a SIEM client. One of the most important onboarding steps is to establish a connection with RocketCyber in SaaS Alerts for the organization of your choice (RocketCyber can only be attached once per tenant). To accomplish this, follow these steps:
- Click Organizations in the side navigation menu.
- Click the edit organization icon for the organization you want to connect.
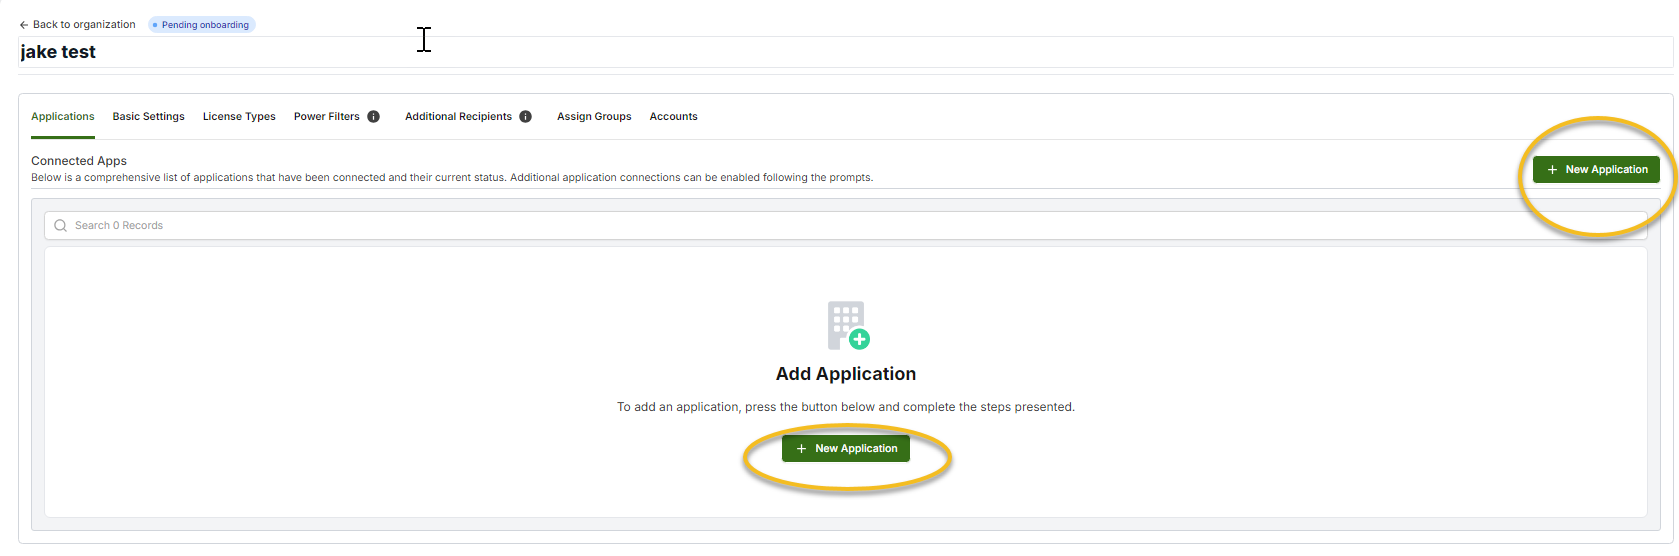
- Click + New Application. If the organization already has other connected applications, you will see the + New Application button on the right. If there are no connected apps for the organization, you will also find the button in the center of the page.
- Make sure the I have customer's global admin credentials option is selected.
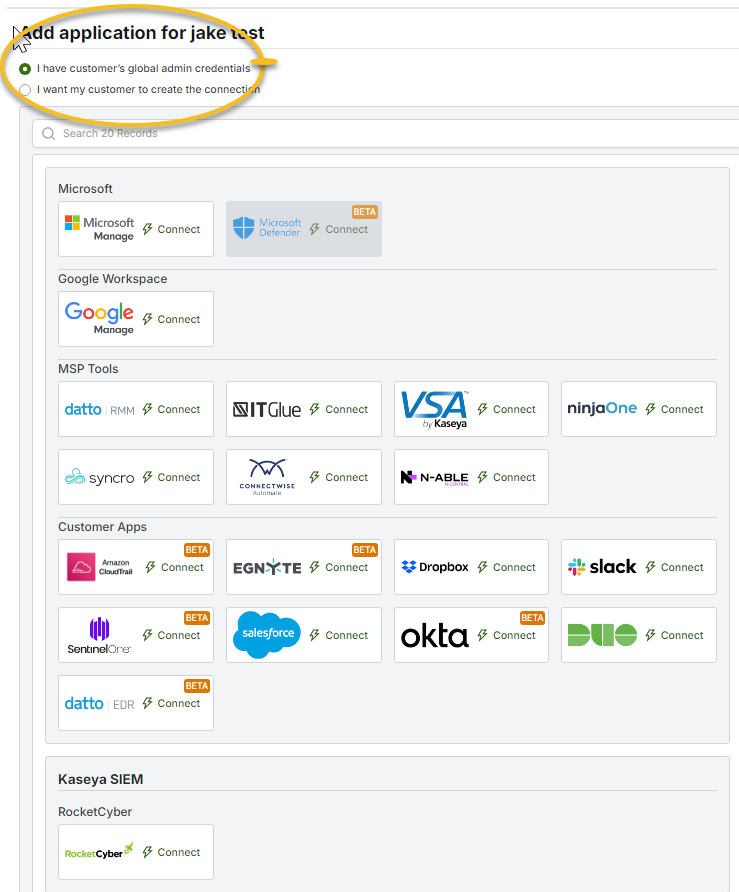
- Scroll down to the bottom of the page, where you will find the option to enable the connection with RocketCyber. Click the tile to proceed.

- After clicking, you will be directed to the RocketCyber Connection Wizard. Please follow these steps:
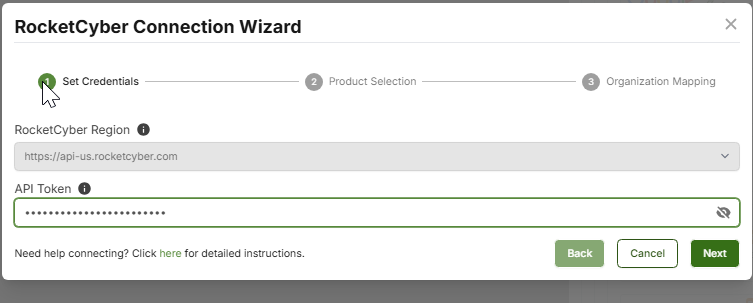
- Set Credentials: This is the first step of the wizard. You will see two items:
- RocketCyber Region: You will see your RocketCyber region displayed. Please make sure that the RocketCyber and SaaS Alerts regions match.
- API Token: Enter your RocketCyber API token to establish an API connection. If you need assistance accessing your RocketCyber API token, please refer to this article. You can click the eye icon to temporarily unmask the token for verification. Once you’ve entered the token, click Next to continue.
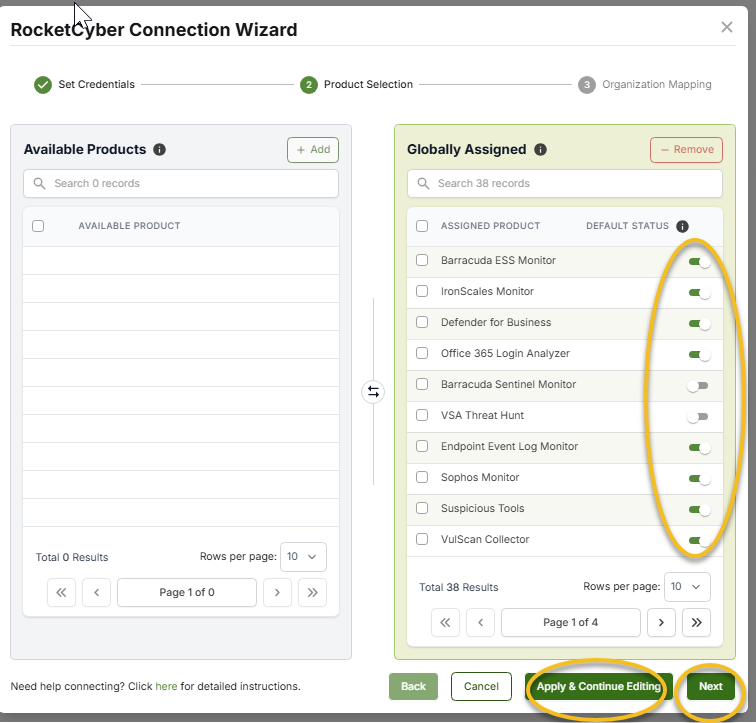
- Product Selection: In Step 2 of the wizard, you will complete the Product Selection section. This is where you can choose from a range of products available for activation. This area serves as the global control panel, allowing you to enable various functionalities:
- Under Available Products, select the checkboxes for the products you want to activate—typically, those that the partner will use for the vast majority of their organizations—and click + Add.
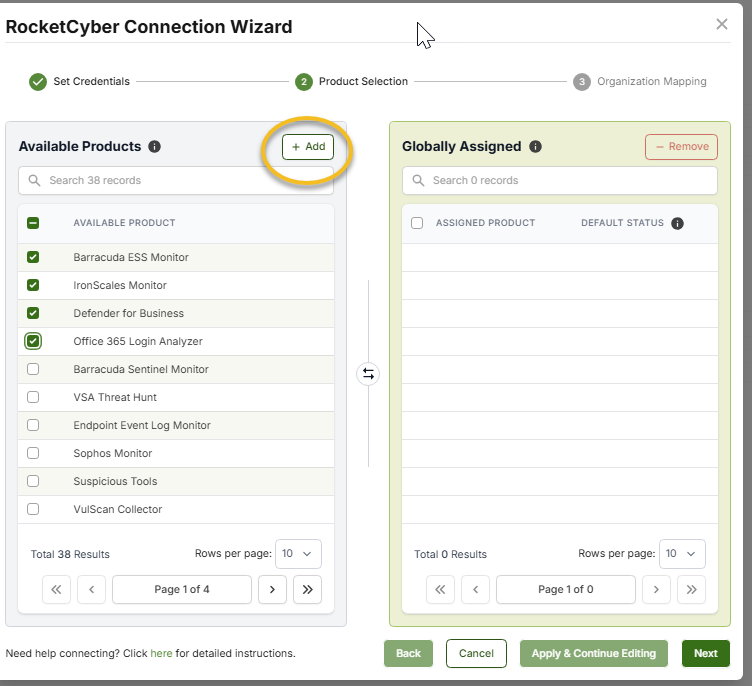
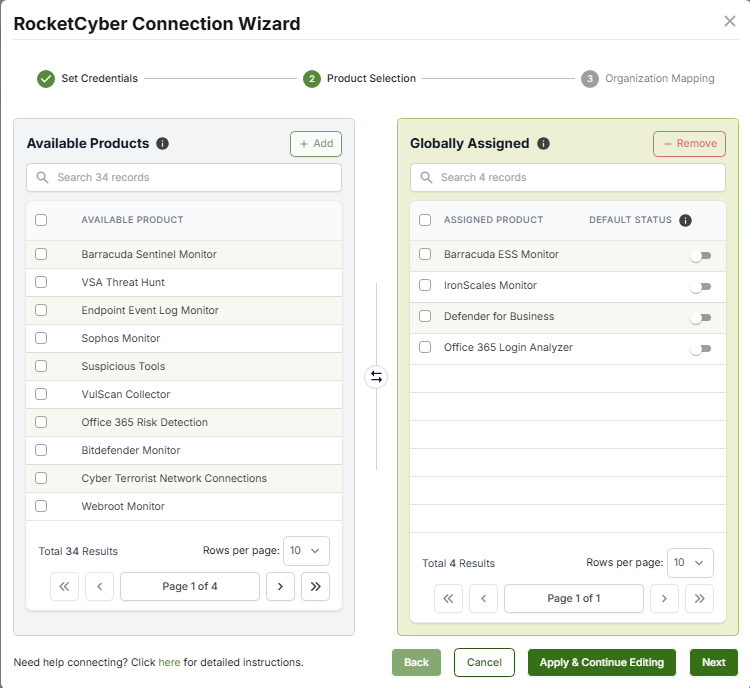
- The products you select will then appear under Globally Assigned.
- Here, you also have the option to select the checkbox next to a product and click Remove.
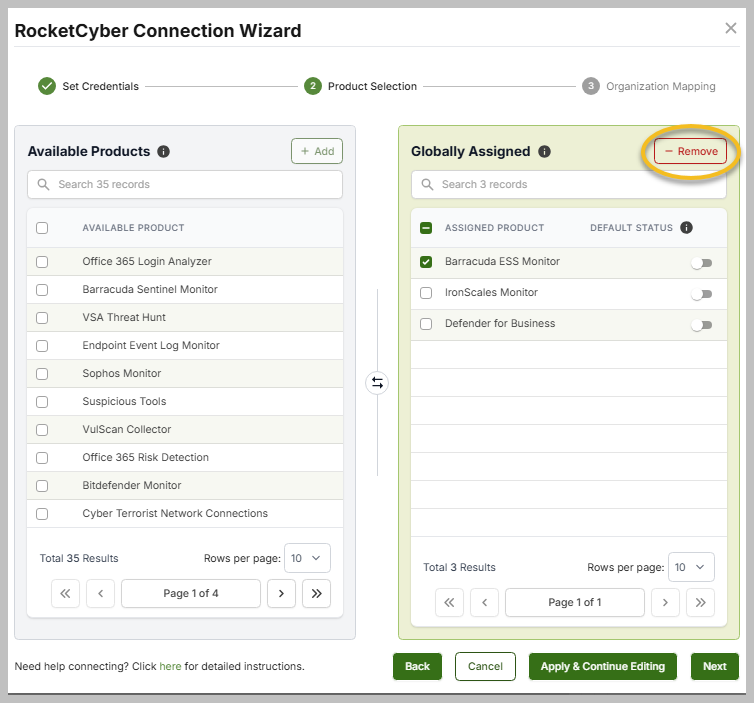
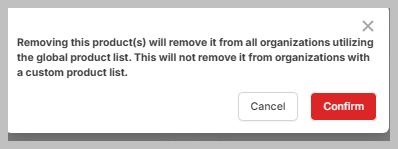
- A warning message will pop up, informing you that removing a product means it will be taken off the global product list for all organizations using it, but it will not be removed from organizations that have a custom product list. Please choose either Cancel or Confirm.
- Next, you can set the default state of these products for each organization. By default, the products are turned off, which means they can be connected but are not actively monitored. As a result, these products will not be displayed in the application list, but they will be available to connect when clicking + New Application. When you toggle a product on, the switch will turn green, indicating that the product is assigned and its monitoring will start once you map the organization in the next step. This information also applies to the toggles on the Organization Mapping screen. Finally, click Apply & Continue Editing or Next to proceed.
- Under Available Products, select the checkboxes for the products you want to activate—typically, those that the partner will use for the vast majority of their organizations—and click + Add.
- Organization Mapping: Additionally, there is an option to map customers from SaaS Alerts to RocketCyber:
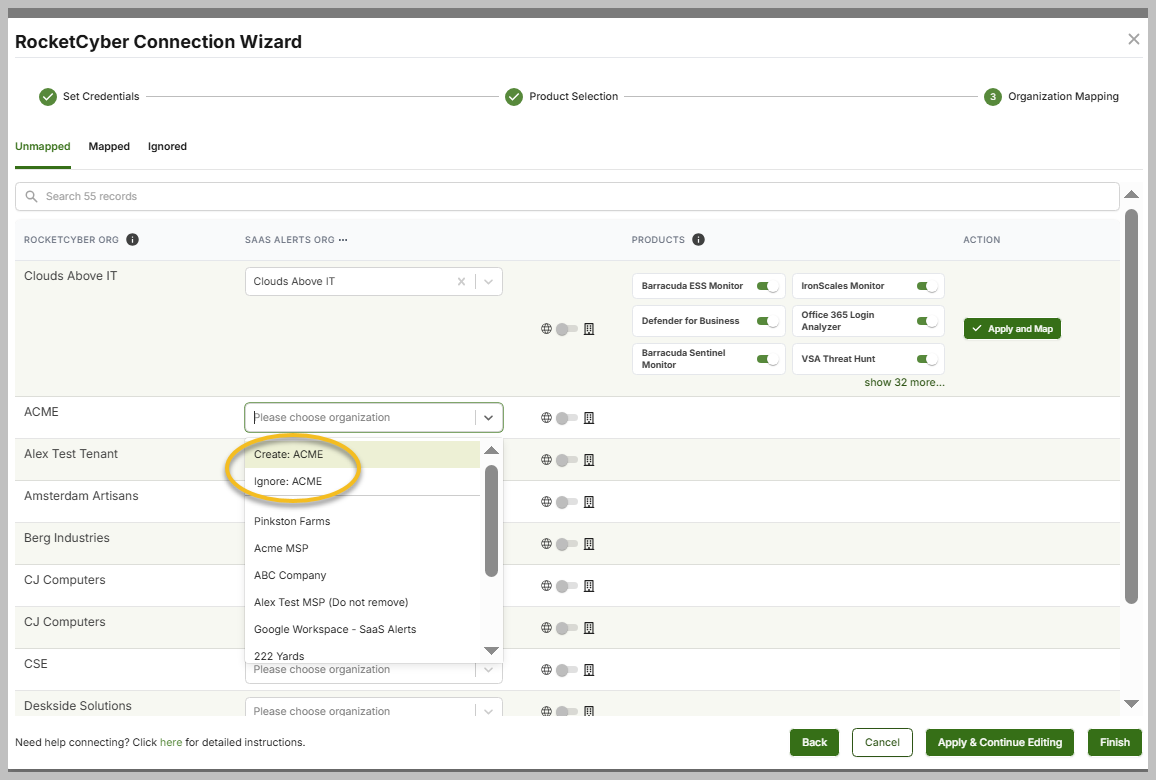
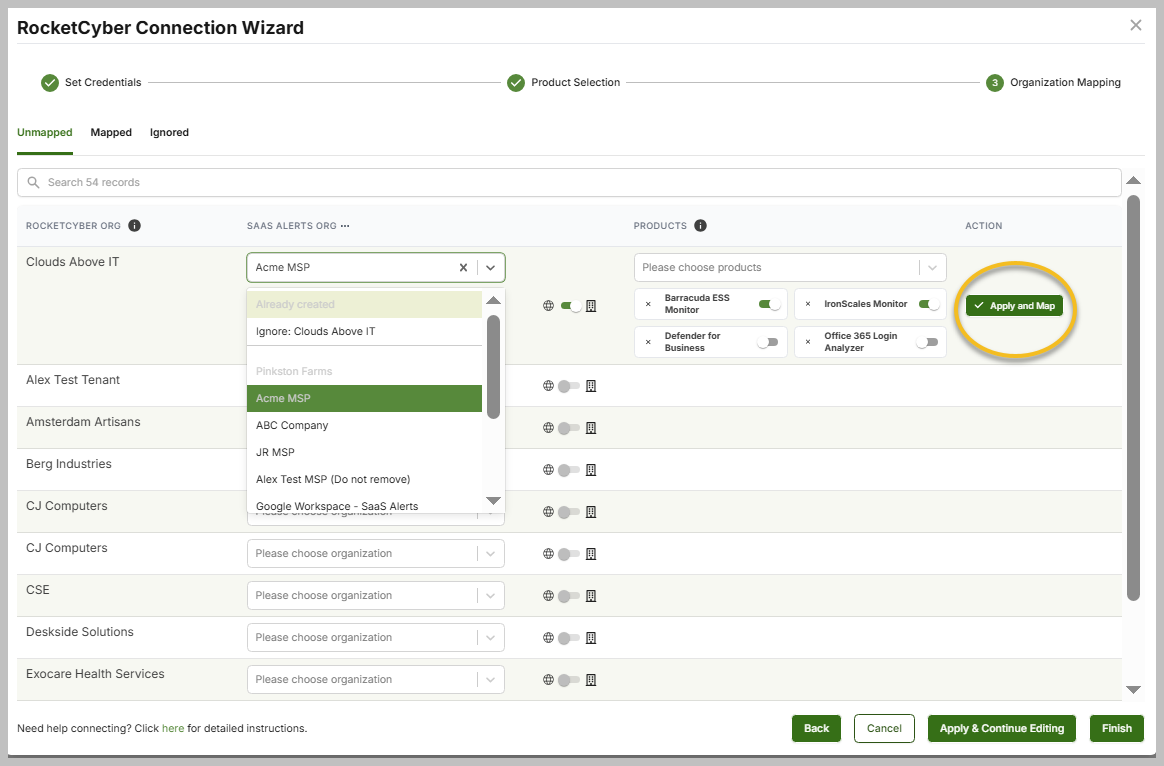
- Click the dropdown menu under SAAS ALERTS ORG to select the appropriate organization.
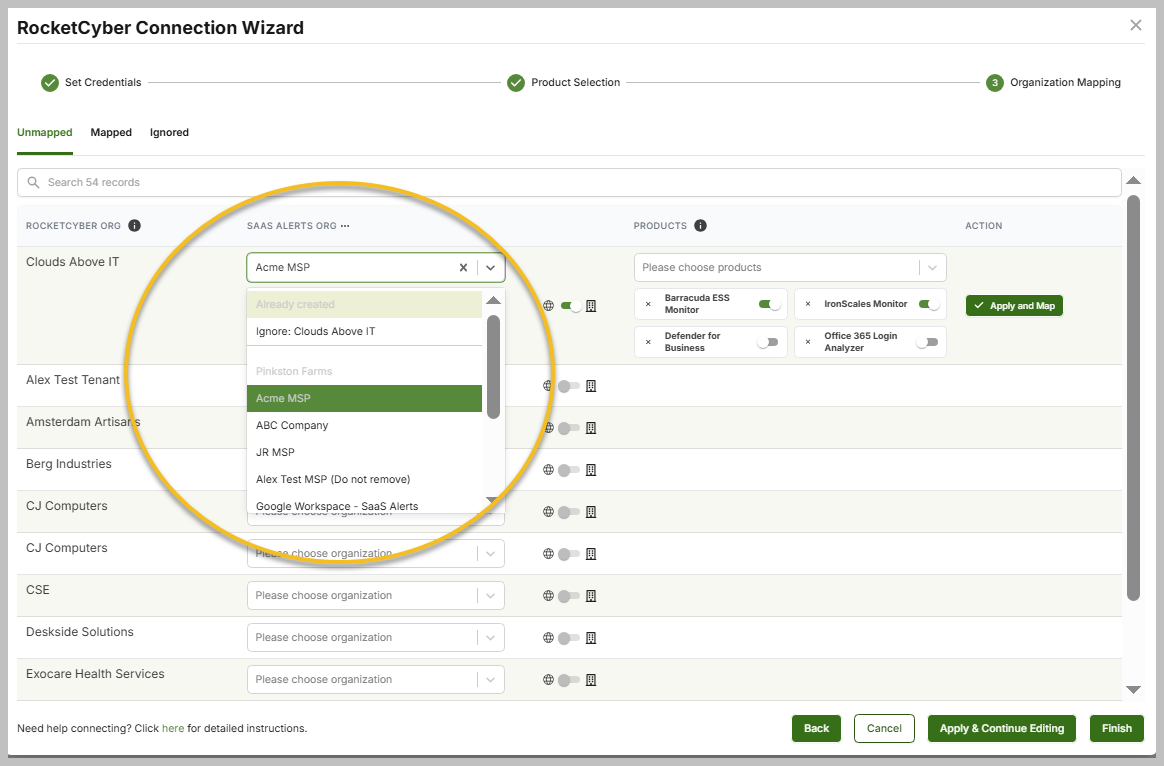
- In the event that a new SaaS Alerts organization needs to be created, the system allows for a straightforward command (Create) to facilitate this process. Alternatively, if it is determined that a SaaS Alerts organization will not be utilized, there is an option to disregard it (Ignore), which will then move the organization to the designated Ignored tab.
- Once you choose a SaaS Alerts organization, you can decide whether to enable certain features for specific clients. By default, the toggle in the middle is displayed in gray, indicating that the organization is currently using globally assigned apps.
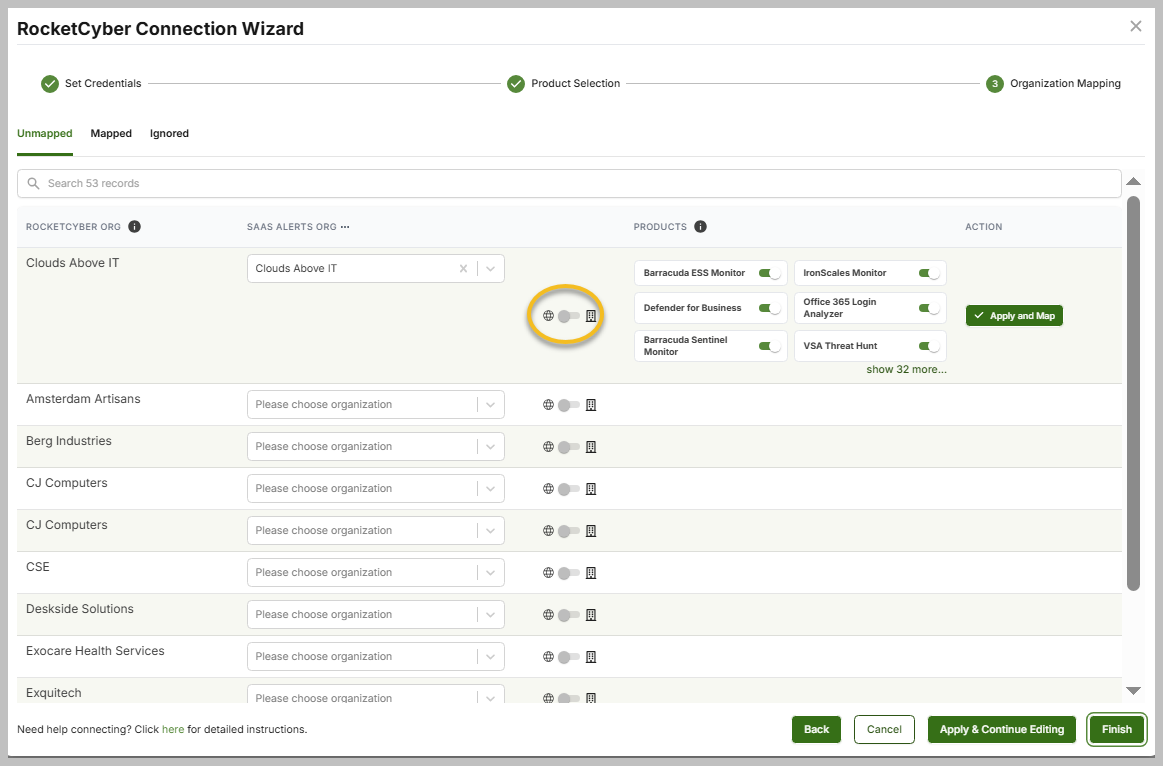
- To activate the toggle, simply slide it until it turns green. This indicates that you are no longer using the global list you previously established, nor are you applying the global toggle settings. Instead, you can start from the base settings and customize as needed. Everything you do here will now be specific to this particular organization.
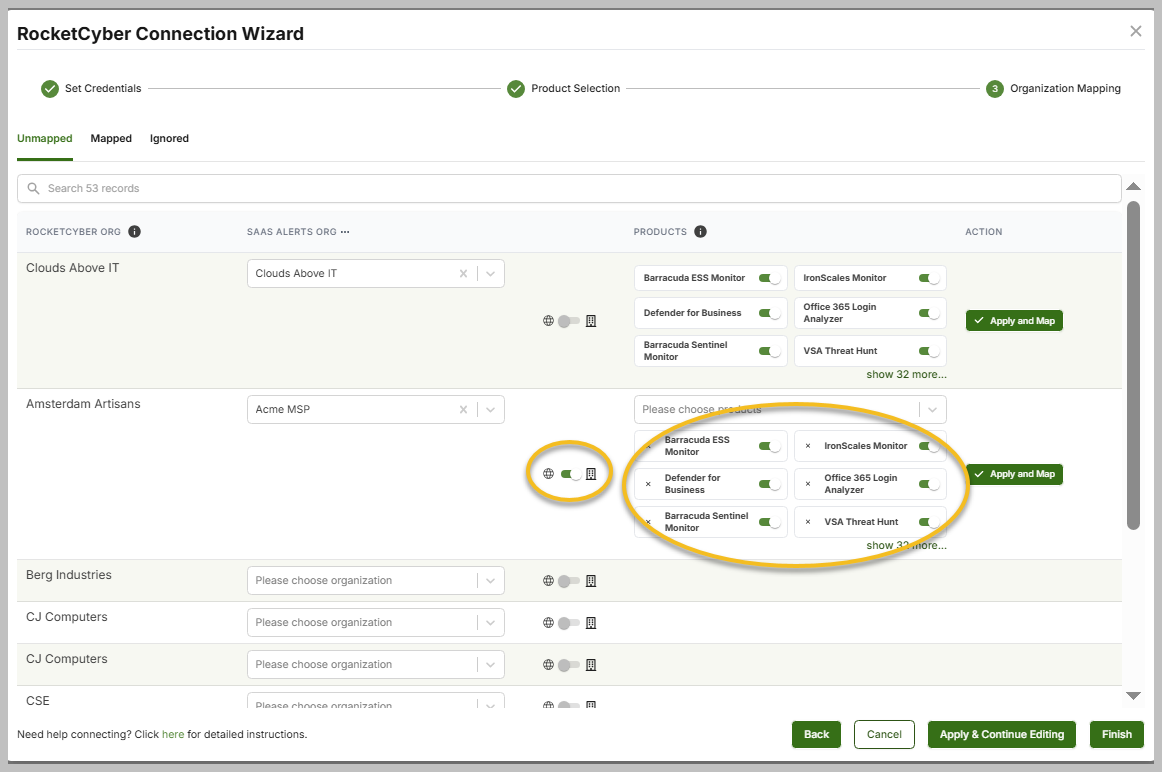
- Next, click Apply and Map to apply organization mapping, product assignments, and their activation statuses.
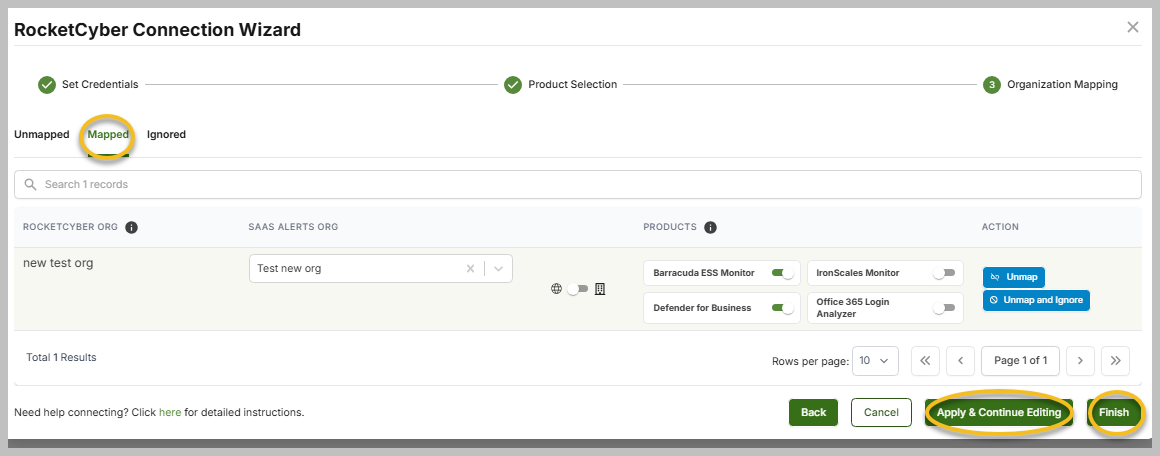
- The organization will then be moved to the Mapped tab. Click Apply & Continue Editing to save your current mapping selections and continue making additional changes in the Organization Mapping screen, or click Finish to complete the organization mapping process and exit the wizard, saving all changes.
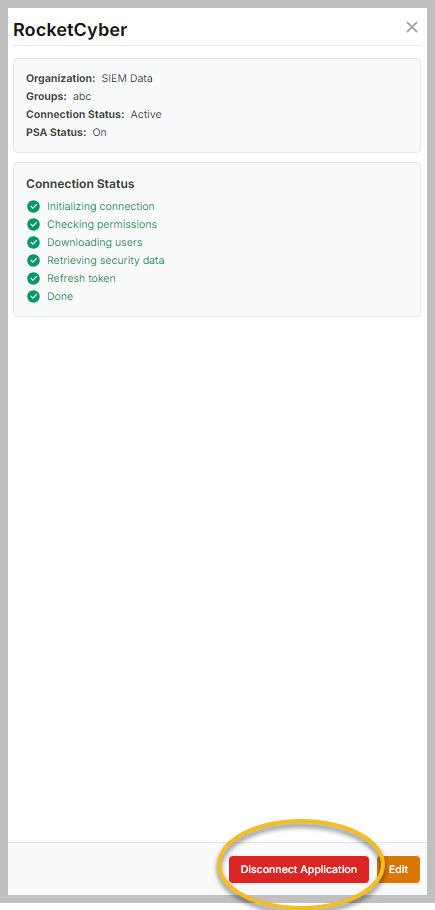
- If you need to adjust your connection to RocketCyber, just click the RocketCyber tile and then select Edit in the lower-right corner. You will be taken to Step 2 (Product Selection) of the RocketCyber Connection Wizard.
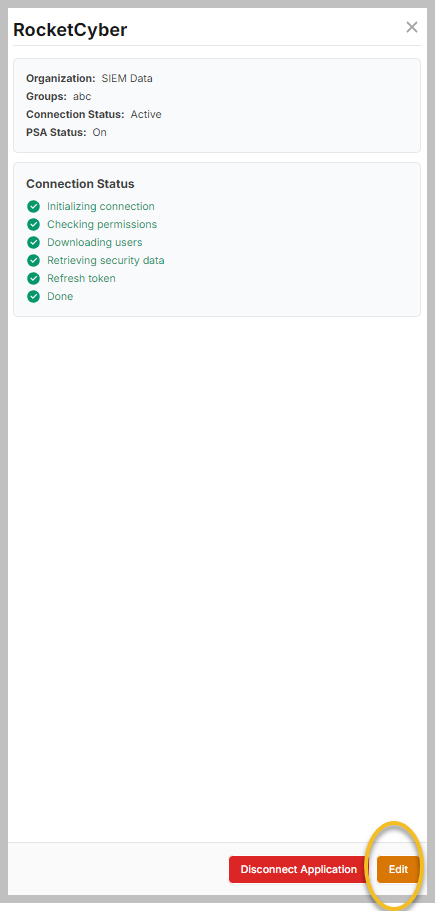
- To disconnect from RocketCyber, click the RocketCyber tile and select Disconnect Application. Deleting the application connection will keep the historical data will remain on the platform. Once you disconnect, data imports will stop, and the organization will no longer contribute to your billable count.
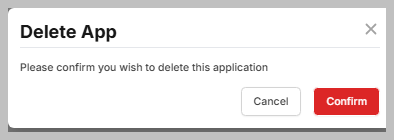
- A Delete App pop-up message will ask you to confirm the deletion of the application or to Cancel.
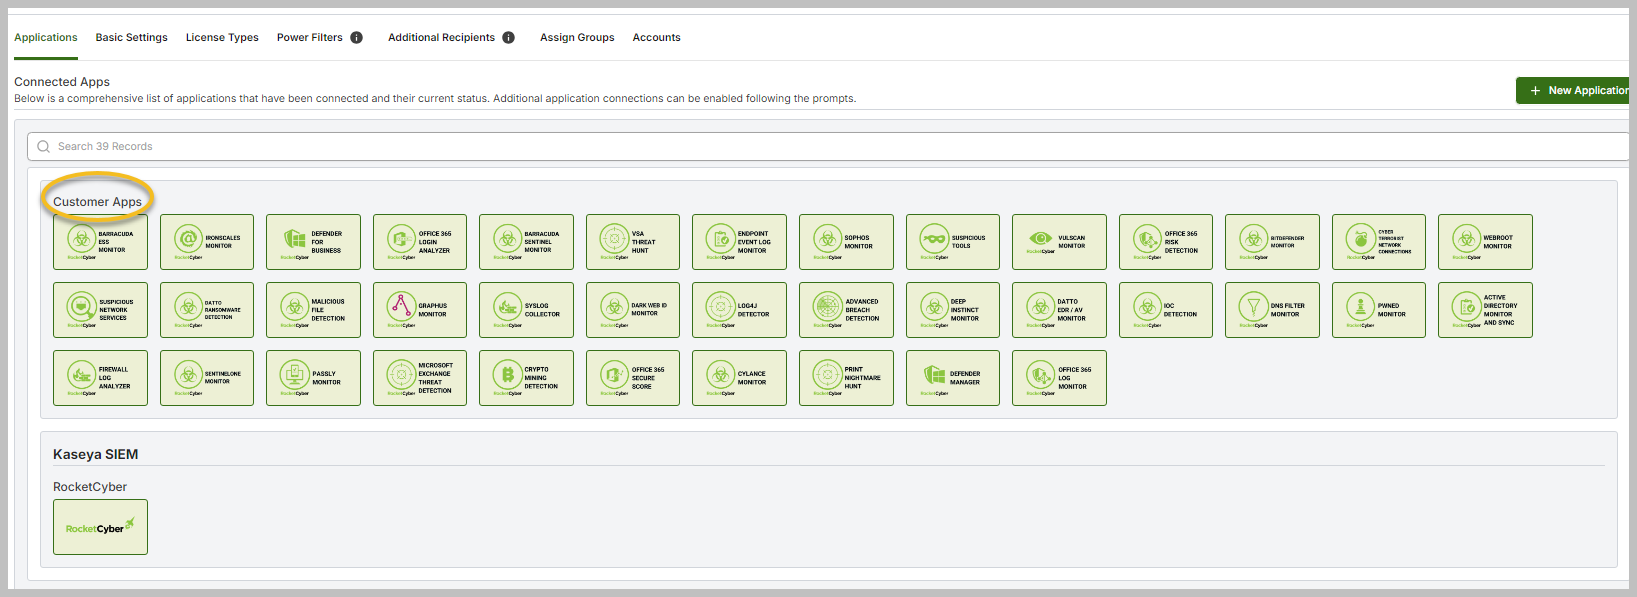
Customer apps
After completing the RocketCyber Connection Wizard, the Customer Apps section will be visible. Essentially, these applications extract information from RocketCyber and integrate it into SaaS Alerts, providing a significant advantage as SaaS Alerts operates more quickly and efficiently.
For instance, in the area of event data filtering, Kaseya SIEM offers the capability to filter and search for event data within SaaS Alerts. This feature enhances data management and allows for faster identification of relevant information when compared to RocketCyber. To use this feature, click Analysis in the side navigation menu. From there, you can select appropriate filters and click Run Report.
In SaaS Alerts, you can filter and search for data similarly to how you would in RocketCyber, but a significant advantage is the ability to set up indicators of compromise.
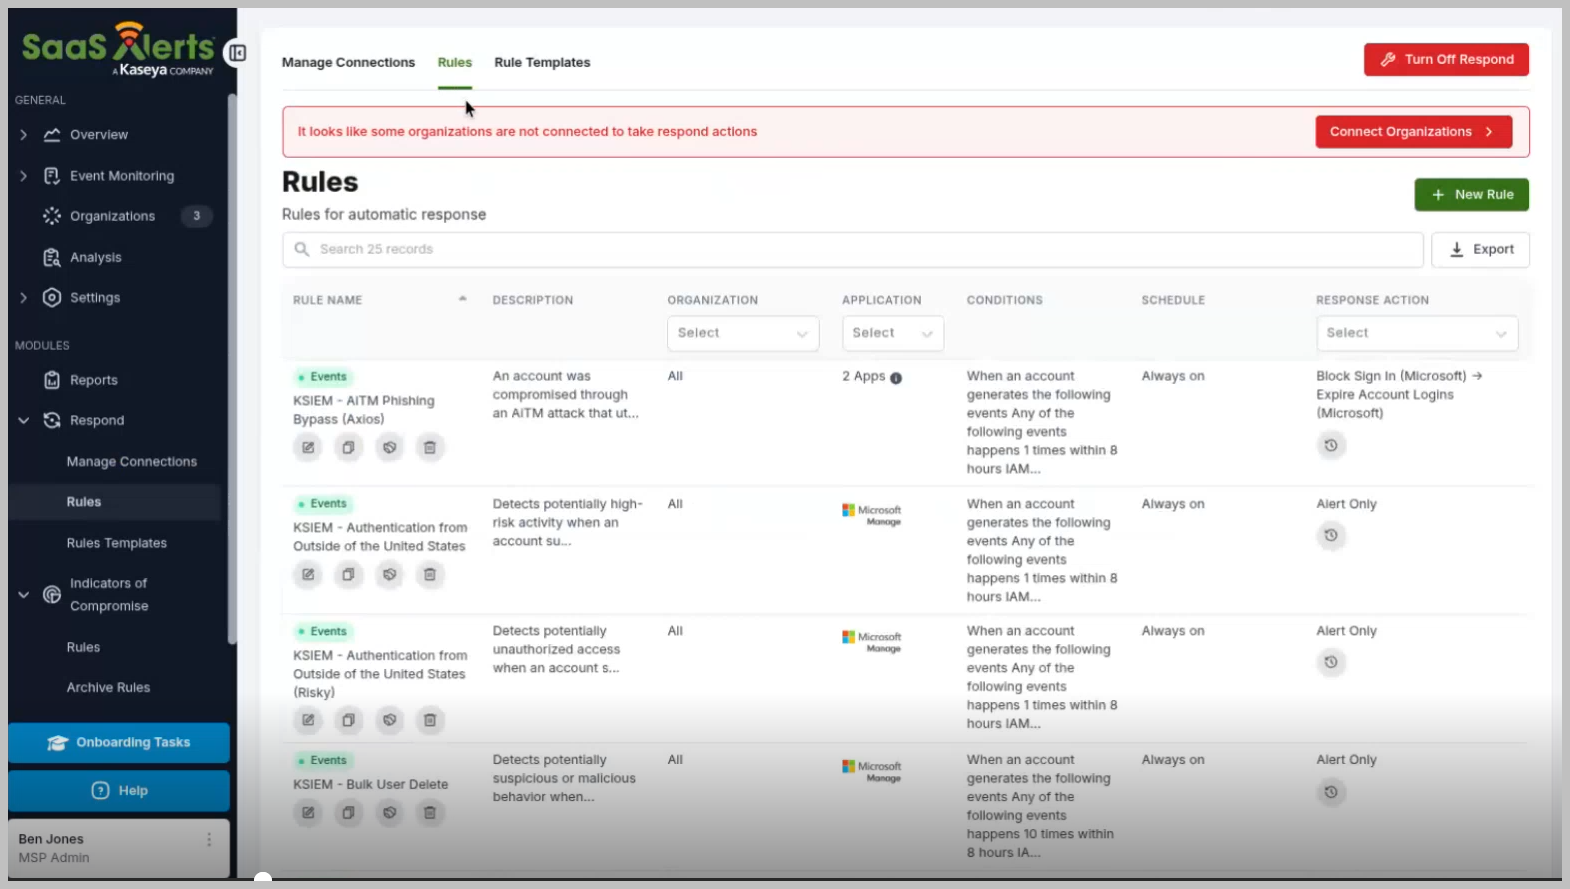
Response rules
We will push out effective response rules to Kaseya SIEM clients automatically, focusing on detecting malicious activity. Instead of overwhelming Kaseya SOC with numerous events—potentially millions—our system allows clients to filter and curate these events through our indicators of compromise. This ensures they only receive events that matter to them, making their response efforts more efficient. Furthermore, our automation will support this process. If our system identifies malicious activity, it can take action without waiting for manual approval. For more information, refer to The Respond module.
This automation is one of the significant benefits of using a security information management (SIEM) system and running RocketCyber through SaaS Alerts.
In summary, successfully integrating RocketCyber in SaaS Alerts is a crucial step that significantly enhances your organization's cybersecurity strategy. This integration enables a more efficient and streamlined approach to monitoring and managing security incidents, allowing for quicker identification and response to potential threats. By following the outlined steps in the RocketCyber Connection Wizard, users can activate and customize various products to suit their specific needs, ensuring that they have the right tools in place for comprehensive protection. Moreover, the ability to leverage Customer Apps not only enhances data management but also provides powerful insights through advanced filtering and reporting mechanisms.
- Click the dropdown menu under SAAS ALERTS ORG to select the appropriate organization.
- Set Credentials: This is the first step of the wizard. You will see two items:


