Getting started with SaaS Alerts
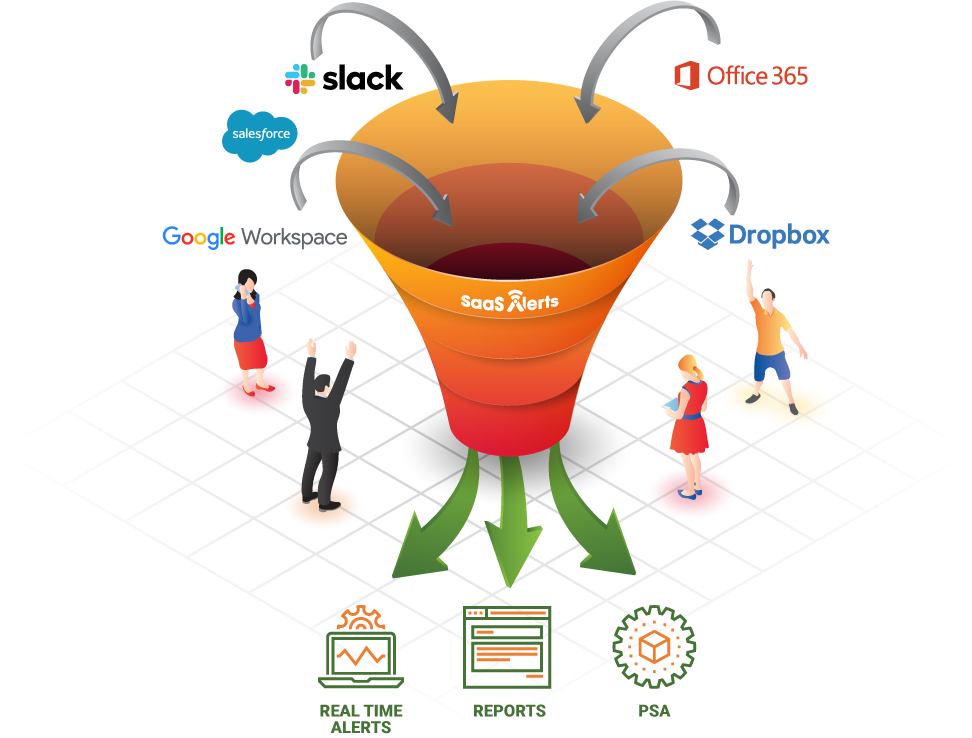
SaaS Alerts is a security platform purpose-built for MSPs to help protect and monetize customers' SaaS applications.
Whether you're setting up your SaaS Alerts account through Kaseya 365 or a standalone activation, this guide will have you alerting on threats affecting your customers in no time.
Accessing SaaS Alerts the first time
- Kaseya 365: If you are the Implementation Contact for a new Kaseya 365 subscription, you can access SaaS Alerts from the Activate link in your Kaseya 365 Setup Guide. For instructions, refer to the next section, Kaseya 365: SaaS Alerts activation steps.
- Standalone SaaS Alerts: If you are a standalone customer for SaaS Alerts, you will access SaaS Alerts through manage.saasalerts.com, where you will enter your information and pay with a credit card. For instructions, refer to Standalone SaaS Alerts account activation.
Kaseya 365: SaaS Alerts activation steps
Complete the following steps to create your SaaS Alerts user account starting from KaseyaOne:
- On the Kaseya 365 Setup Guide page in KaseyaOne, expand the Step 1: Activate and login to modules drop-down section.
- Click Activate in the SaaS Alerts tile.

- The web page to create your user account for your provisioned SaaS Alerts environment will open in a new tab.

- Select the Sign In with e-mail check box.
- Enter your full name, email address, password, confirmed password, and phone number.
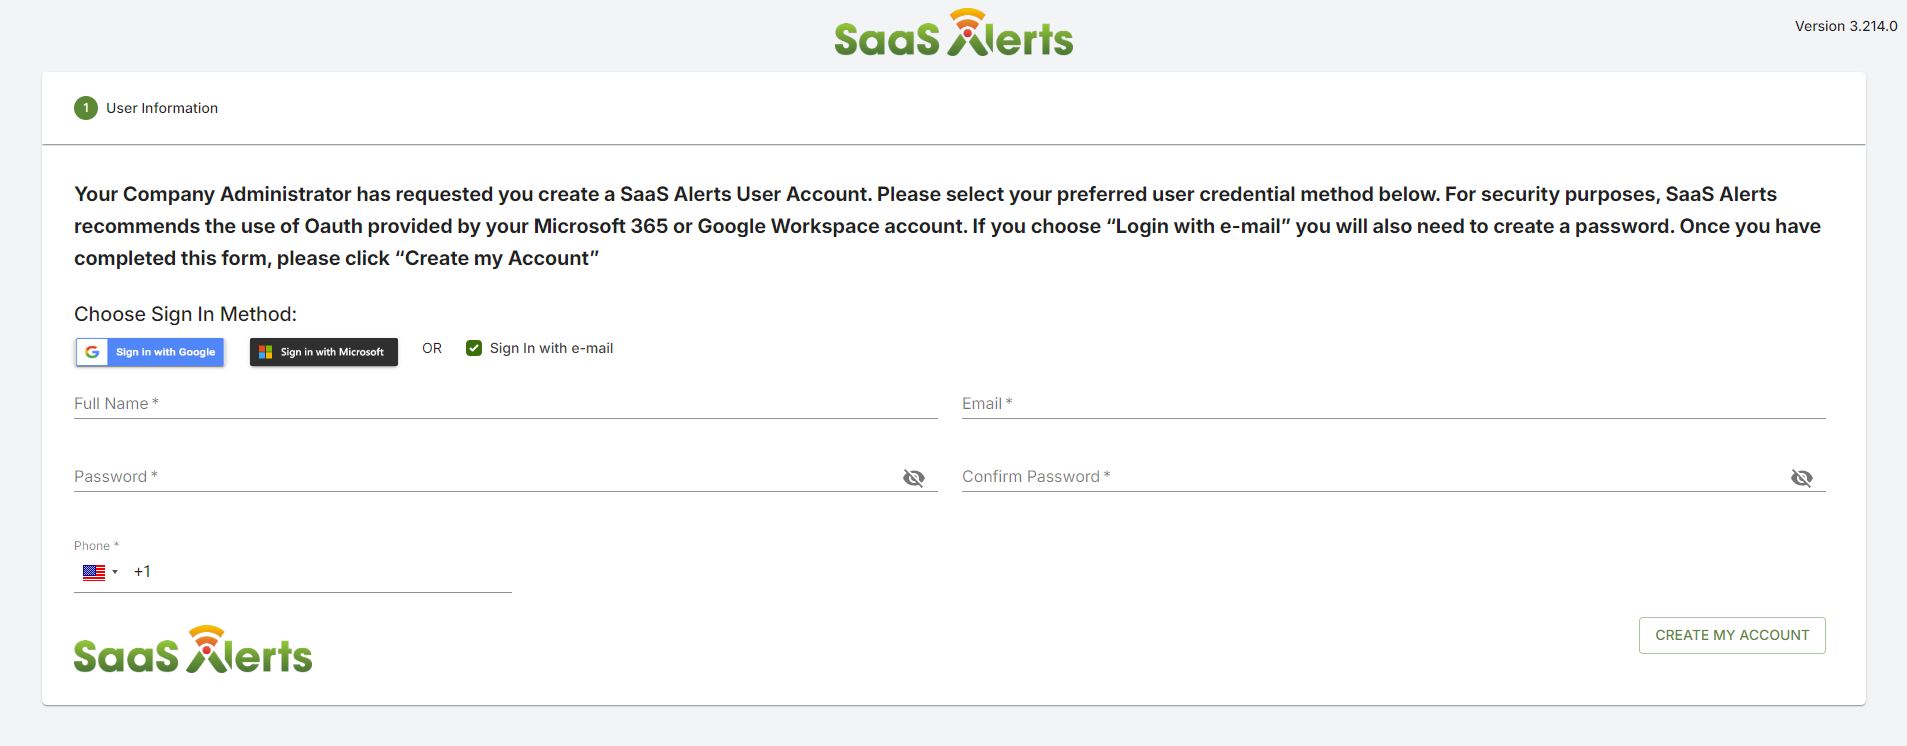
- Click Create My Account.
- Enter your email address and password configured on the last page, and click Authenticate to enter your SaaS Alerts account as an MSP Admin user.
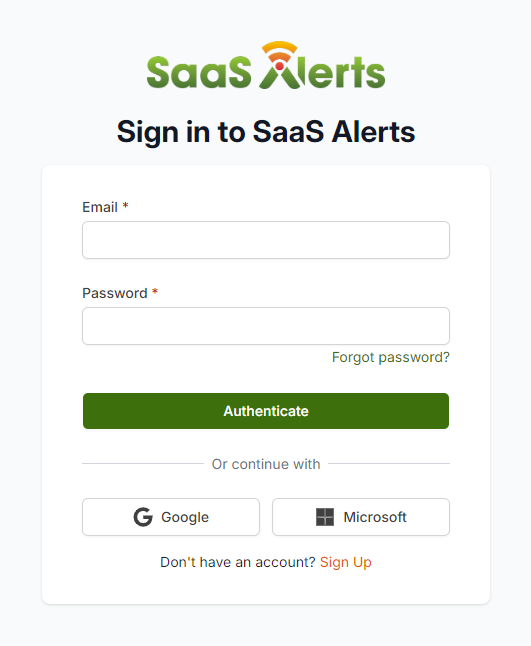
- After you log in to SaaS Alerts for the first time, return to Step 2 of the Kaseya 365 Setup Guide in KaseyaOne.
IMPORTANT Do not select Sign in with Google or Sign in with Microsoft. Email sign-in is required for the Kaseya 365 activation method.
NOTE Your password must contain at least 16 characters.
Configuring KaseyaOne Unified Login
If you are a Kaseya 365 customer, return to your Kaseya 365 Setup Guide to configure KaseyaOne Unified Login.
If you are a standalone SaaS Alerts customer, it is also recommended that you configure KaseyaOne Unified Login for easy access to all your IT Complete modules. For instructions, refer to Unified Login with KaseyaOne.
Scheduling an onboarding call
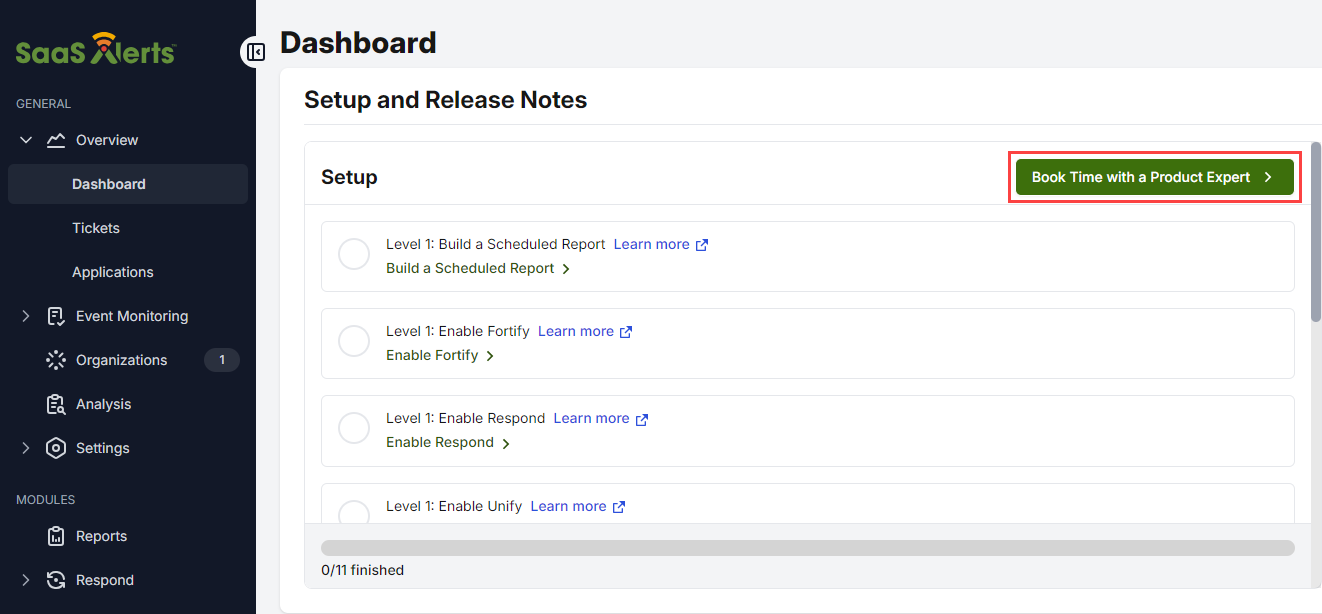
From the Dashboard page in SaaS Alerts, click Book Time with a Product Expert to schedule a meeting with your sales representative or an onboarding meeting.
Adding your MSP to SaaS Alerts
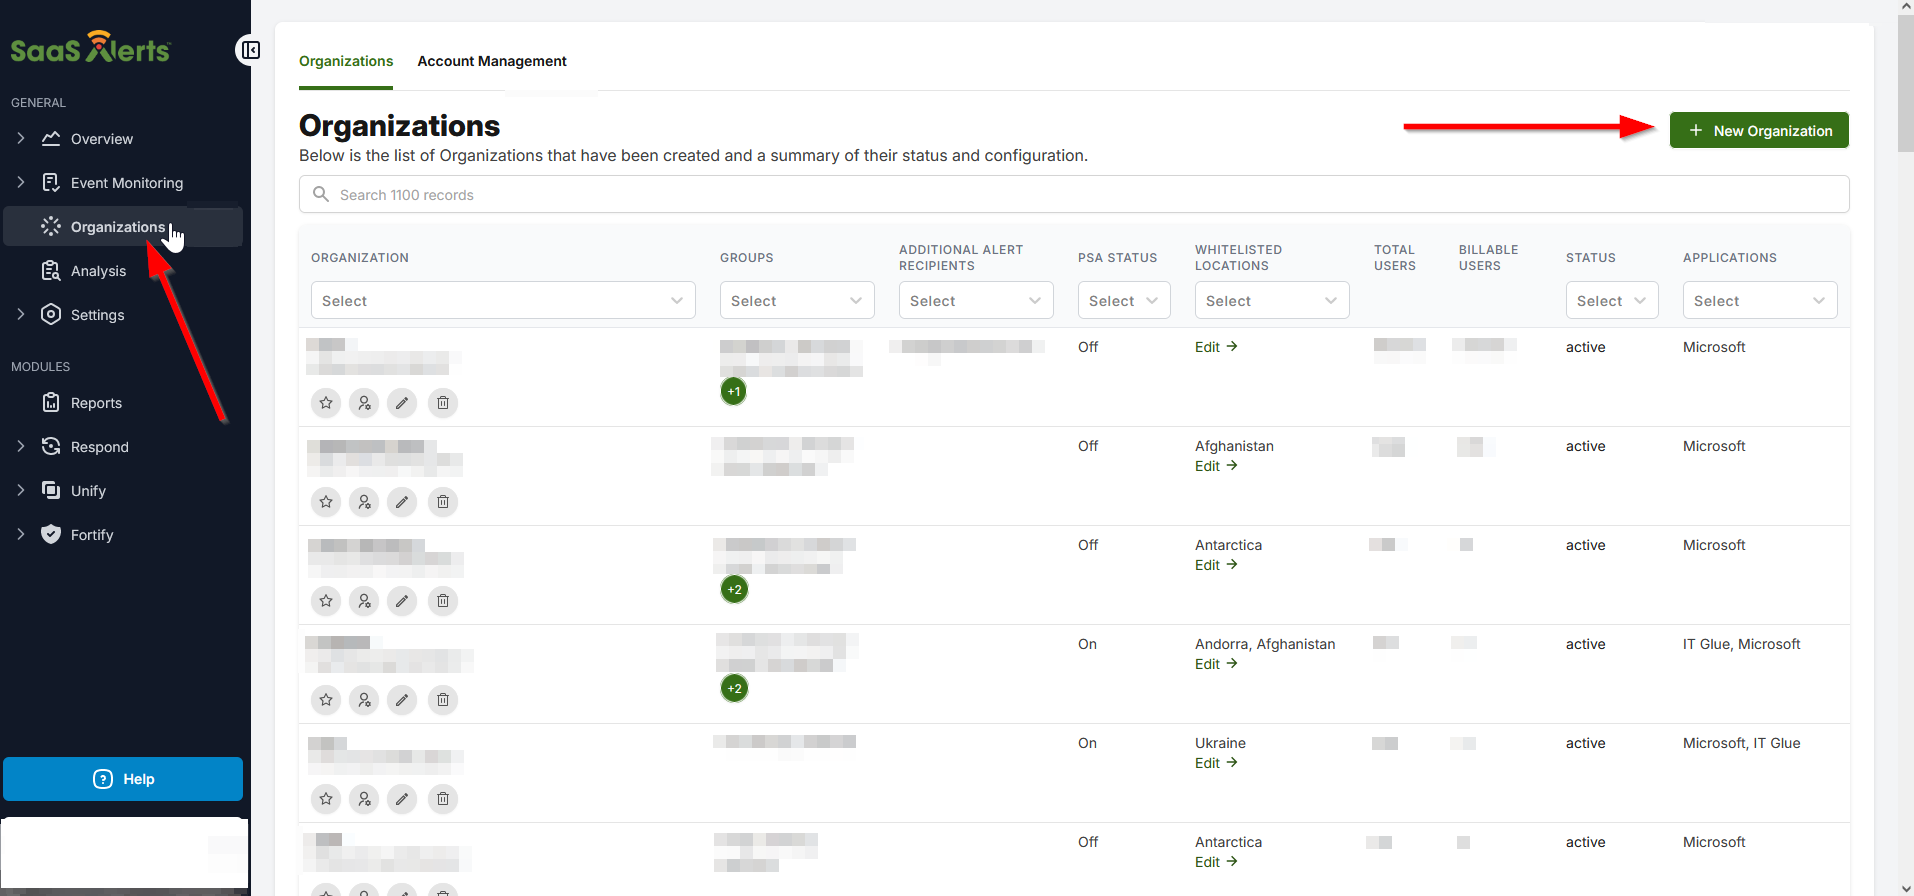
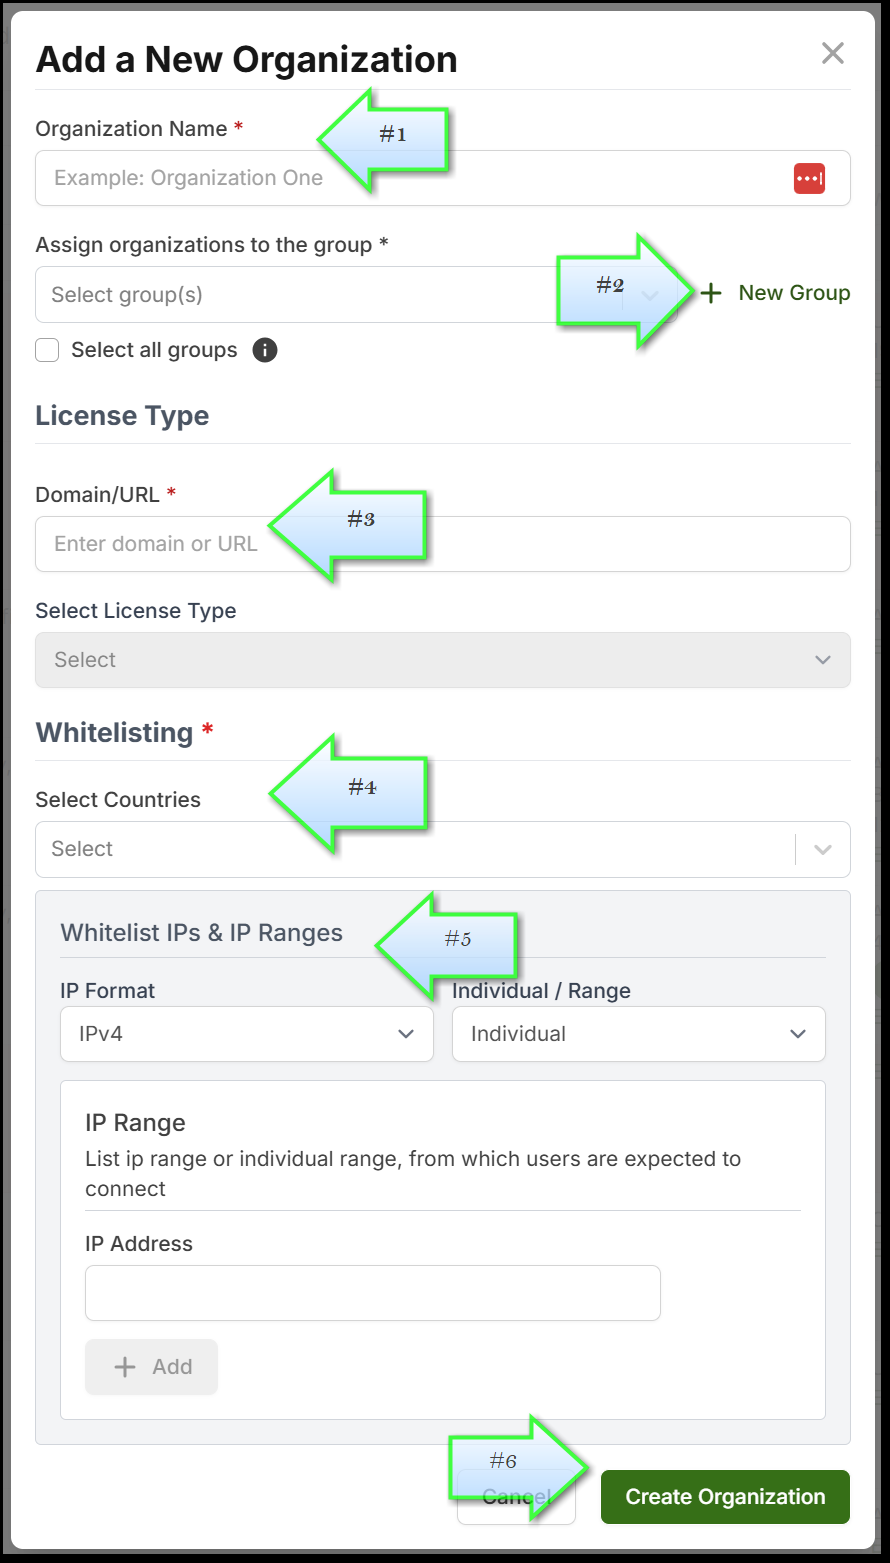
Add New Organization
- Enter an organization name (required).
- If you intend to use Groups, a New Group will have to be created first.
- The customer's domain/URL to be monitored must be entered on the License Type field.
- Select the countries you expect this customer's users to connect from (required)
- If needed, enter the IP(s) you would like to whitelist.
- Click Create Organization.
NOTE Whitelisting: Users logging into SaaS Alerts accounts outside this list of countries will generate OAL (Outside Approved Location) critical alerts.
NOTE License type: Select from the available License types provided. If you are unsure of the desired License type, select Standard.
Choosing your MSP onboarding method
Do you have admin access to the SaaS apps you wish to connect?
- If yes, refer to MSP onboarding.
- If no, refer to I do not have admin access (self-onboarding) .
- Click New Application.
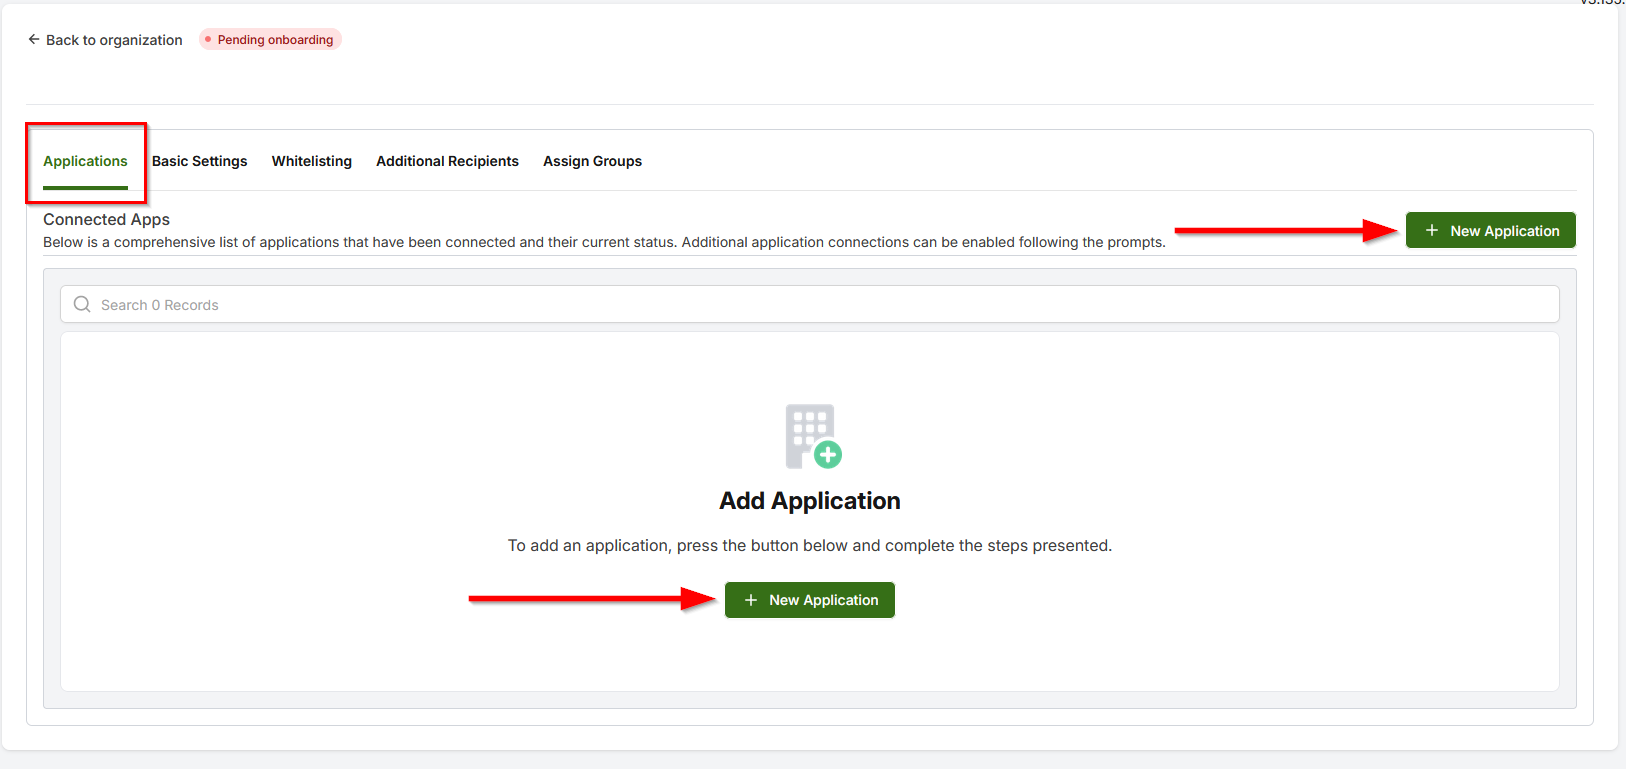
- Ensure I have customer's global admin credentials is selected.
- Click Connect adjacent to the application you would like to connect.
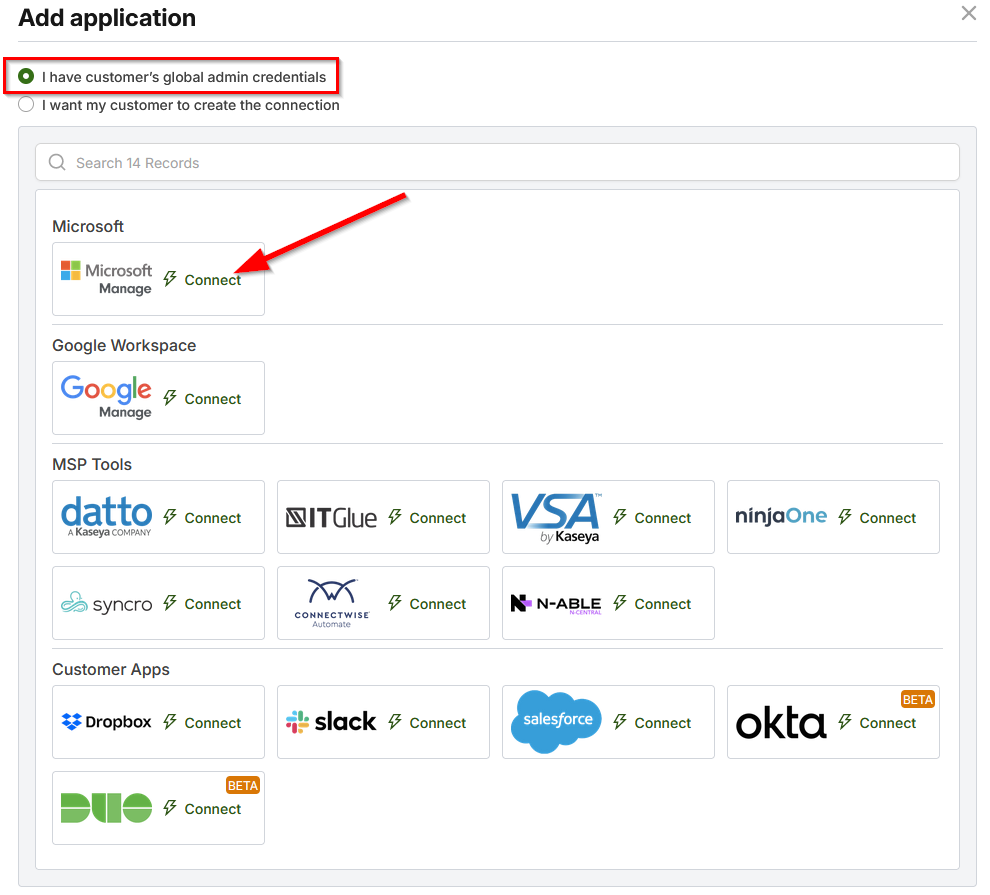
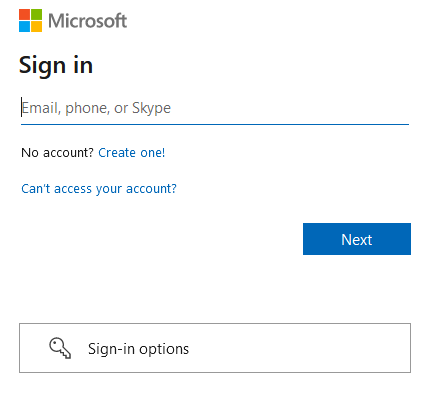
- Using a unique local global administrator account, enter the credentials to establish the connection.
- Review and accept permissions.
- Microsoft may require 30 to 60 seconds to respond and establish the connection.
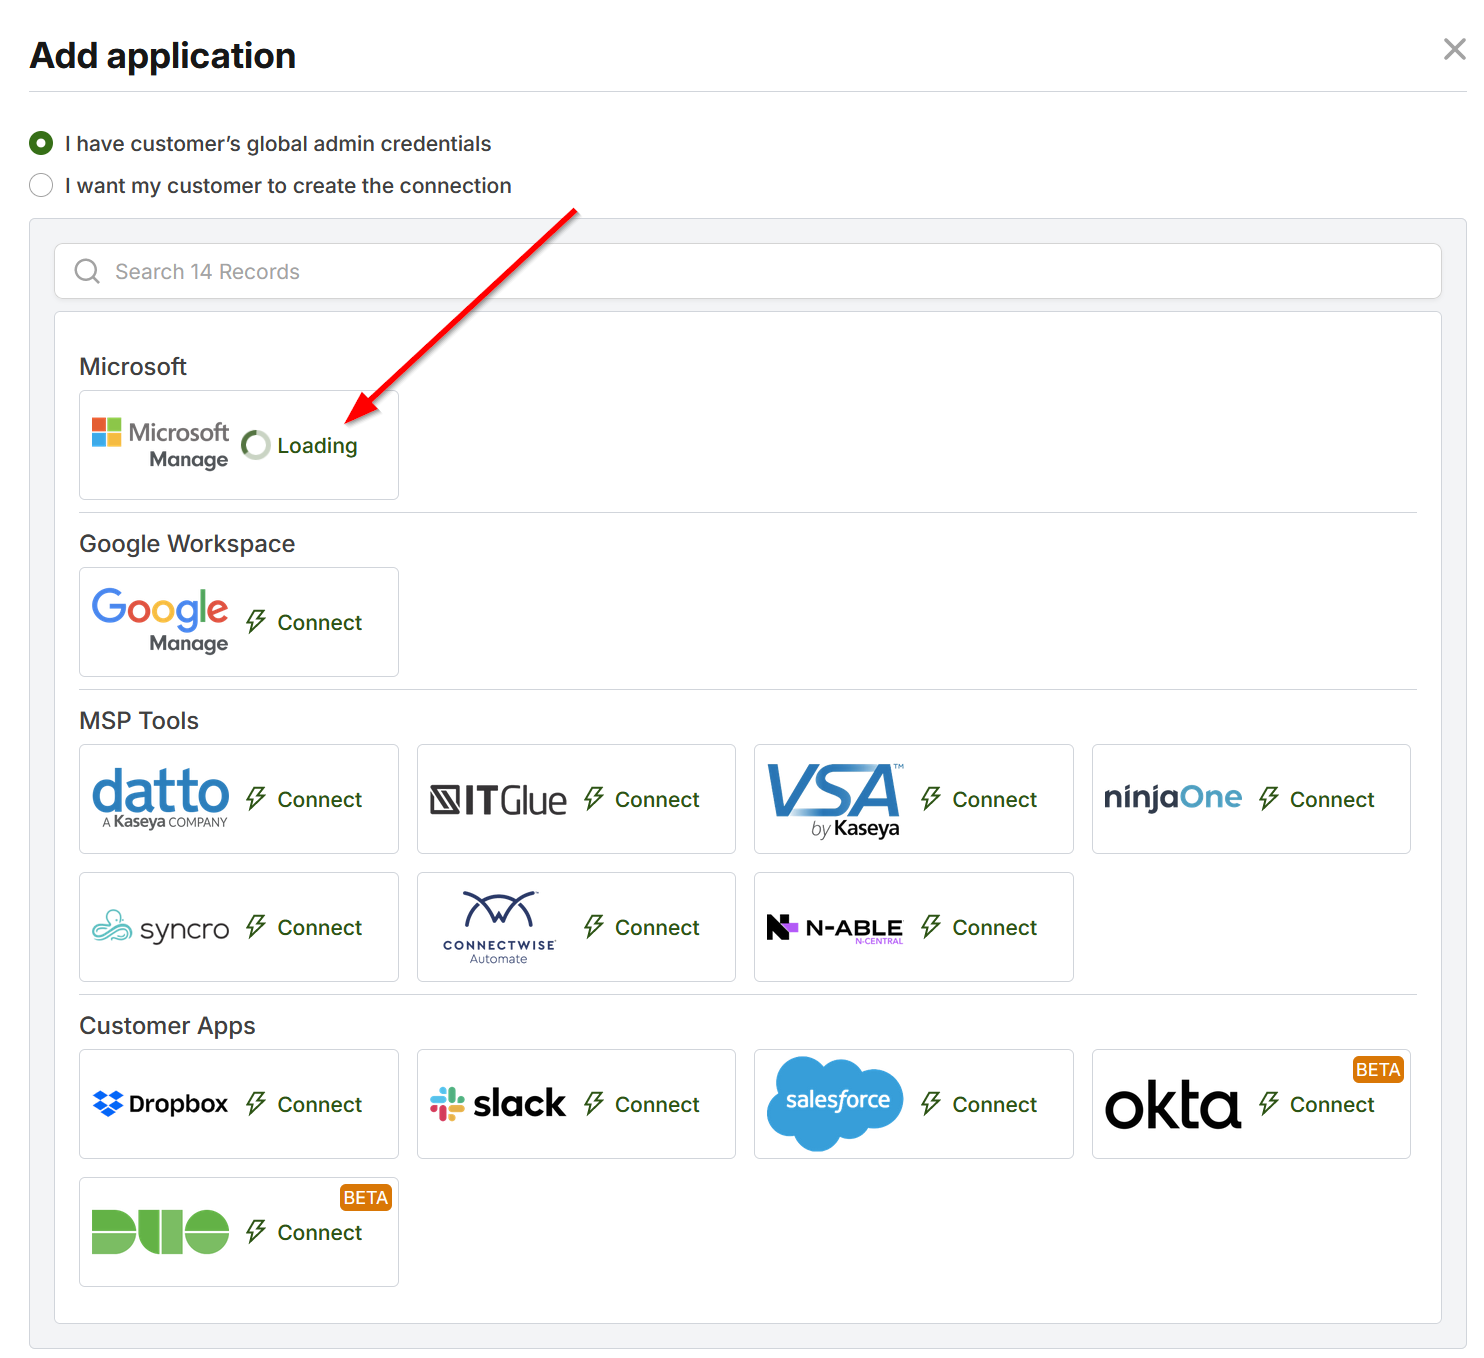
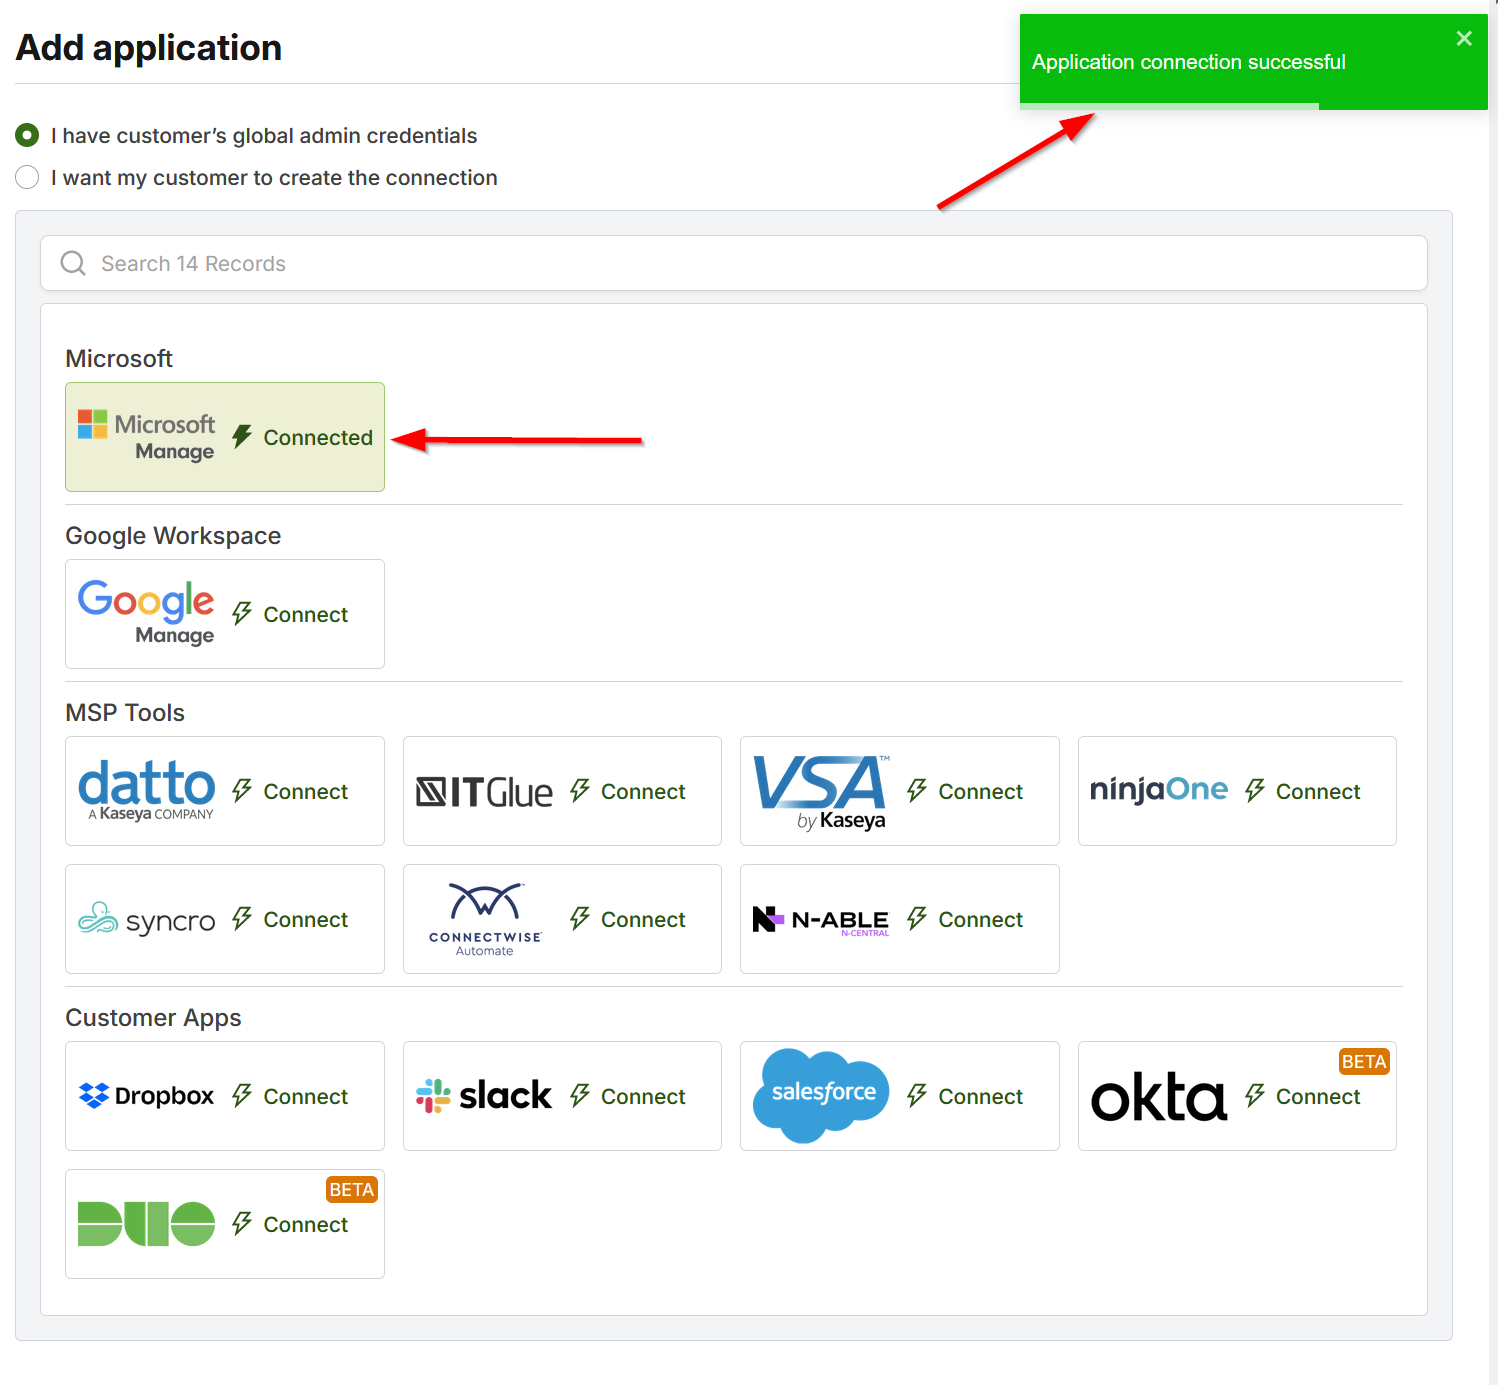
NOTE The account is required to be an interactive account and not a non-interactive account.

Optional: Enter additional alert recipients
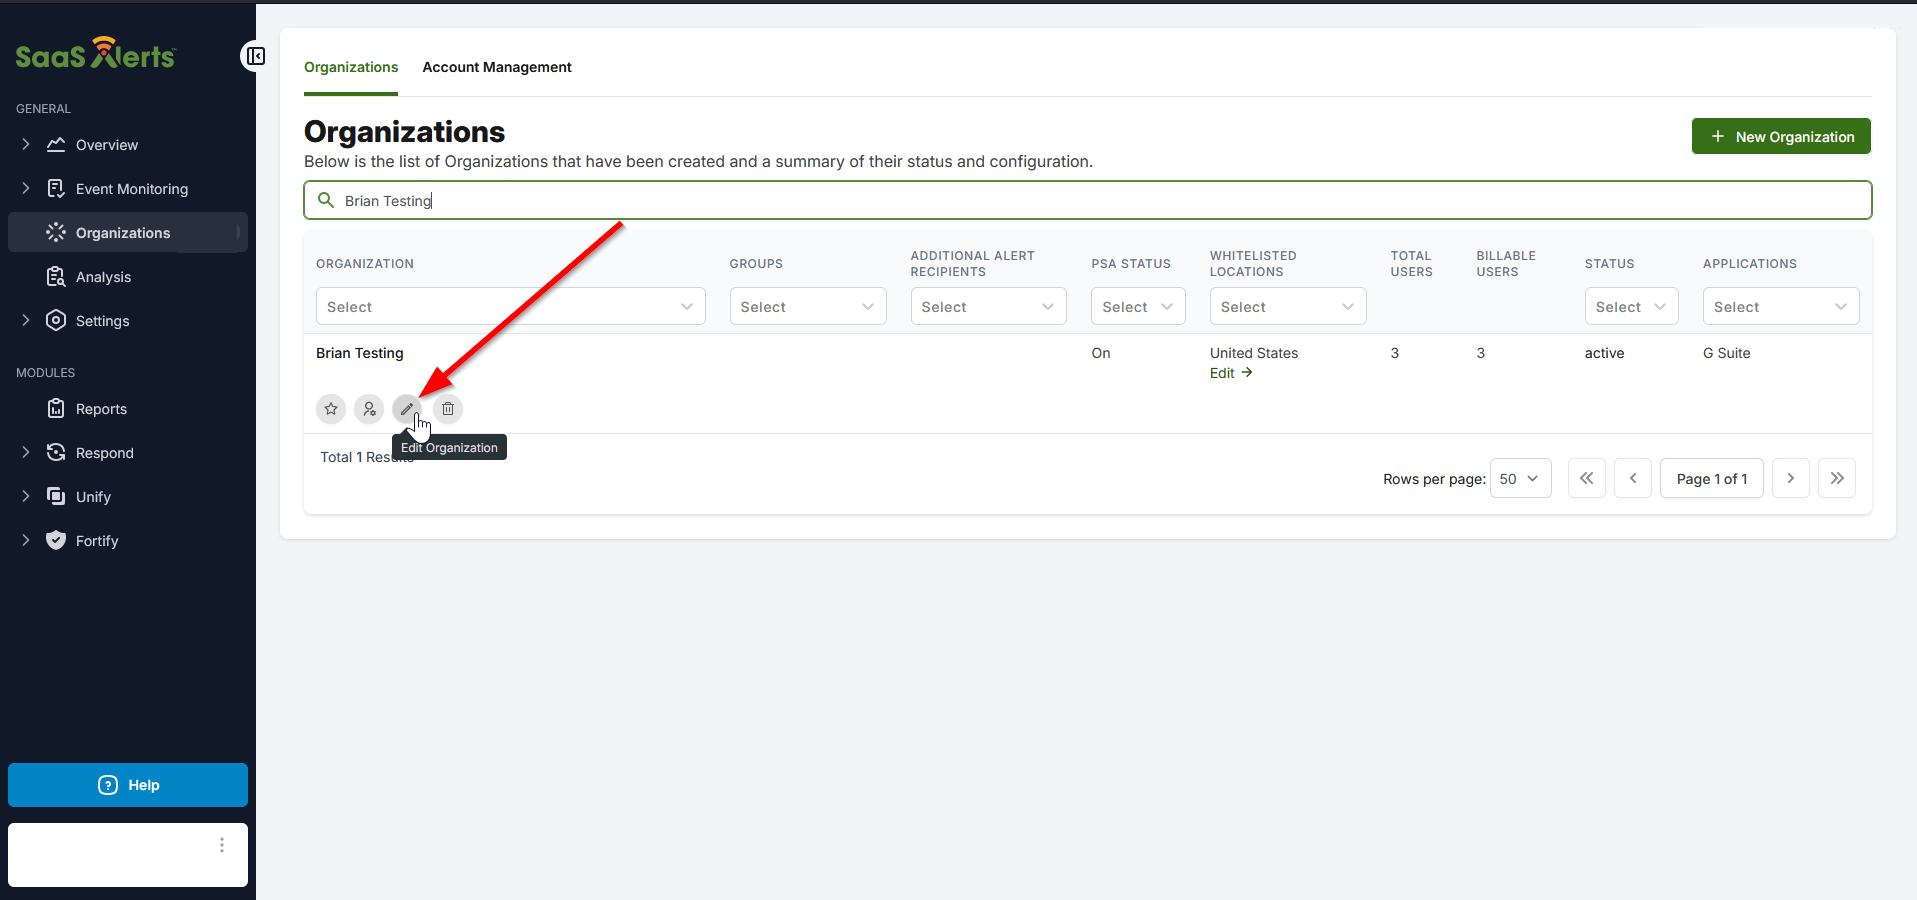
- From the left navigation menu, click Organizations.
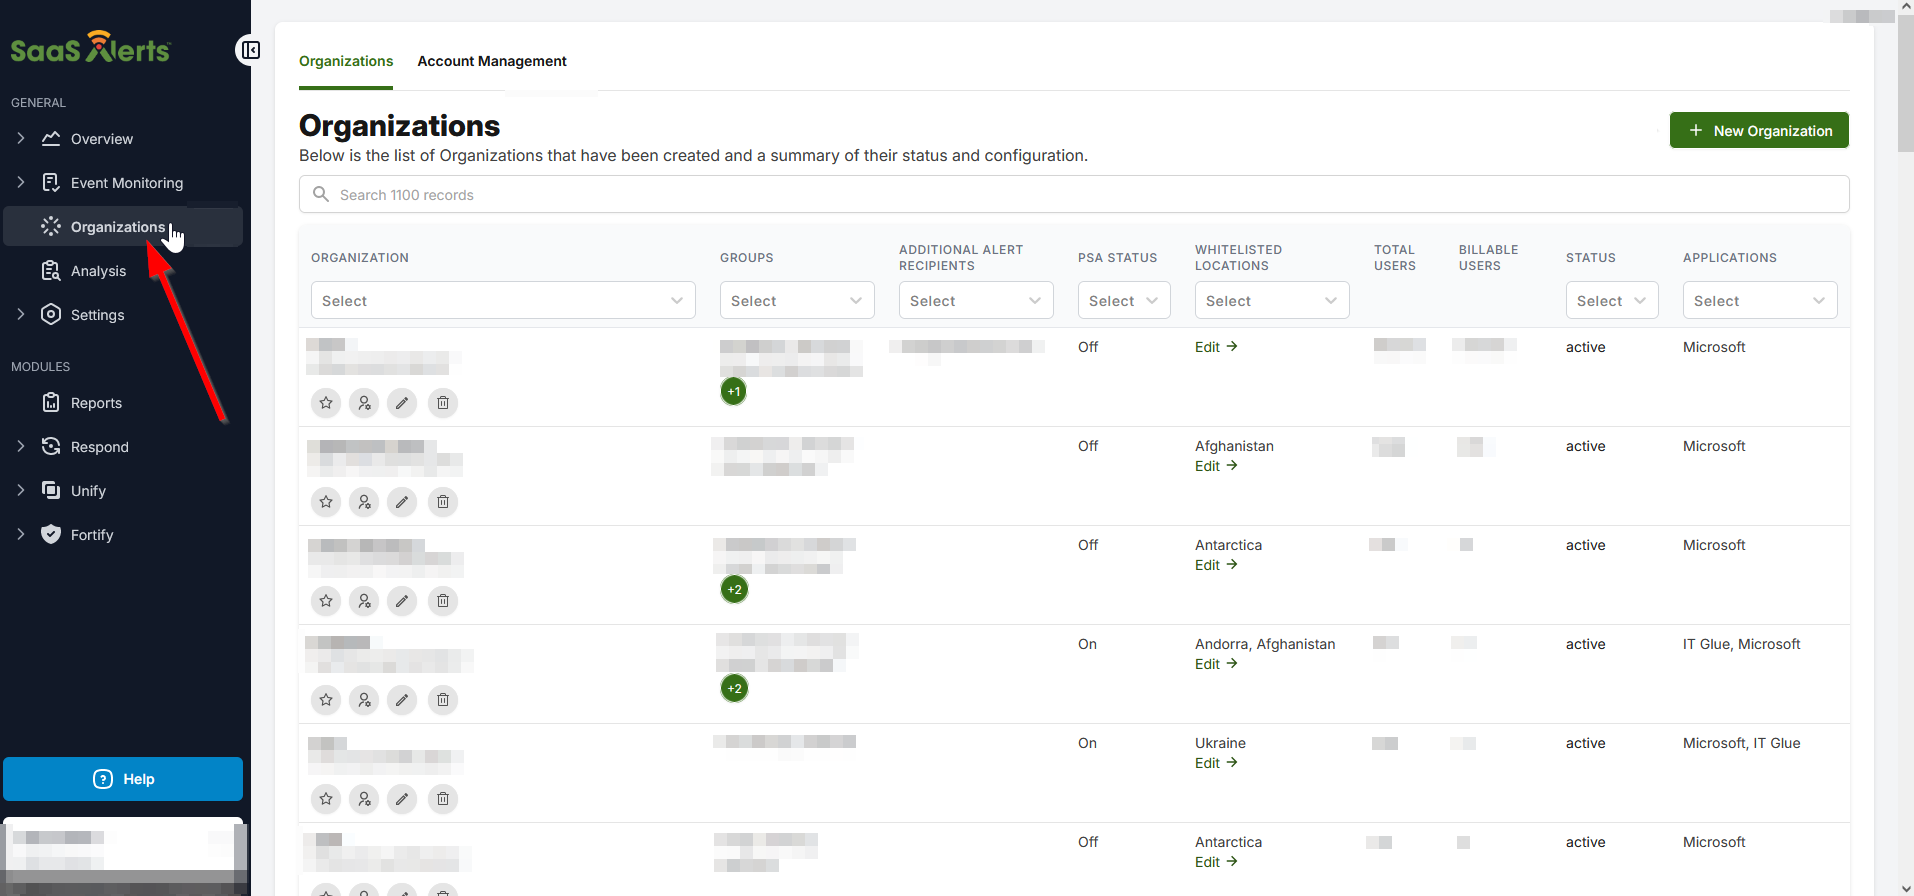
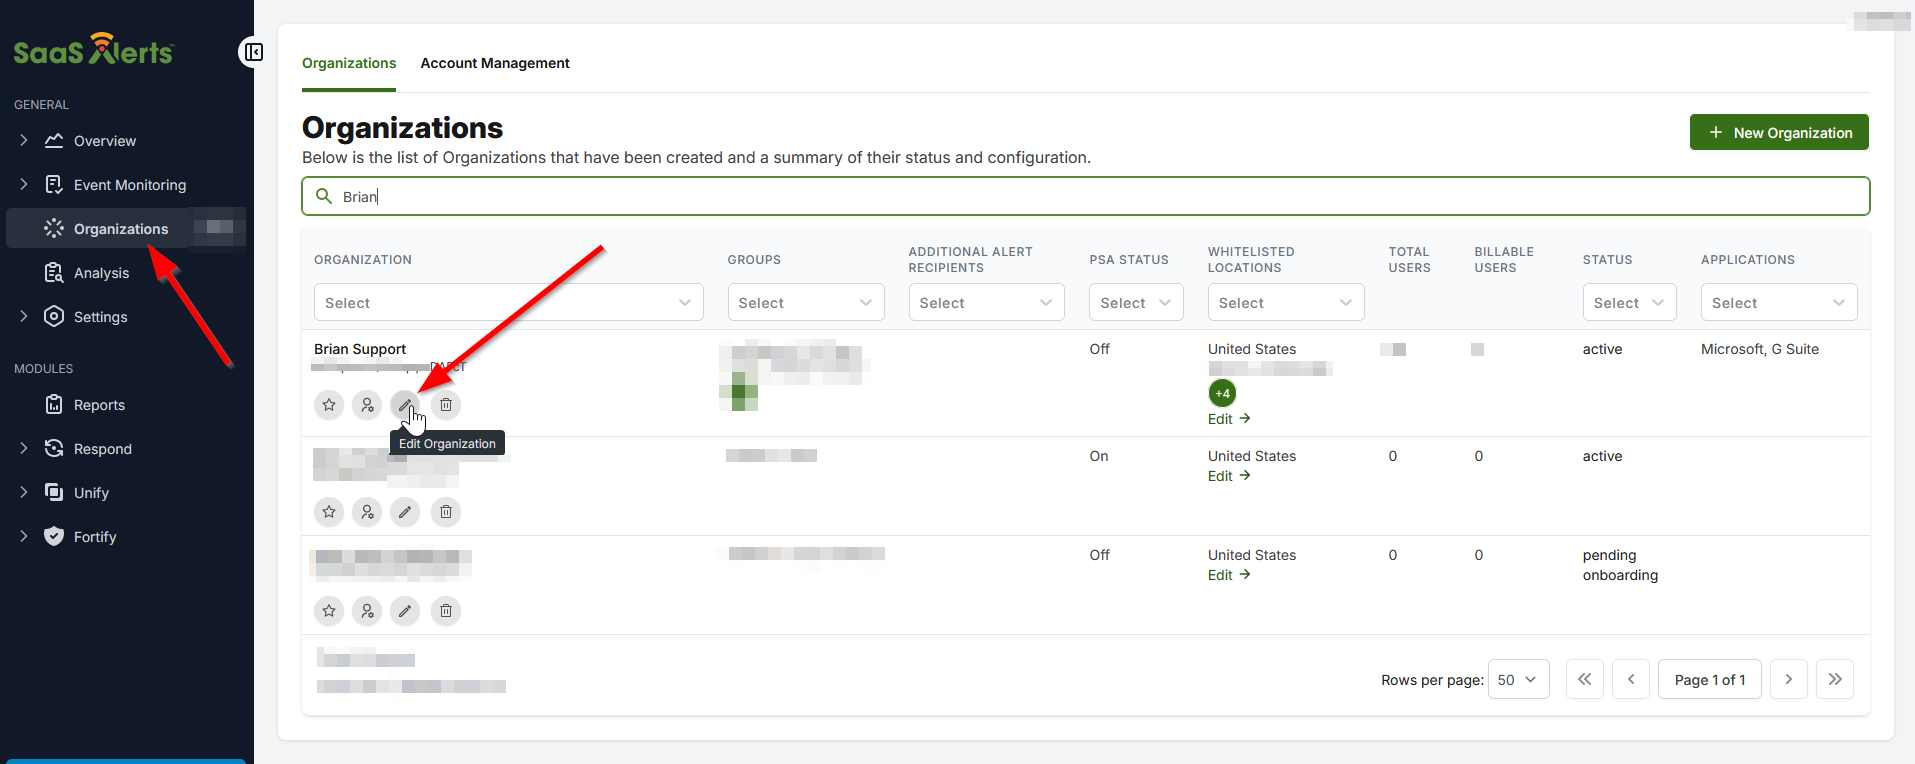
- Click the Edit Organization pencil icon
 .
.
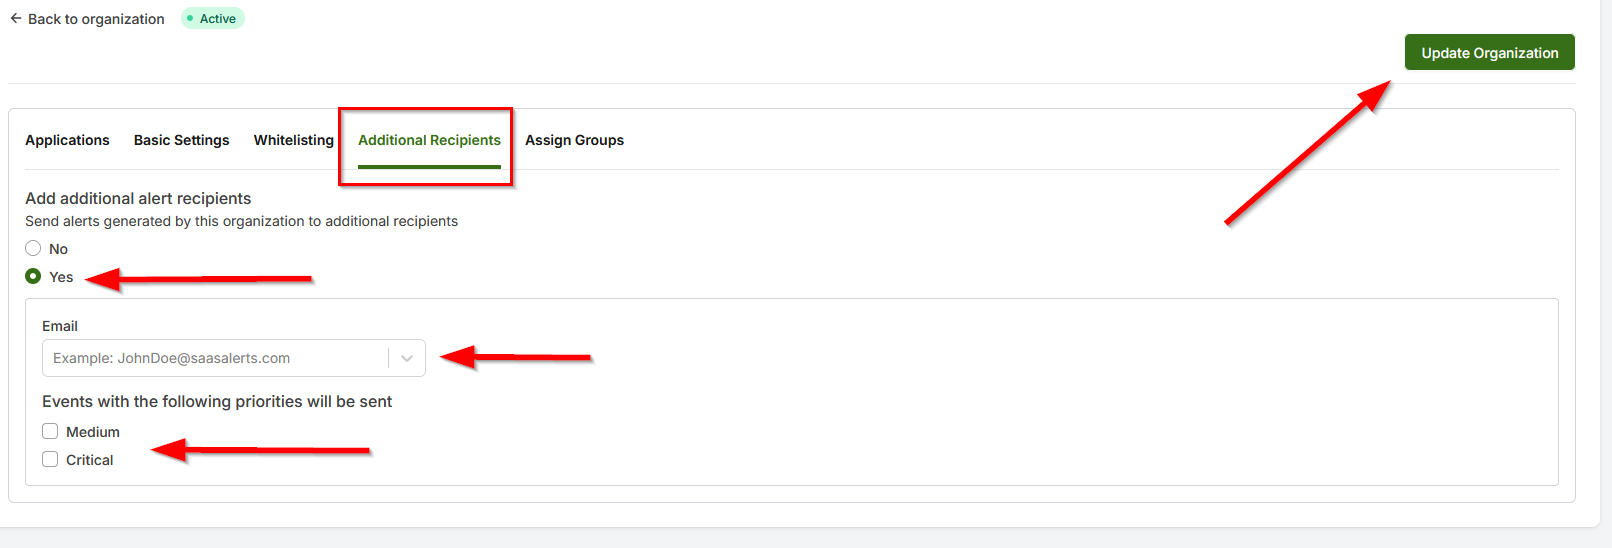
- Click Additional Recipients.
- Click Yes to add additional alert recipients.
- Enter the applicable alert recipient email address(s).
- Select which events (Medium, Critical) will be sent.
- Click Update Organization to apply the settings.
A Google Workspace license that supports third-party integration is required. Third-party integrations are supported by Google Workspace Enterprise, Business (Starter, Standard, and Plus), Education (Fundamentals, Standard, Plus), and Cloud Identity Premium.
Google Workspace Essentials Starter and Enterprise Essentials licenses do not support third-party integration and won't connect to SaaS Alerts.
Before adding the Google Workspace connection to SaaS Alerts, some Google Admin permissions are required. These permissions can be set manually per organization or as a bulk update list. If you are interested in the bulk update list method, email support@saasalerts.com to obtain the required files.
Setting the permissions manually
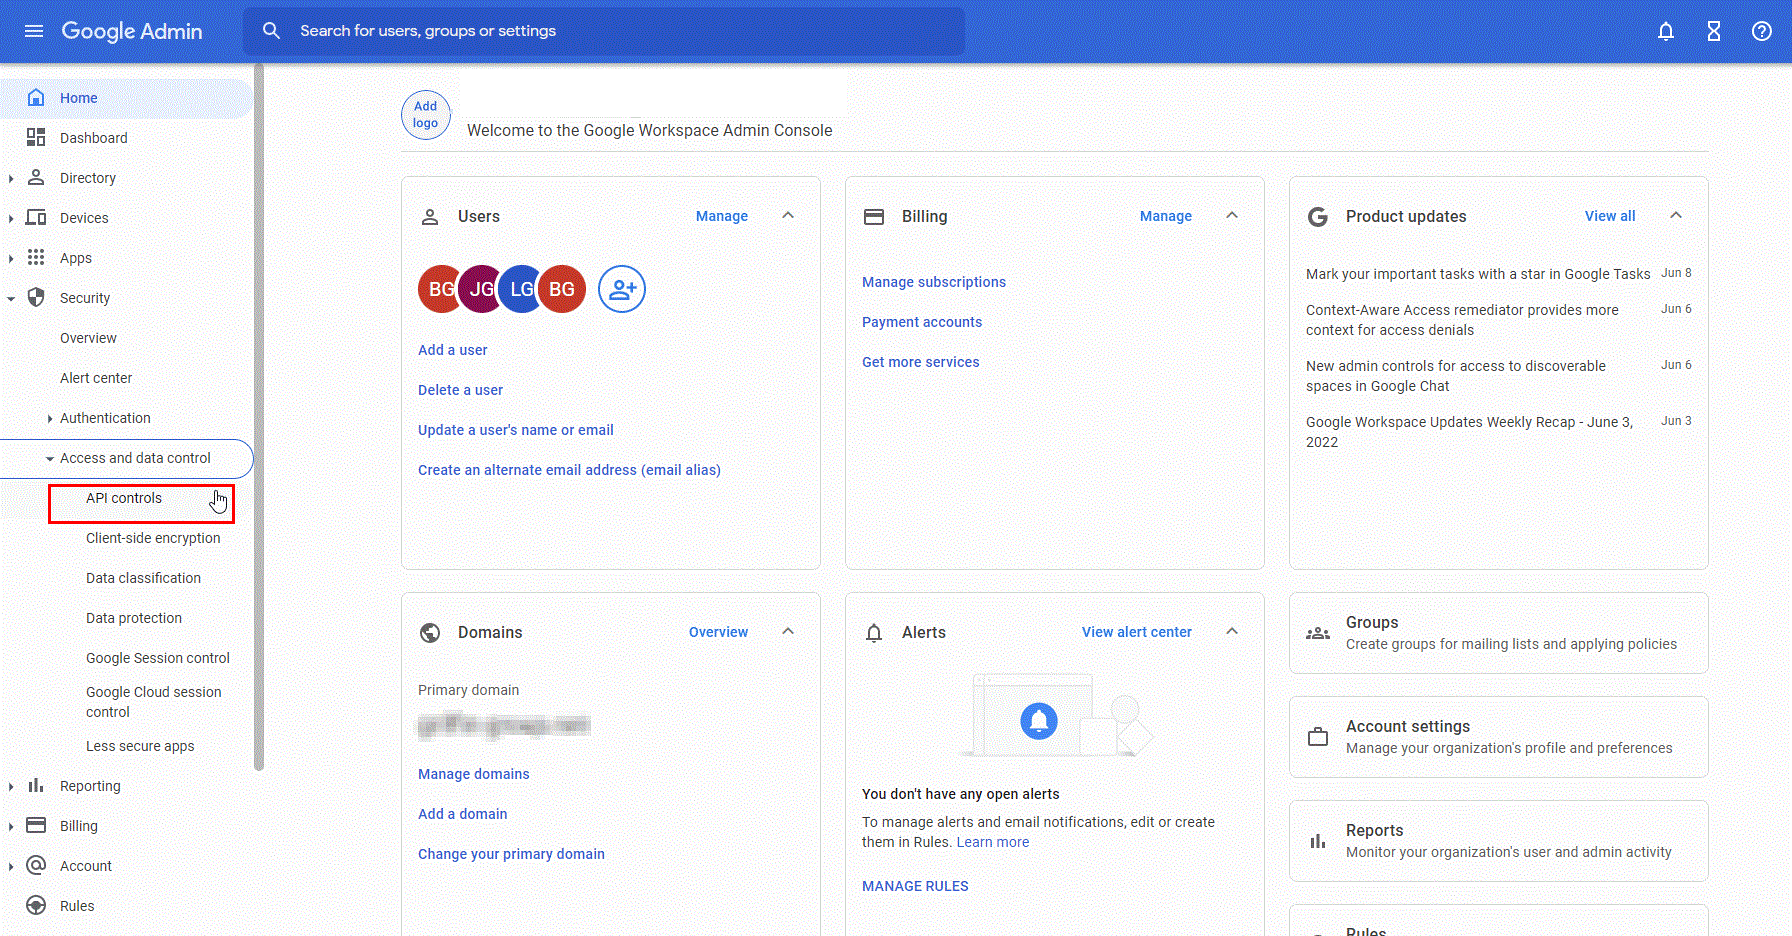
- Log in to Google Admin.
- From the left navigation menu, navigate to Security > Access and data control > API controls.
- Click Manage Third-Party App Access.
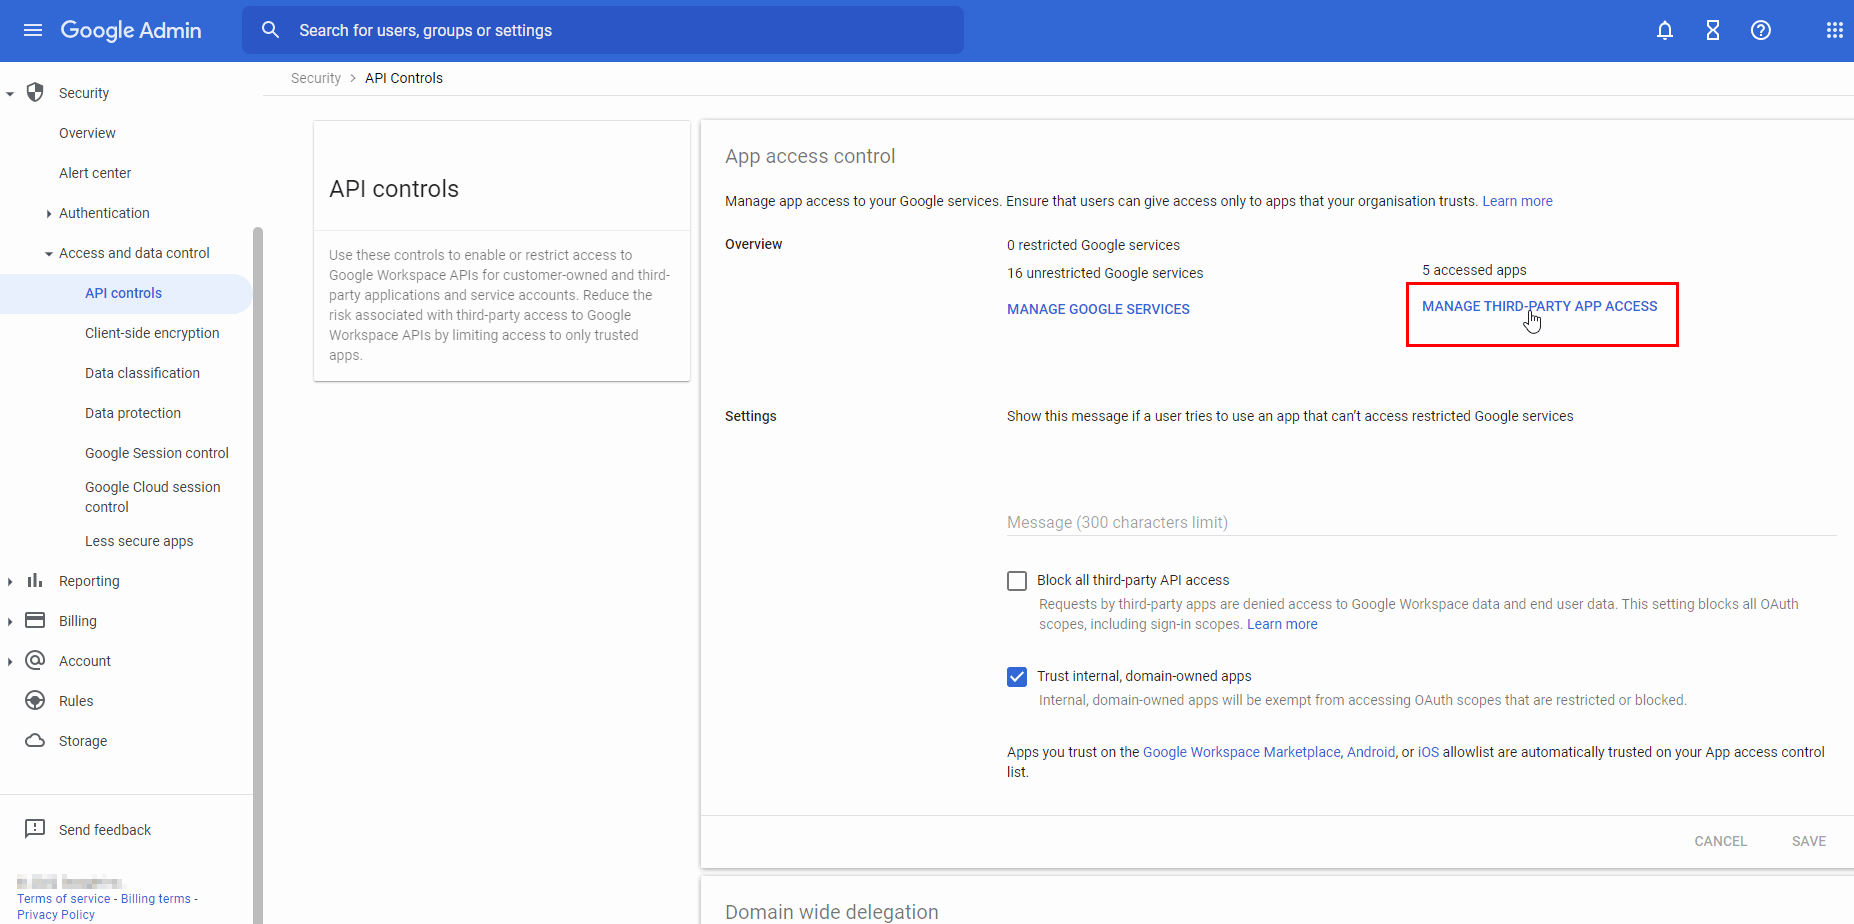
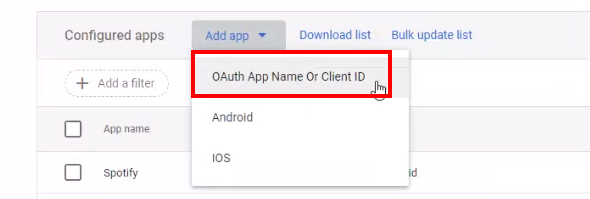
- From the Add app drop-down menu, select OAuth App Name Or Client ID.
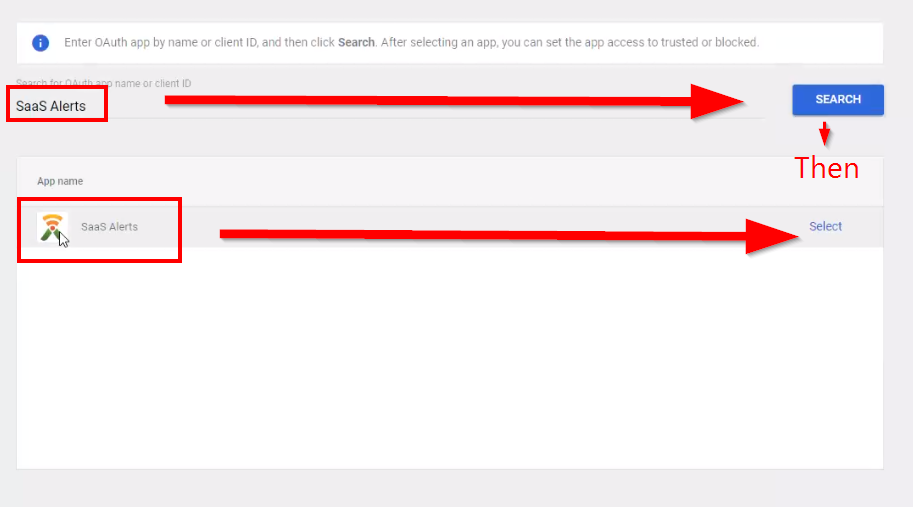
- Enter SaaS Alerts, click Search, then click Select for SaaS Alerts.
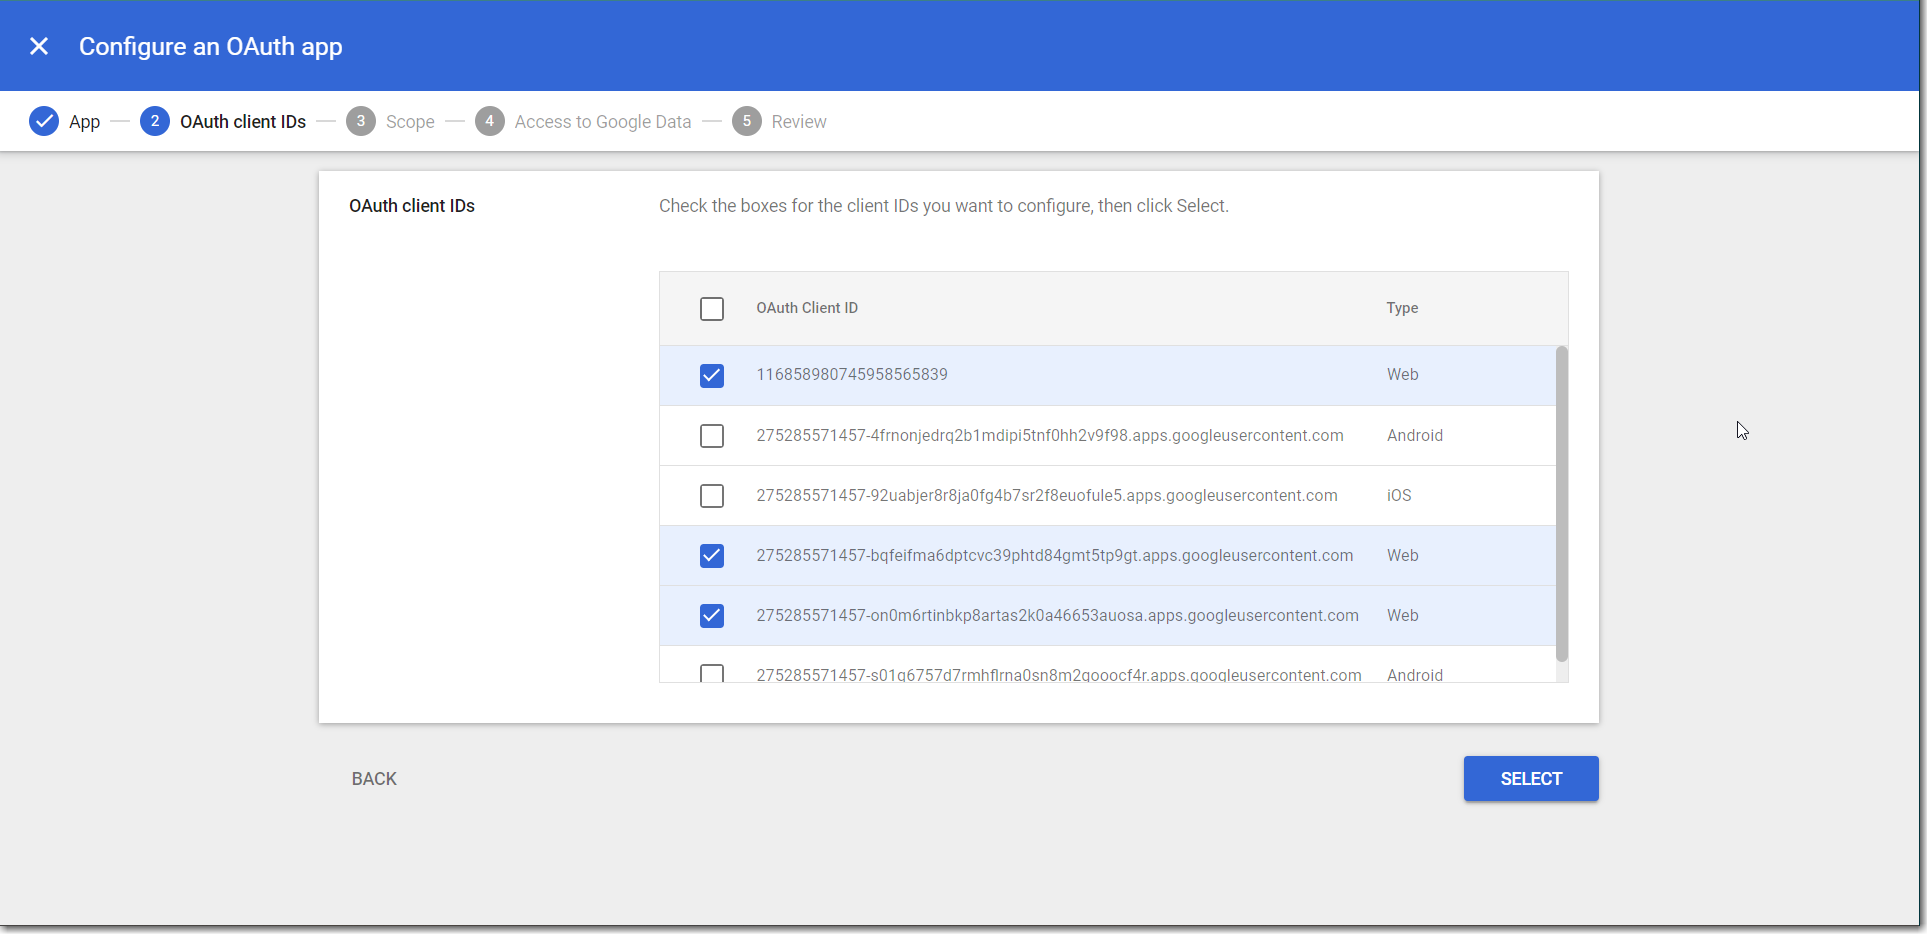
- Select all three web apps in the OAuth client IDs section.
- Select the organization(s) to be managed by SaaS Alerts.
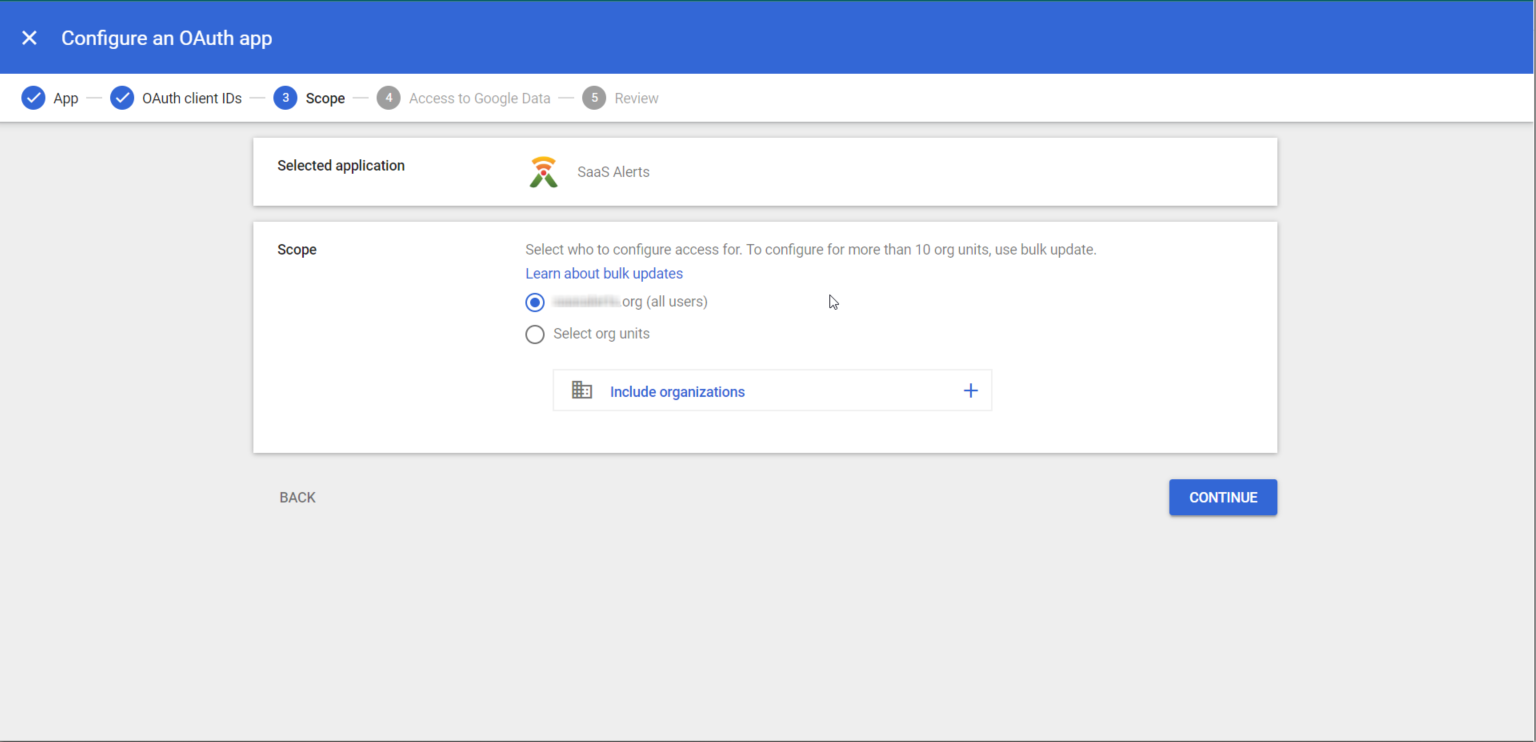
- Select Trusted.
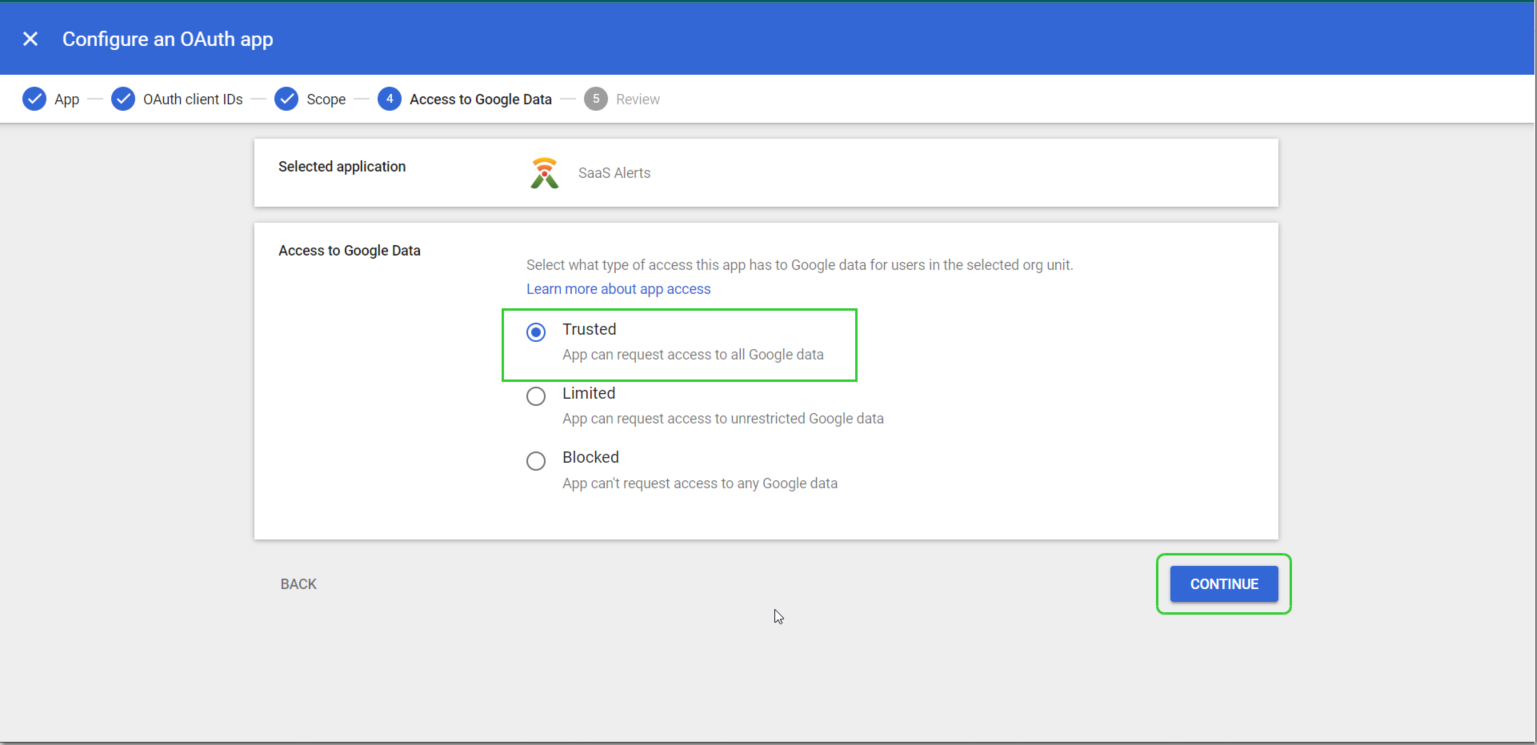
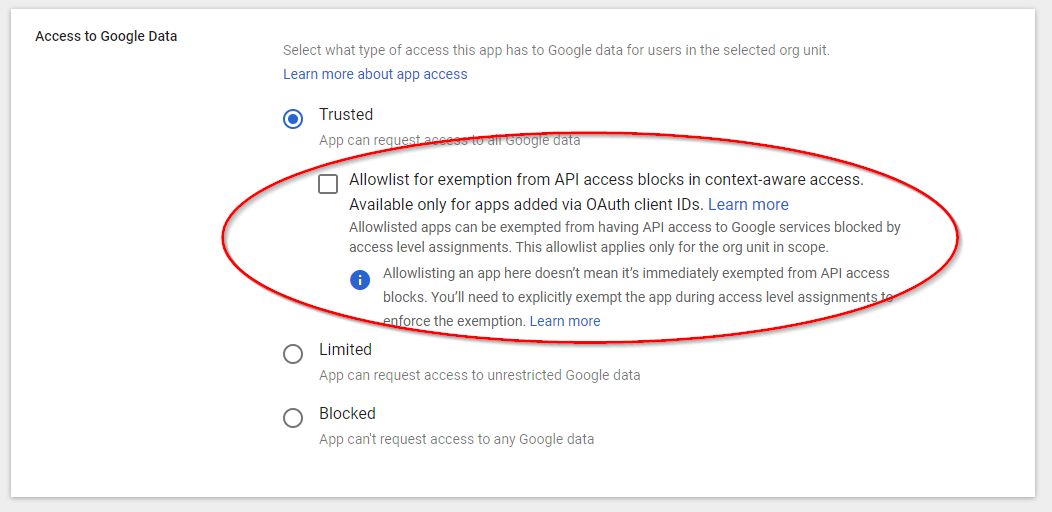
- Should you be prompted with the allowlist check box, select the check box.
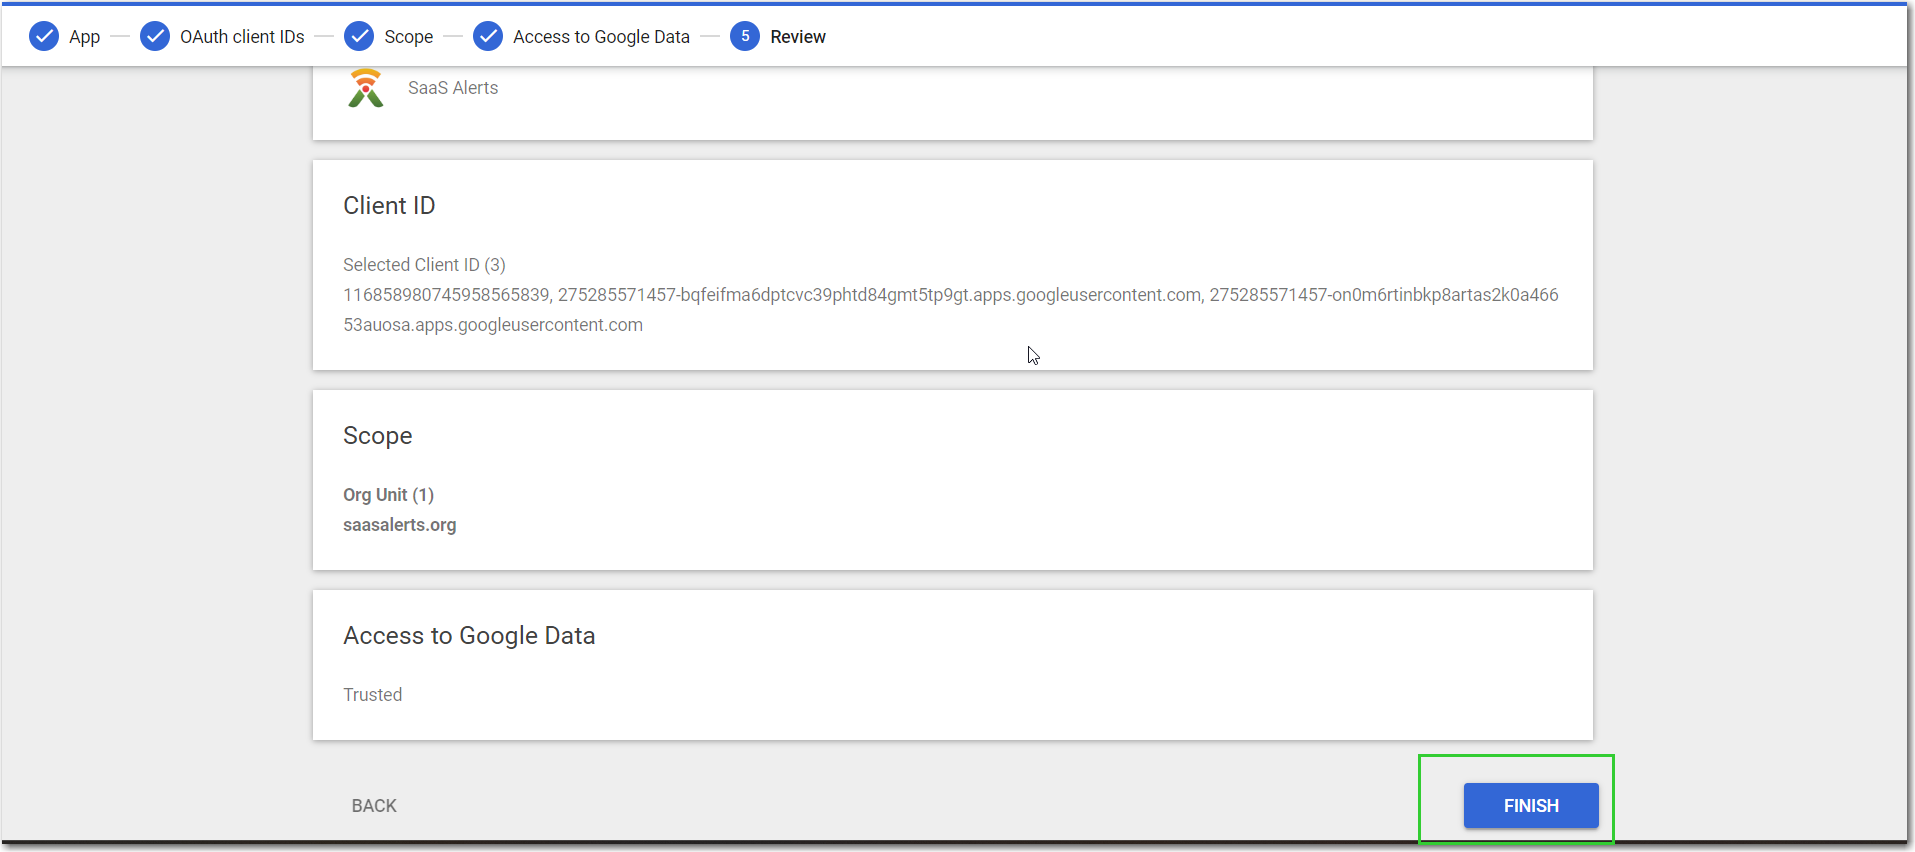
- Click Continue.
- Review and click Finish.
NOTE If you are planning to use our mobile app, add the OAuth client IDs for iOS or/and Android, as well.
Creating the API connection in SaaS Alerts
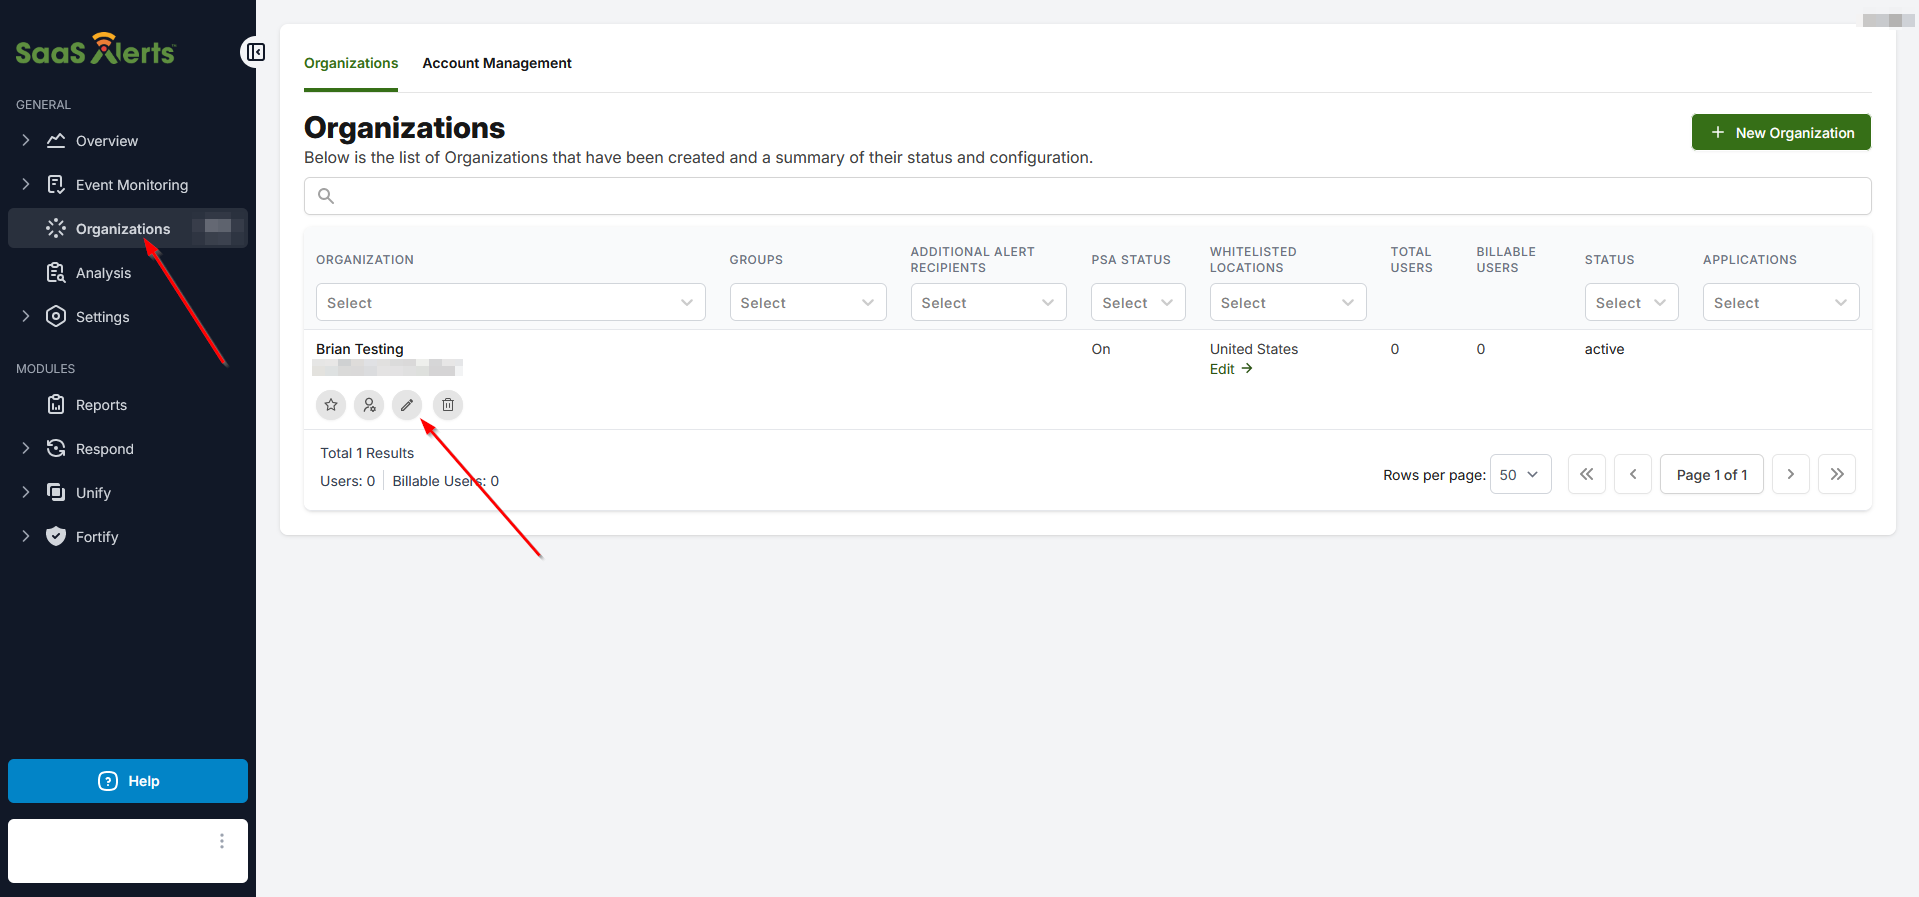
- From the left navigation menu in SaaS Alerts, click Organizations, then click the Edit Organization pencil icon
 .
.
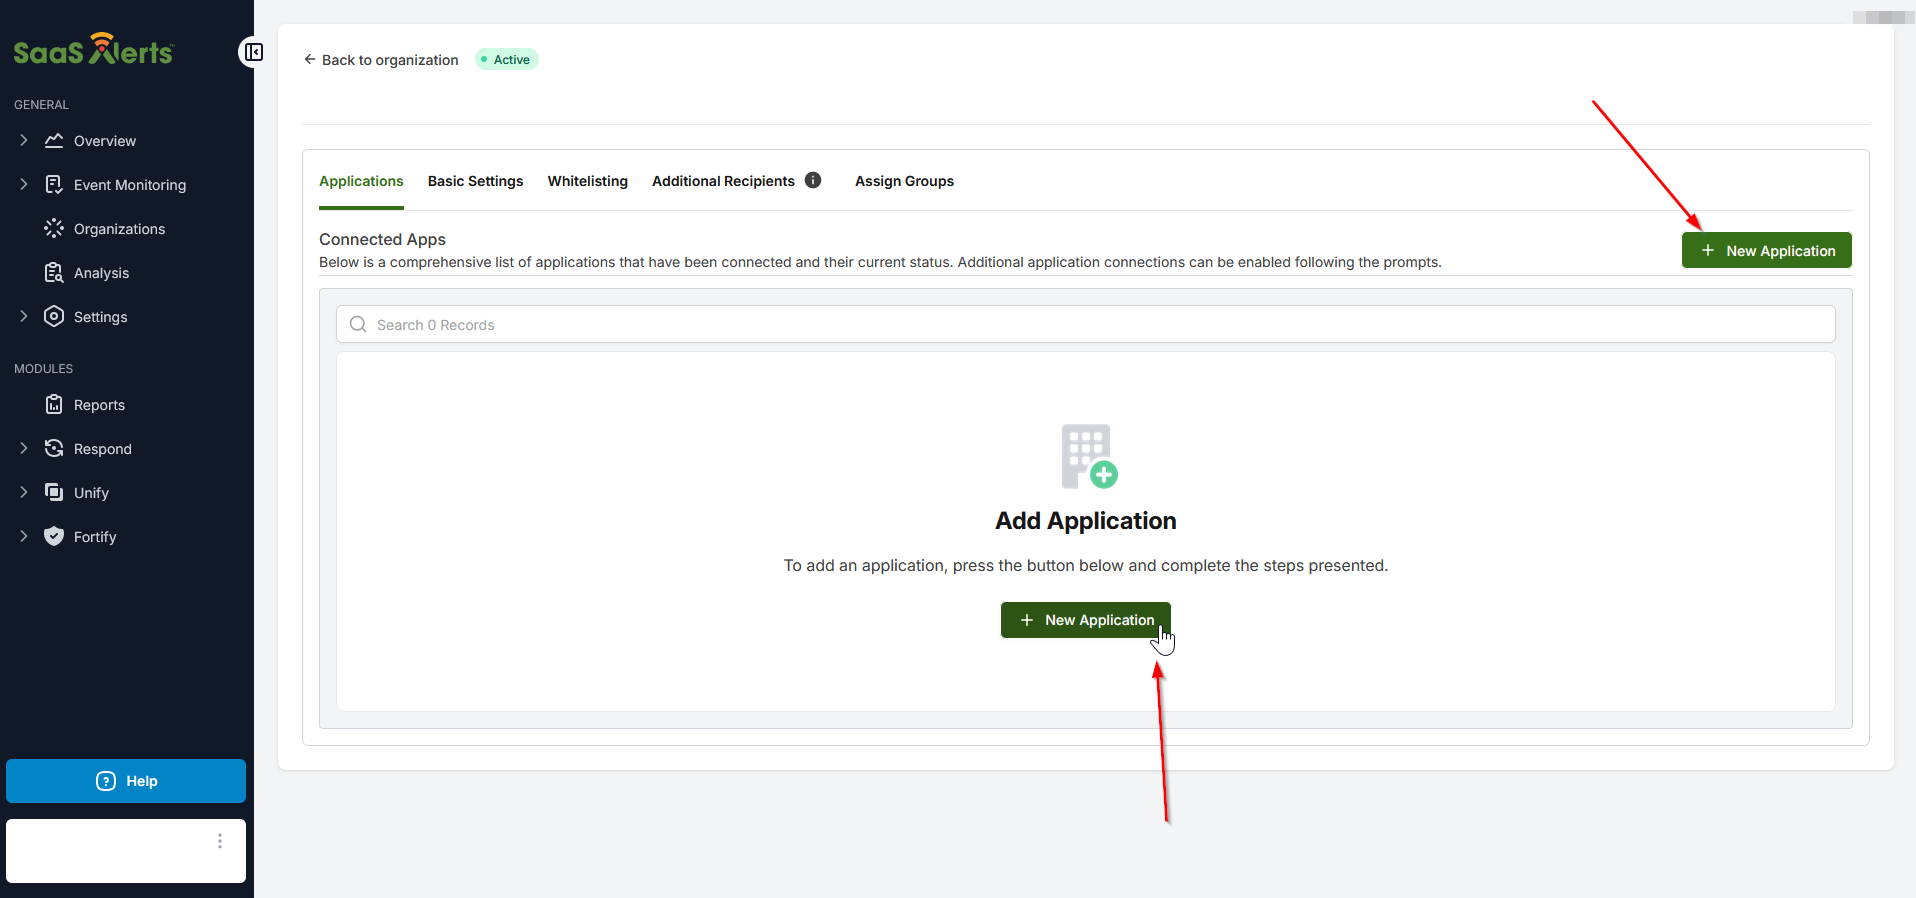
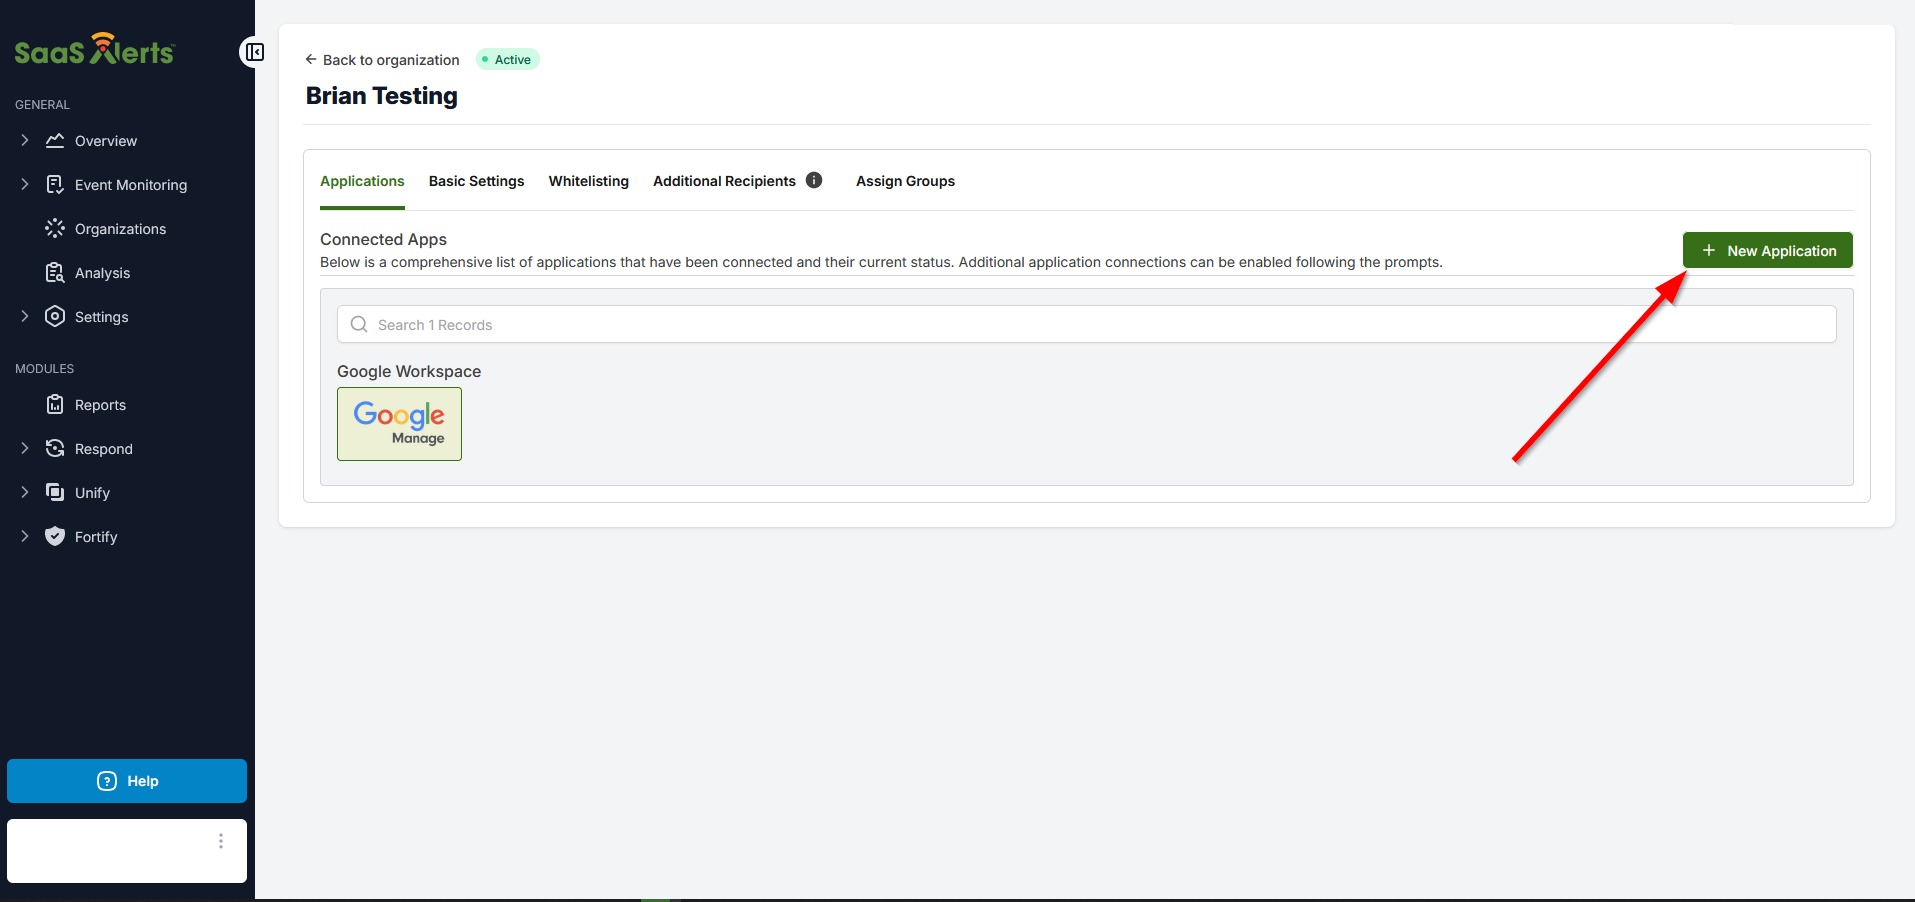
- Click New Application.
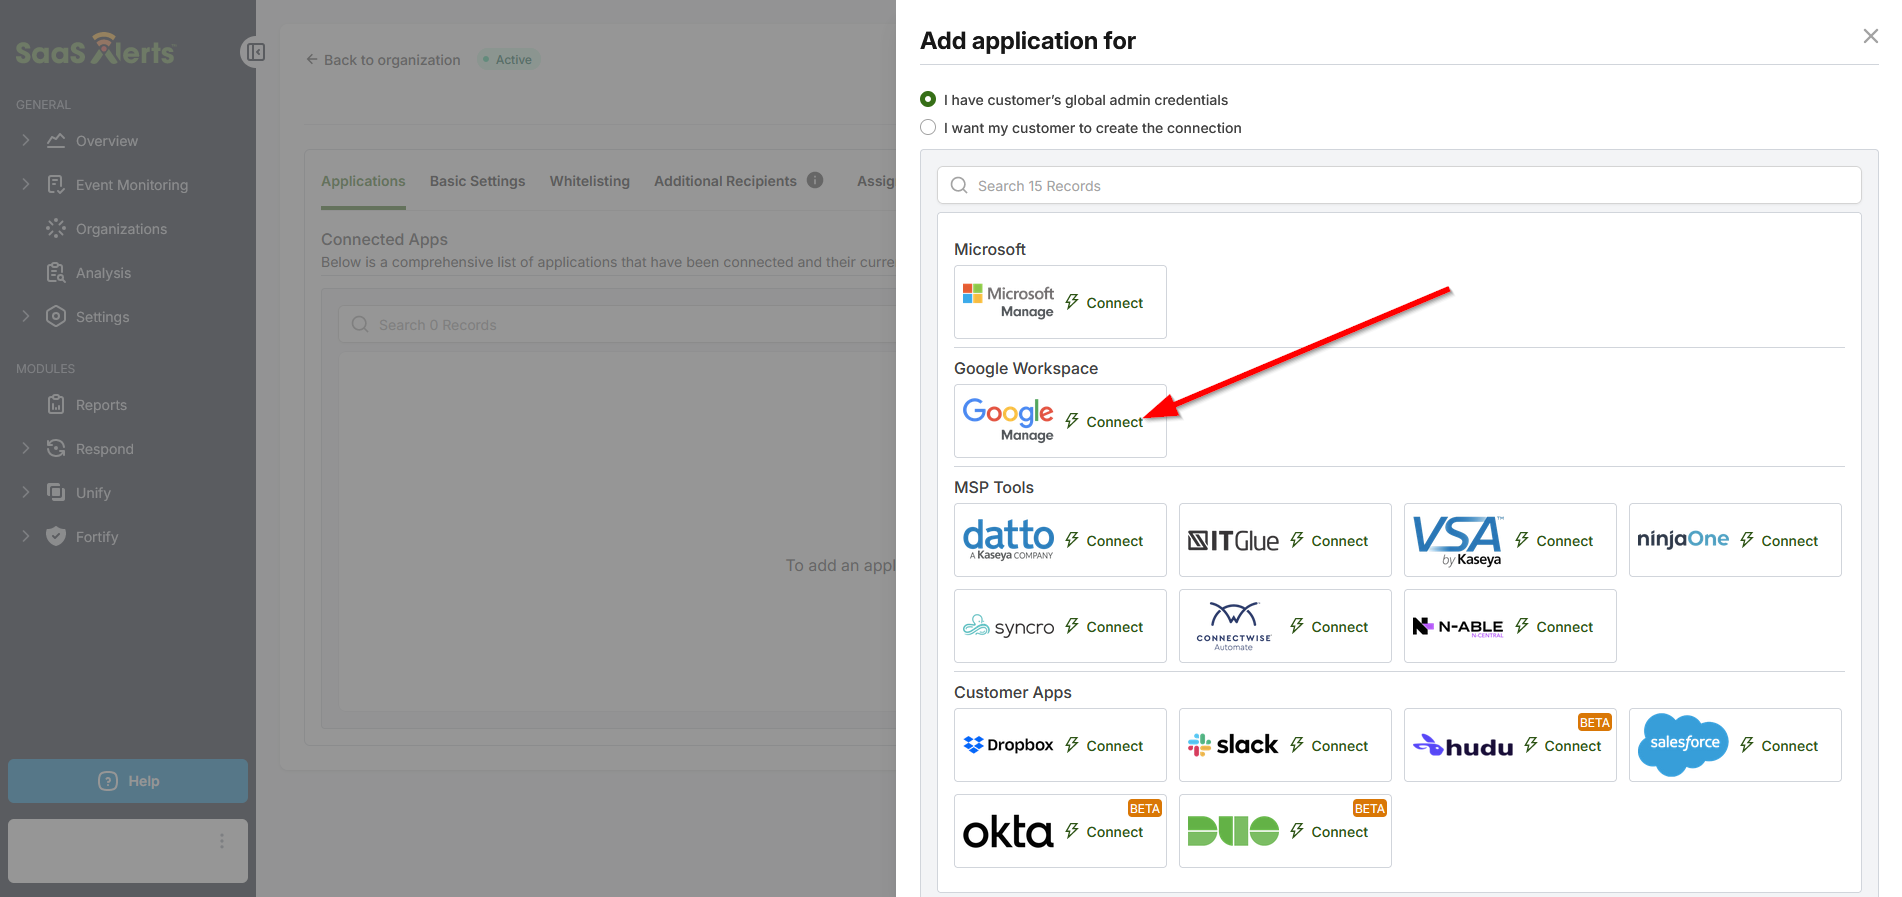
- Click Connect in the Google Workspace tile.
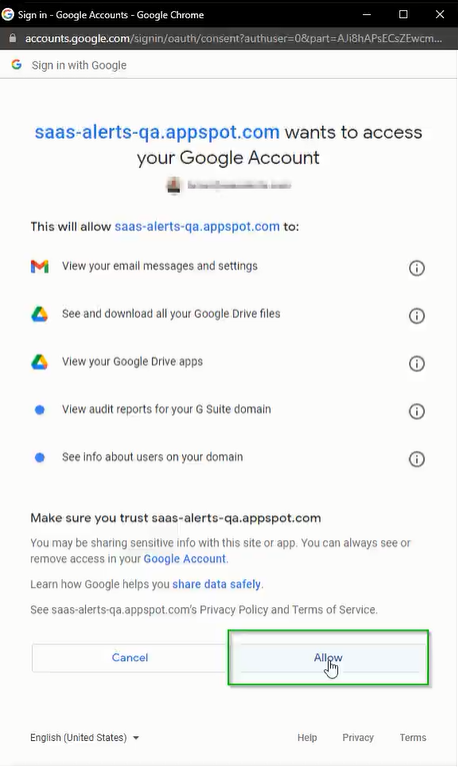
A Super Administrator account with a Google Workspace Business or Enterprise license is required for a successful connection.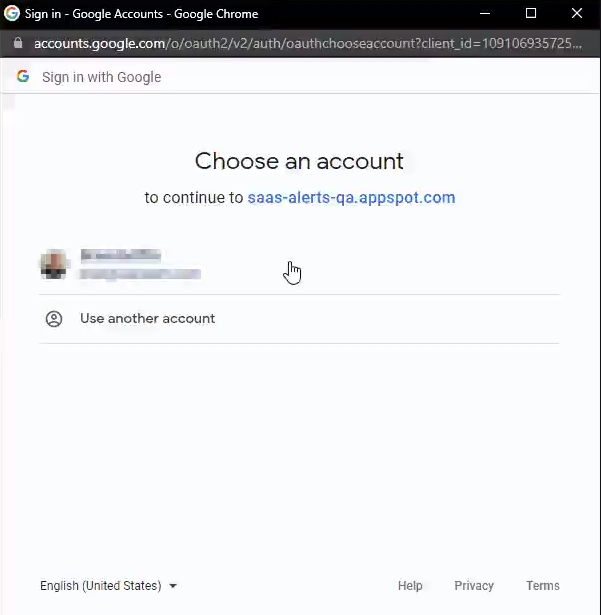
- If check boxes are visible, select all check boxes before clicking Allow.
Successful connection
SaaS Alerts will indicate that the app is successfully connected.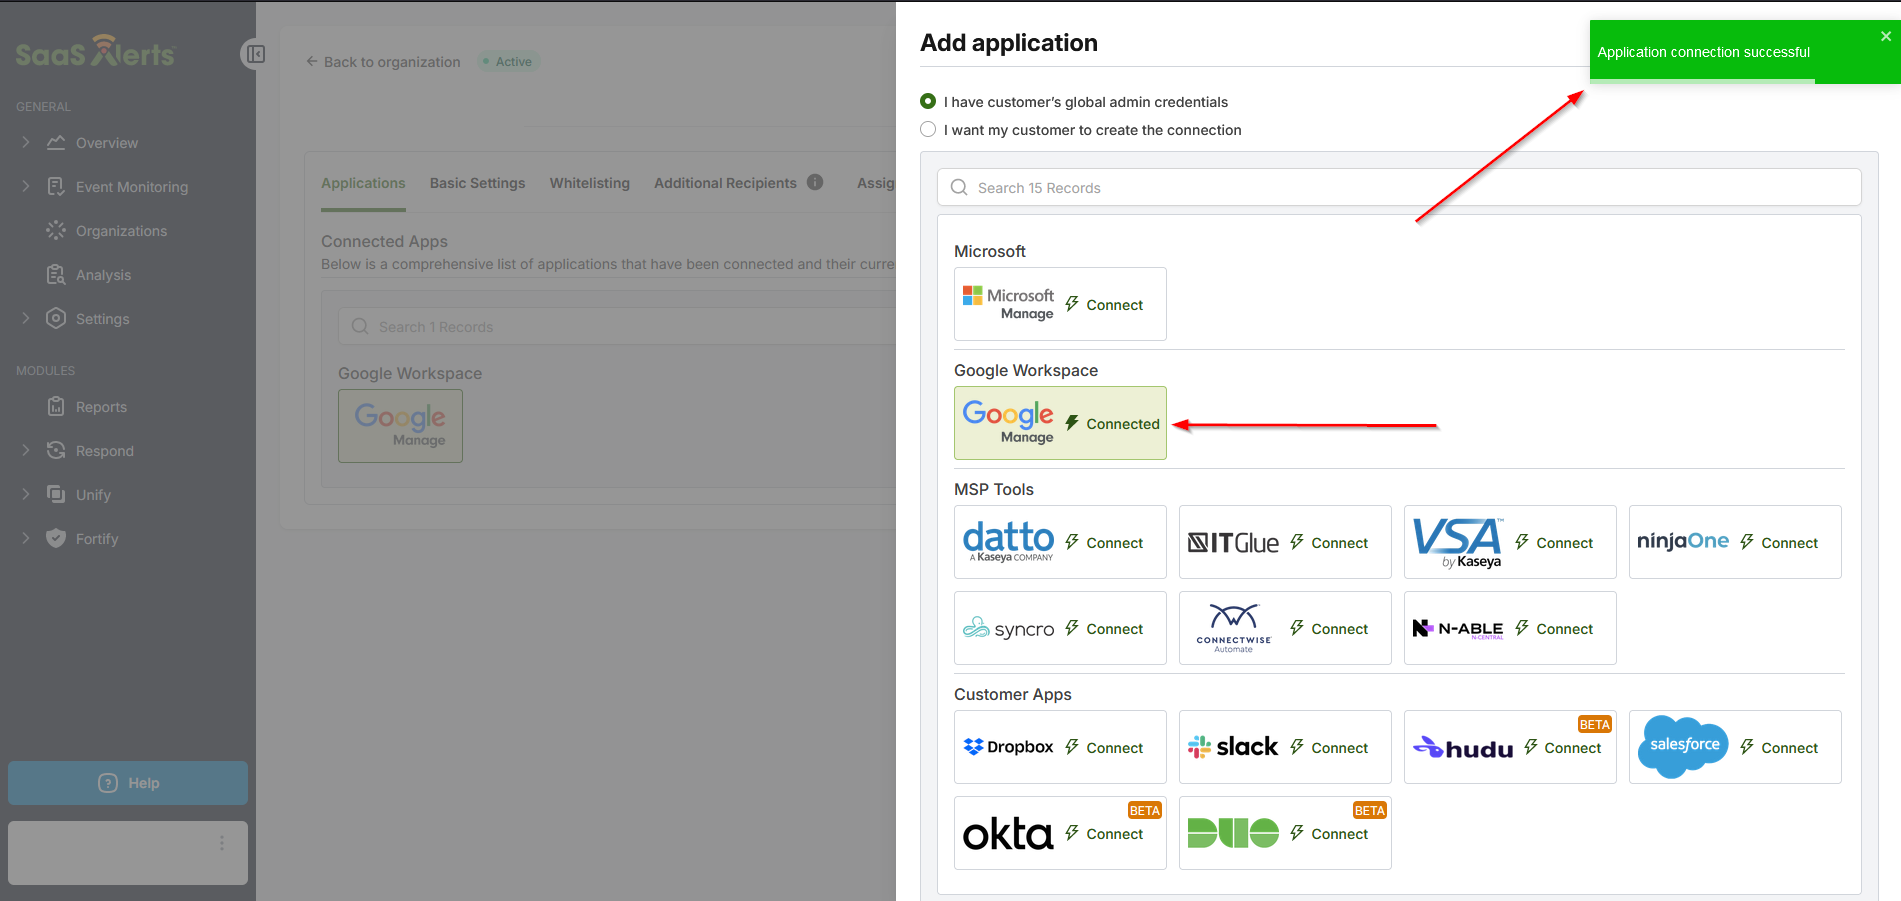
IMPORTANT Ensure that each organization connection is created with a unique local global administrator account and not with a master CSP account.
- From the left navigation menu in SaaS Alerts, click Organizations, then click the Edit Organization pencil icon
 .
.
- Click New Application.
- Click Connect in the Microsoft Manage tile.
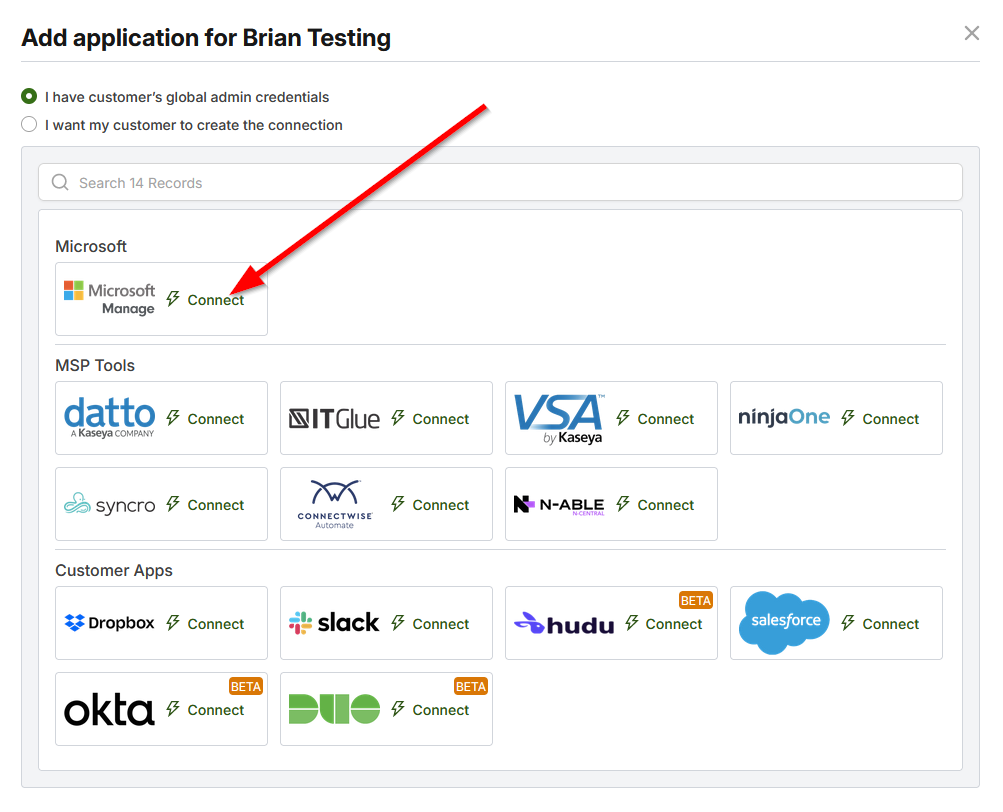
- Click the account you wish to connect to this customer's account.
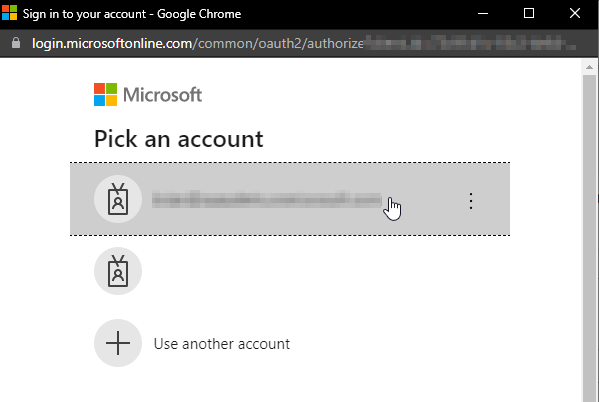
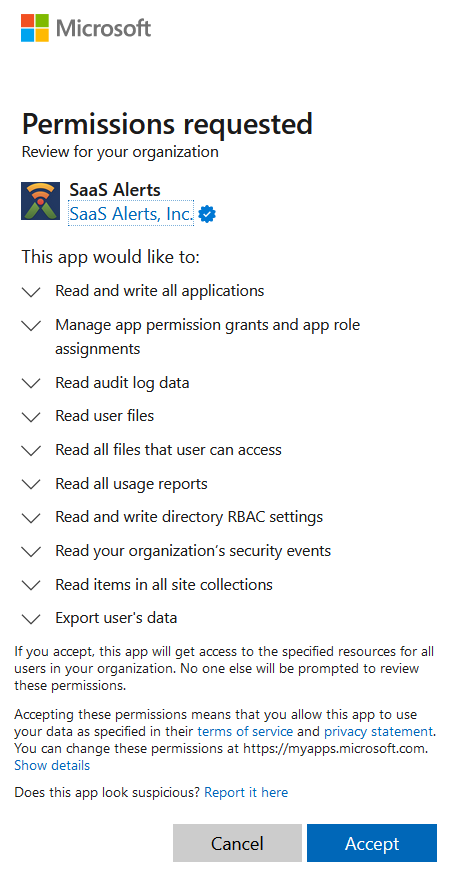
- Verify the complete list and click Accept.
- Review and accept permissions. Microsoft may require 30 to 60 seconds to accept the connection request.
Microsoft pop-up blocked
Connecting with Microsoft requires two API connections: the Graph API and the Azure AD API. Your browser may block the second pop-up.
To resolve this issue, click the blocked pop-up notification in the upper-right corner of the URL address bar.
Select the option to allow pop-ups in Google Chrome.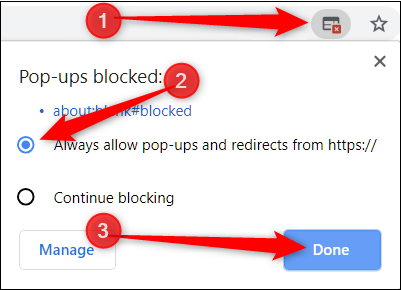
Successful connection
SaaS Alerts will indicate that the app is successfully connected.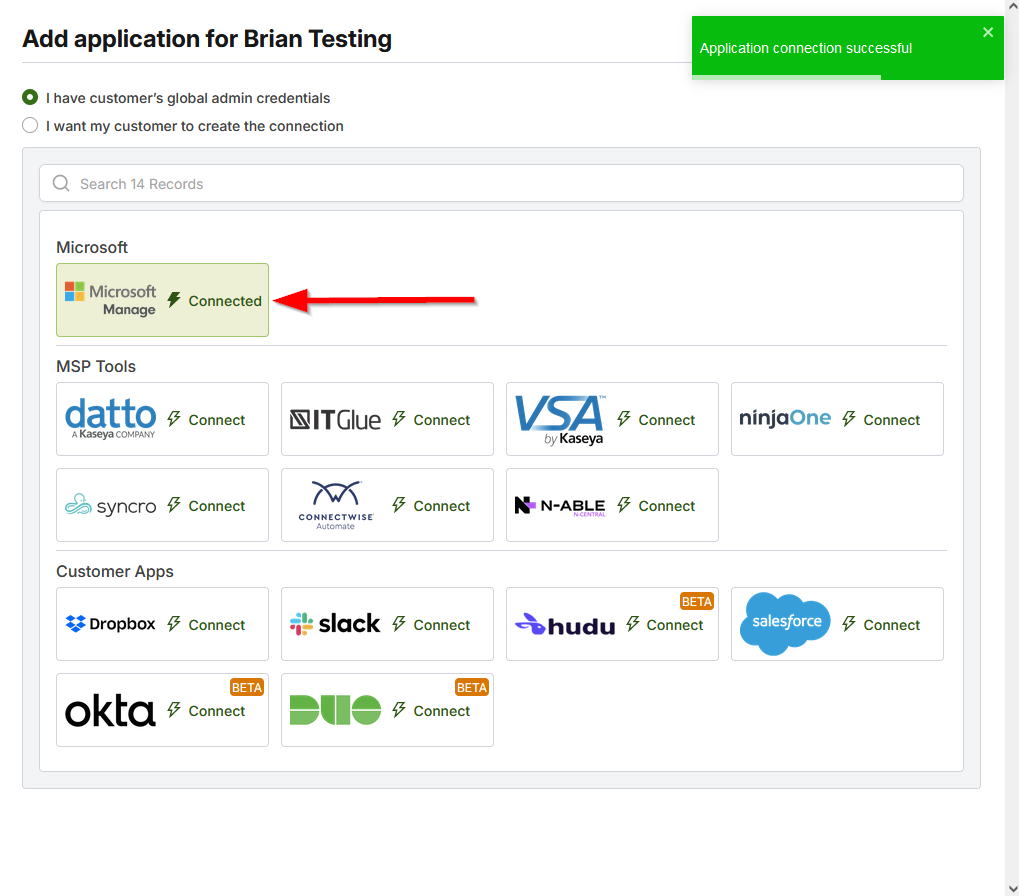
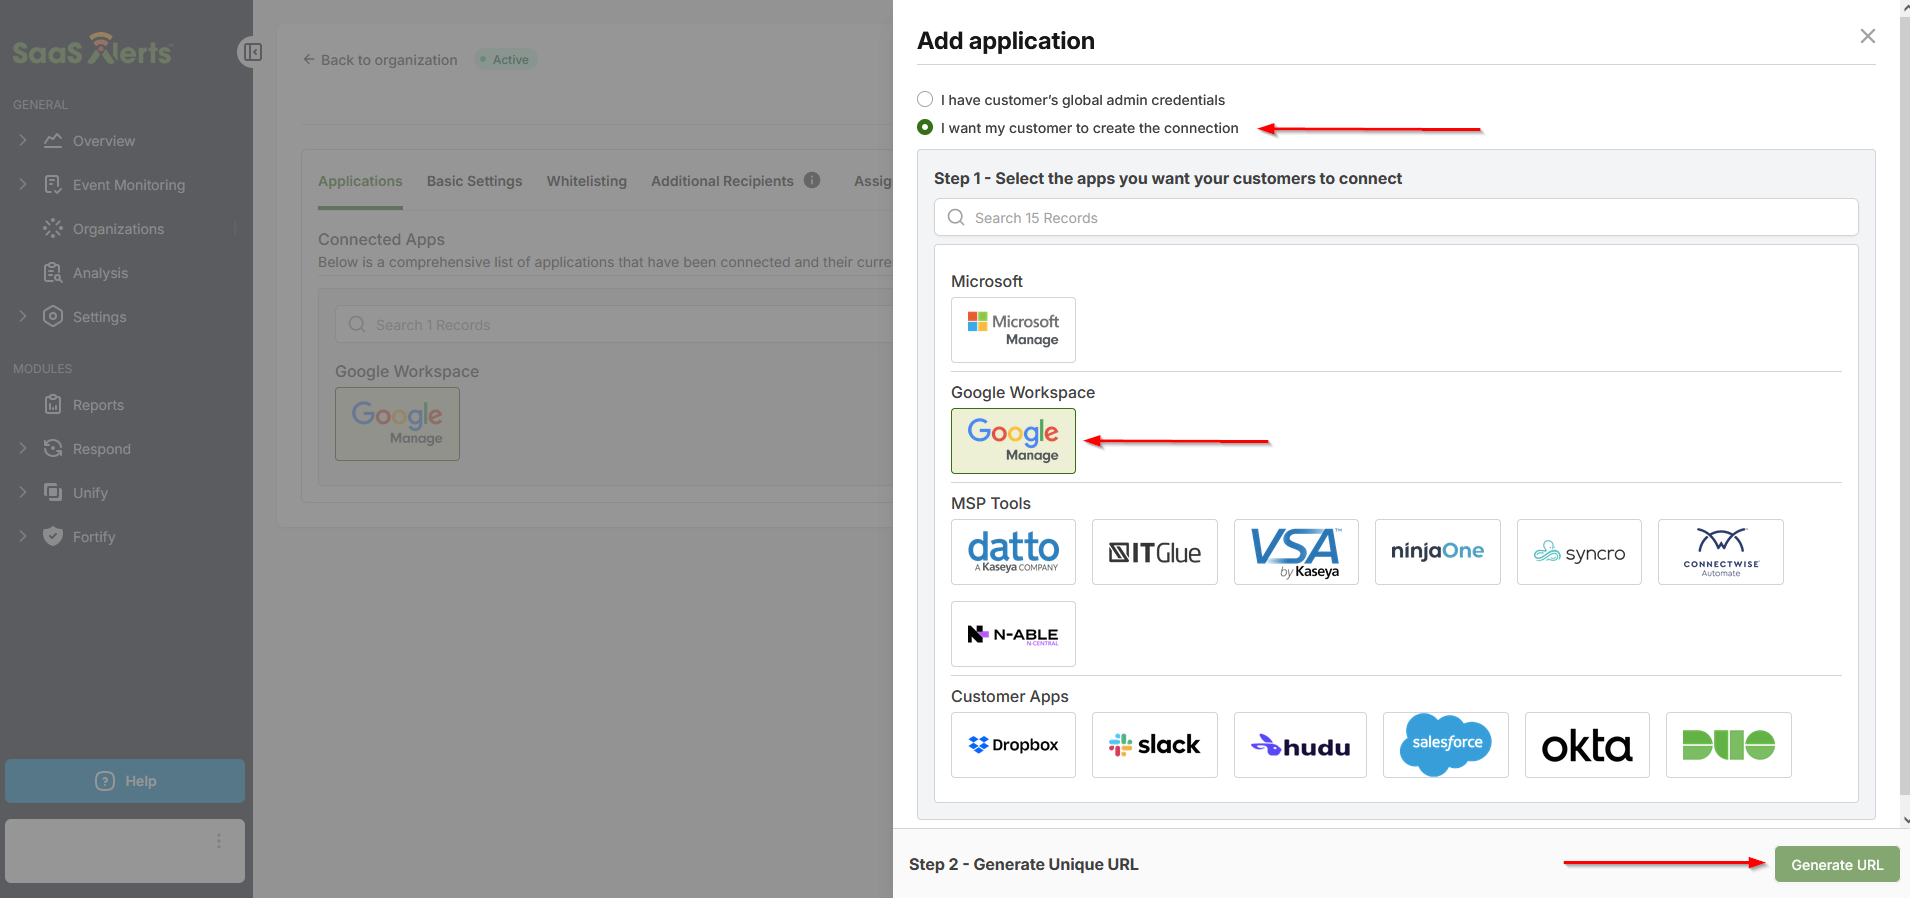
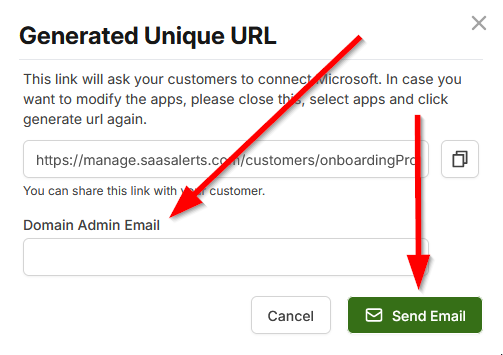
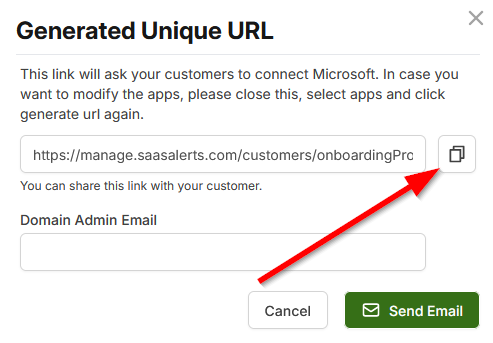
If you don't have admin access, your customer can self-onboard by selecting I want my customer to create the connection.
Two options are available:
Accessing SaaS app data
Depending on the SaaS application you just added, the data could require anywhere from 15 minutes to two hours to appear in SaaS Alerts. Timing varies depending on the SaaS application provider.
Checking on your data
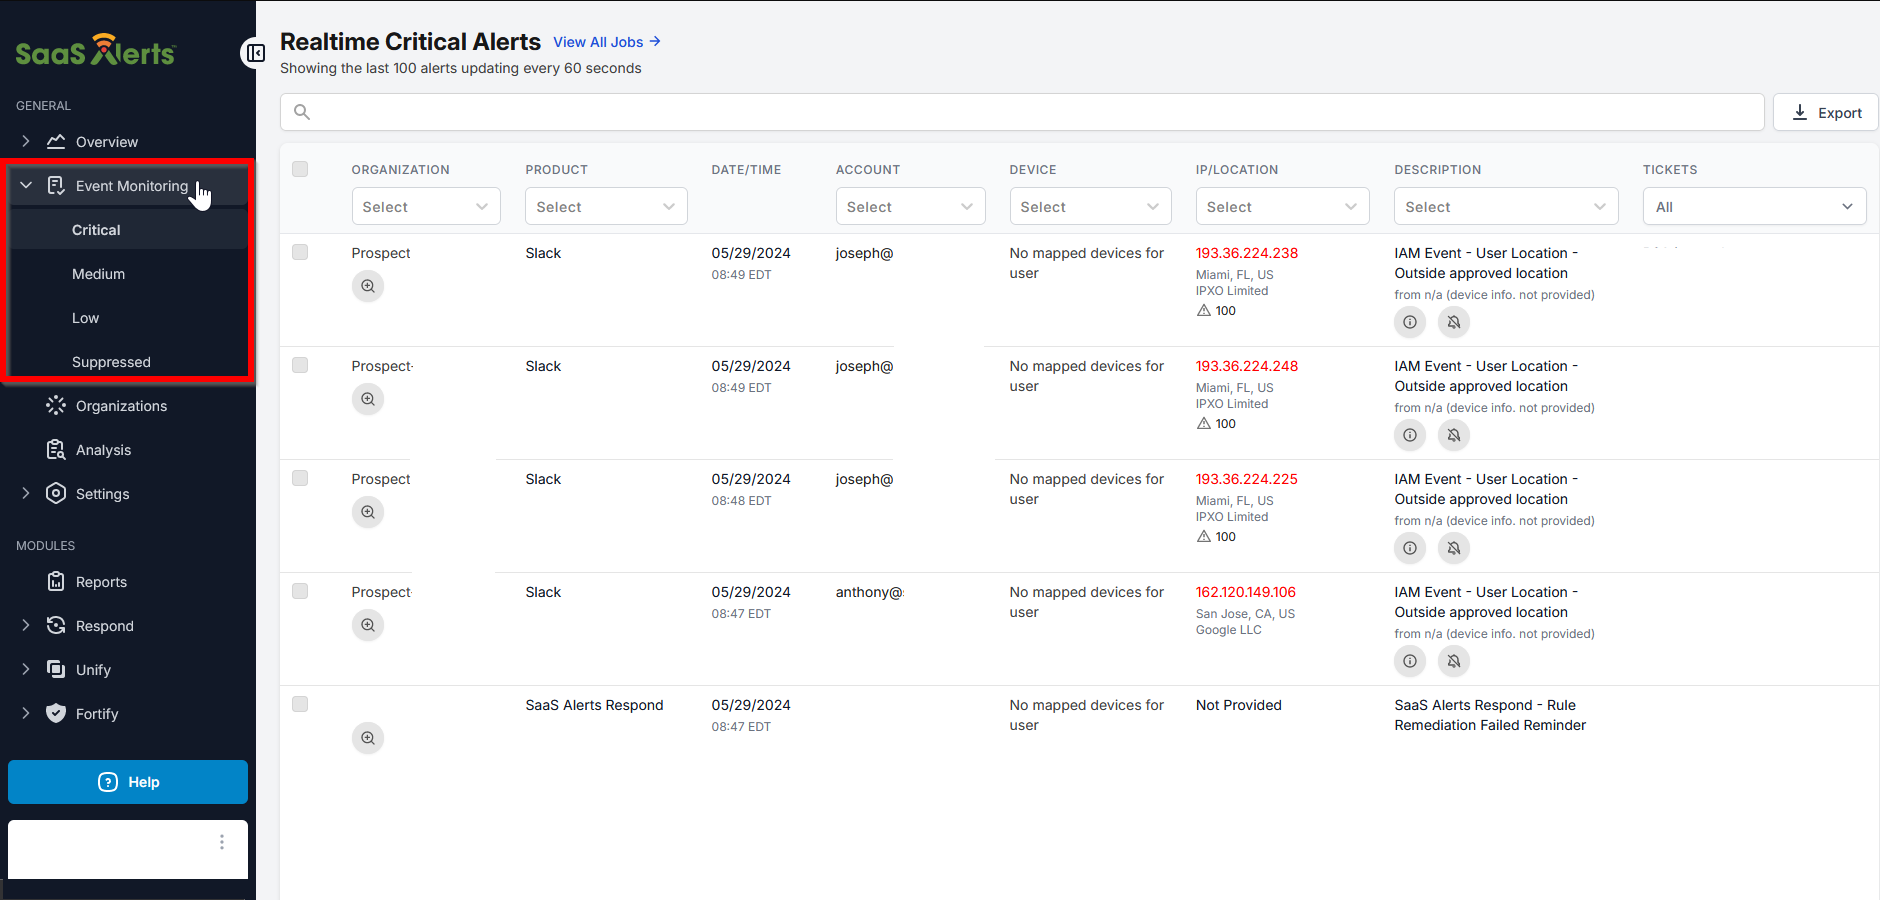
- The first place to look for data is in Event Monitoring.
- Alerts are categorized as Suppressed, Low, Medium, and Critical.
- If you just added your first customer application, not yet seeing data is normal.
What to do with data
Reviewing the user login map
The user login map shows you users logged in from your approved and non-approved countries.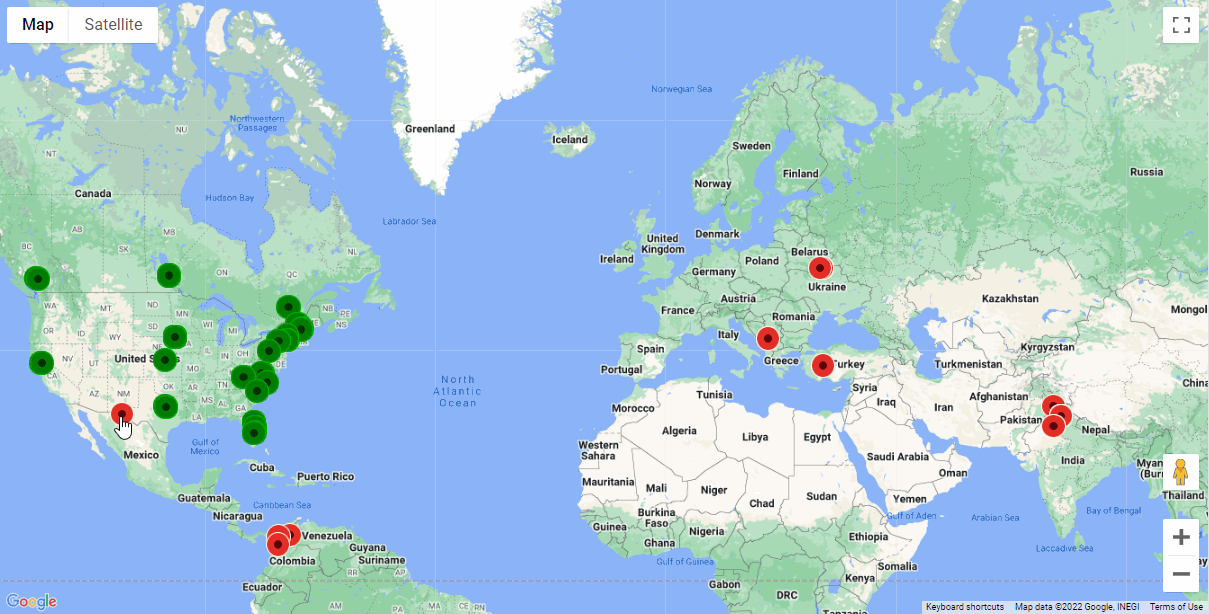
- Logins from Approved countries appear in green.

- Logins from Unapproved countries appear in red.

Clicking on a map point for additional details
This screenshot shows a login attempt outside the customer's approved countries.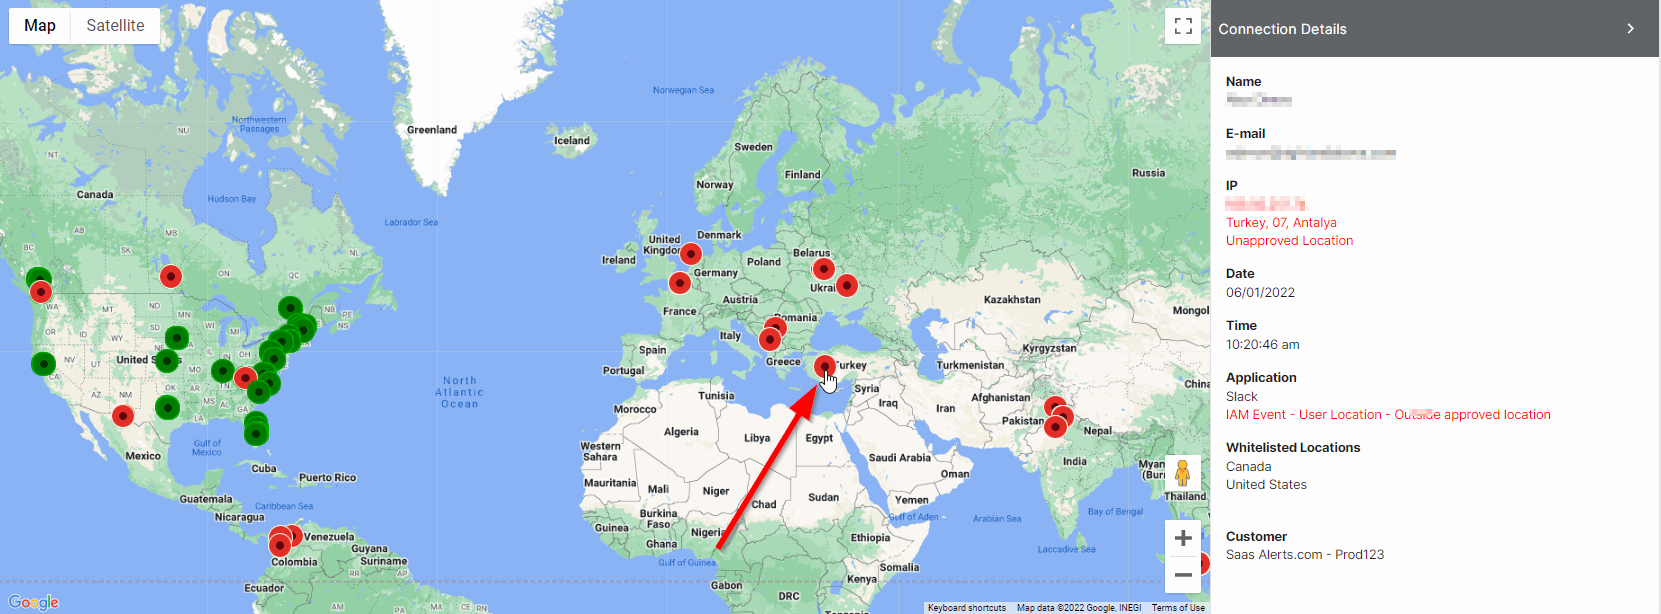
Unauthorized login
In the event of a login outside of an approved location, the following actions are recommended:
- Contact the customer or user to make them aware of this event.
- Force logout from all devices and temporarily disable login for the user account.
- Change the user password and ensure MFA is enabled for the user.
- Evaluate firewall rules for geolocation where applicable.
Reviewing realtime alerts
You can filter your alerts by keyword, customer, product, IP/location, and description.
Realtime alerts are listed as the Last 100 Alerts. To learn how to view a specific time range, refer to Analyzing data.
Critical alerts require immediate attention and communication with the customer.
Medium alerts require evaluation on the part of the MSP and a decision on what step to take next with the customer.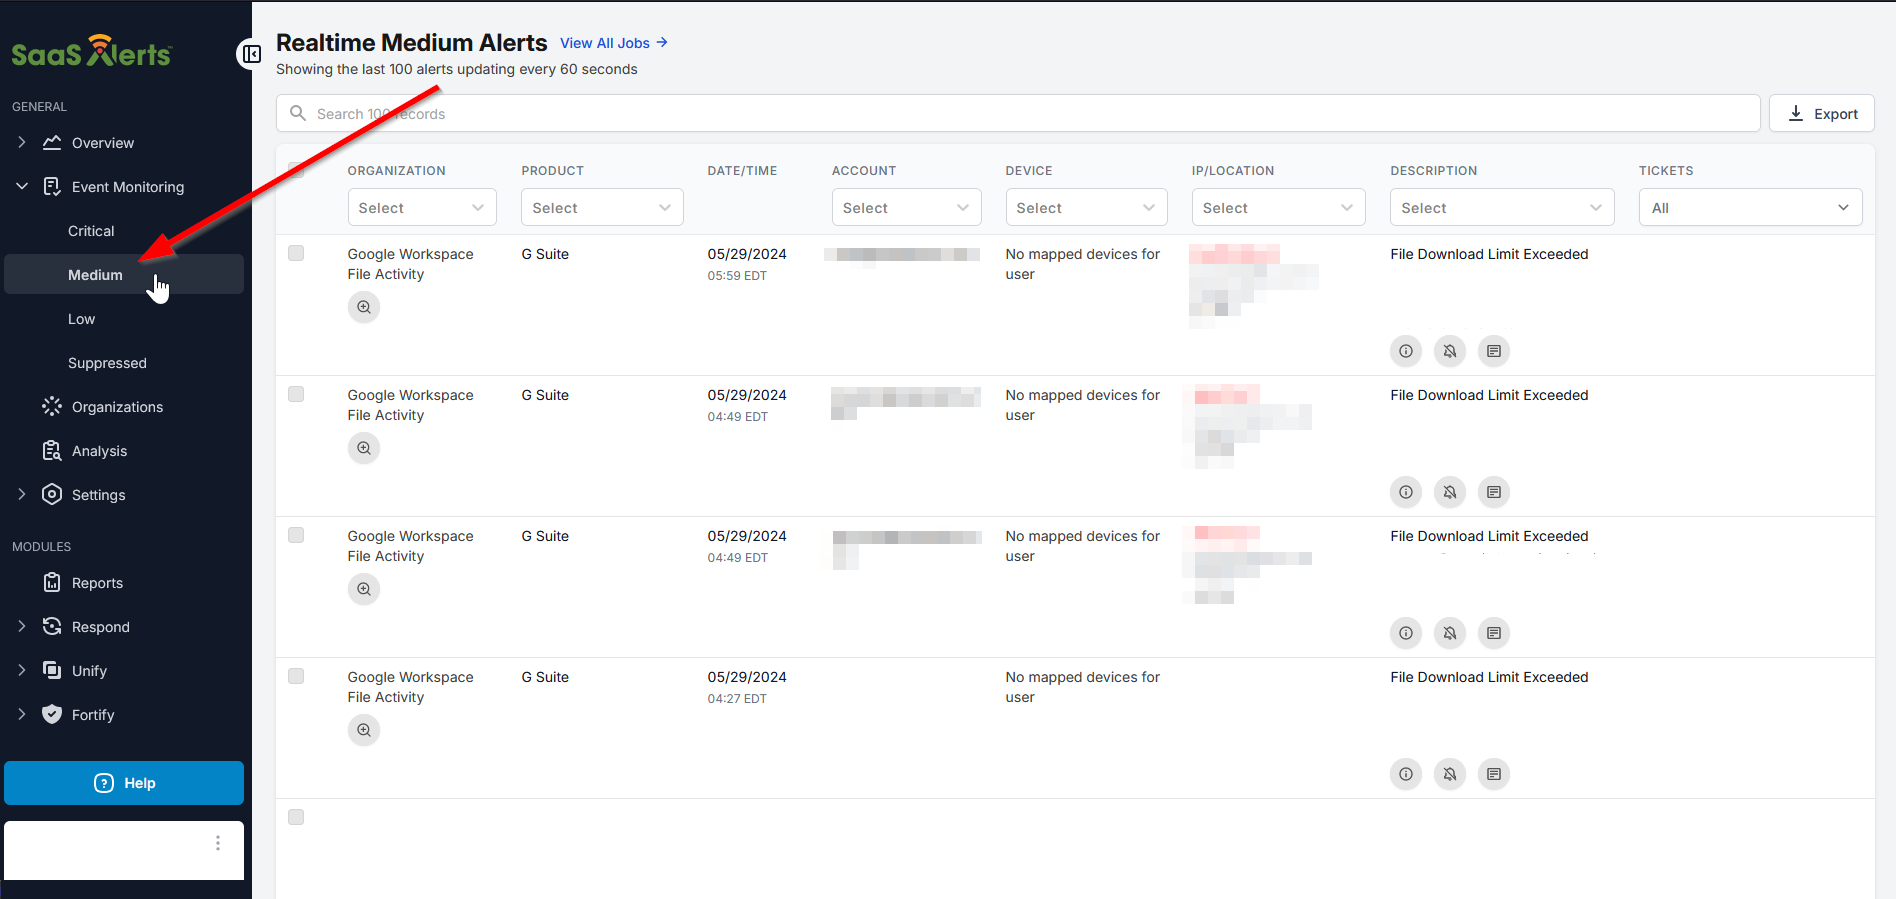
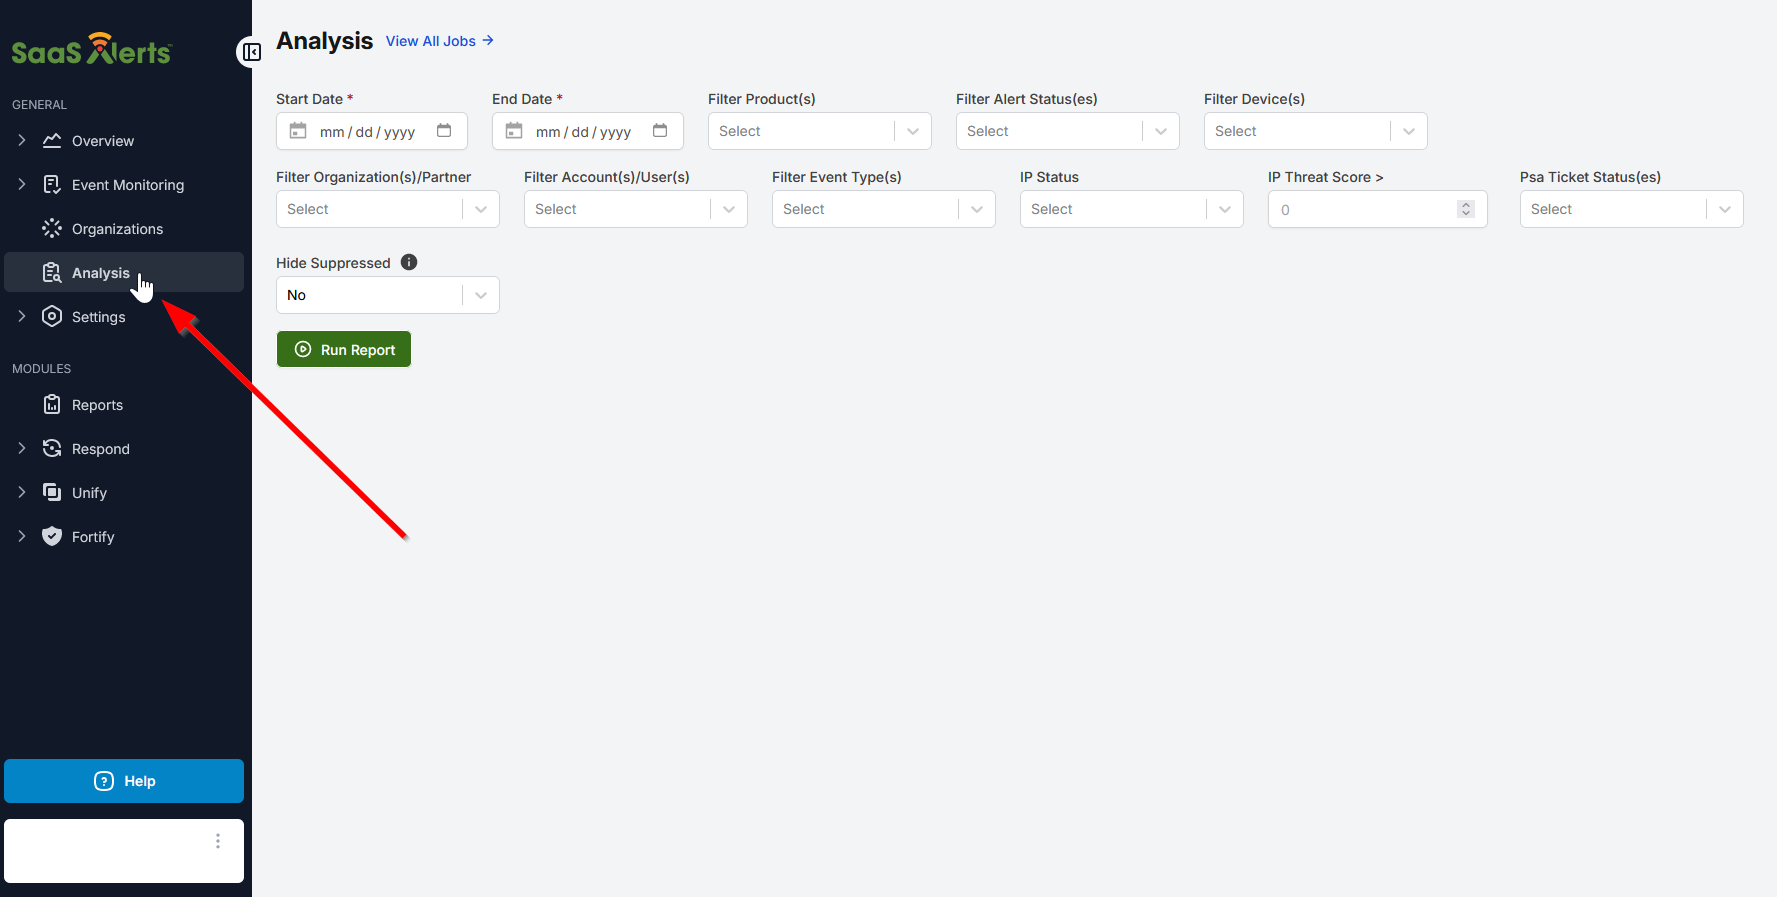
Analyzing data
Analysis allows you to filter your data using the following criteria:
- Start Date and End Date: Both of these fields are required to run a report.
- Product(s)
- Alert status(es): Low, Medium, Critical
- Customer(s)/partner(s)
- Account(s): Specific email address(es)
- Event type(s): Specific type(s) of event(s)
Alert types: Critical, standard, logged event
Critical alerts require immediate attention and communication with the customer.
- IAM Event - User Location - Outside approved location
- Policy Event - Admin Access Granted
- IAM Event - Multiple Password Reset
- Policy Event - Security Policy Change
- IAM Event - Multiple Account Locks
- Unable to Refresh SaaS App Token
- Policy Event - Admin Access Granted
A standard alert requires evaluation on the part of the MSP and a decision on what step to take next with the customer.
- IAM Event - Account Locked
- IAM Event - Multiple Authentication Failures
- Device Event - New Device
- Policy Event - Security Group Change
The following are examples of a logged event:
- IAM Event - Authentication Failure
- IAM Event - Authentication Success
- Application Integration Detail - SaaS Application File Share
- IAM Event - Oauth Access Used for Foreign Application
- File Share Event - Internal
- File Share Event - External
- File Share Event - Local Download
- File Share Event - External Orphaned Link
- Application Integration Detail - SaaS Application Link Share
- IAM Event - Password Reset
- IAM Event - Multiple Login Connections From Different IP Addresses
- IAM Event - Multiple SaaS Connections From Different IP Addresses
- IAM Event - New User Added
- IAM Event - An Unknown Actor is Attempting to Access the Domain
Connecting to PSA
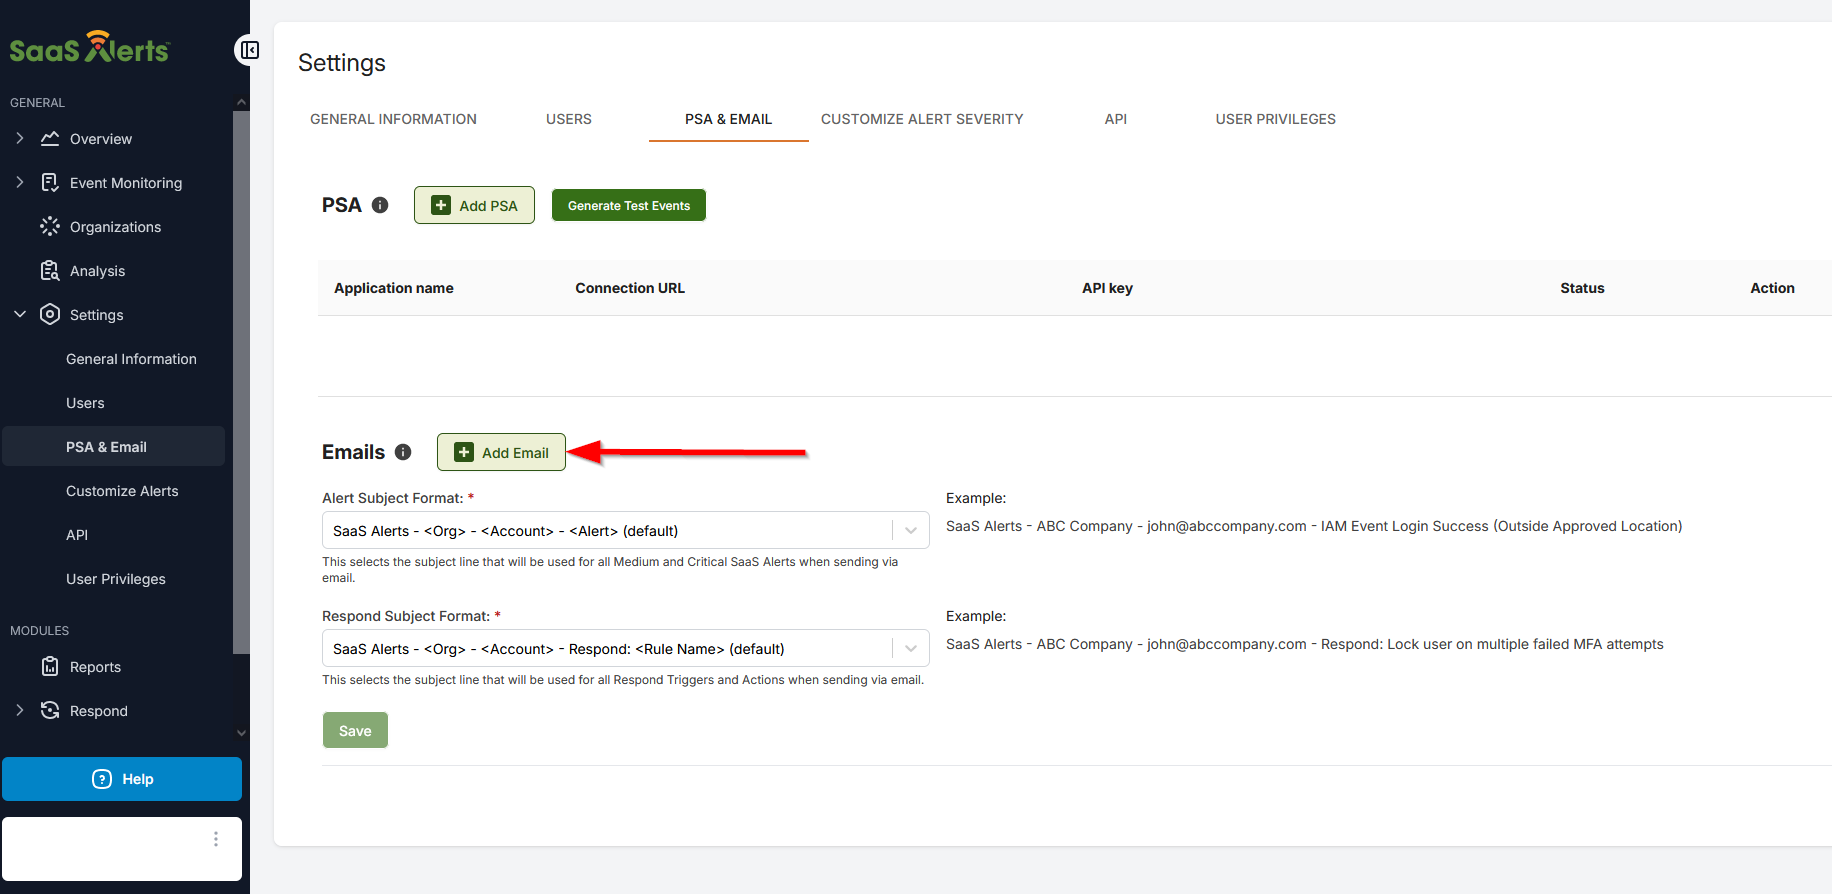
From the left navigation menu, navigate to Settings > PSA & Email.
Connecting SaaS Alerts to your PSA will automatically create tickets out of alerts generated from SaaS Alerts.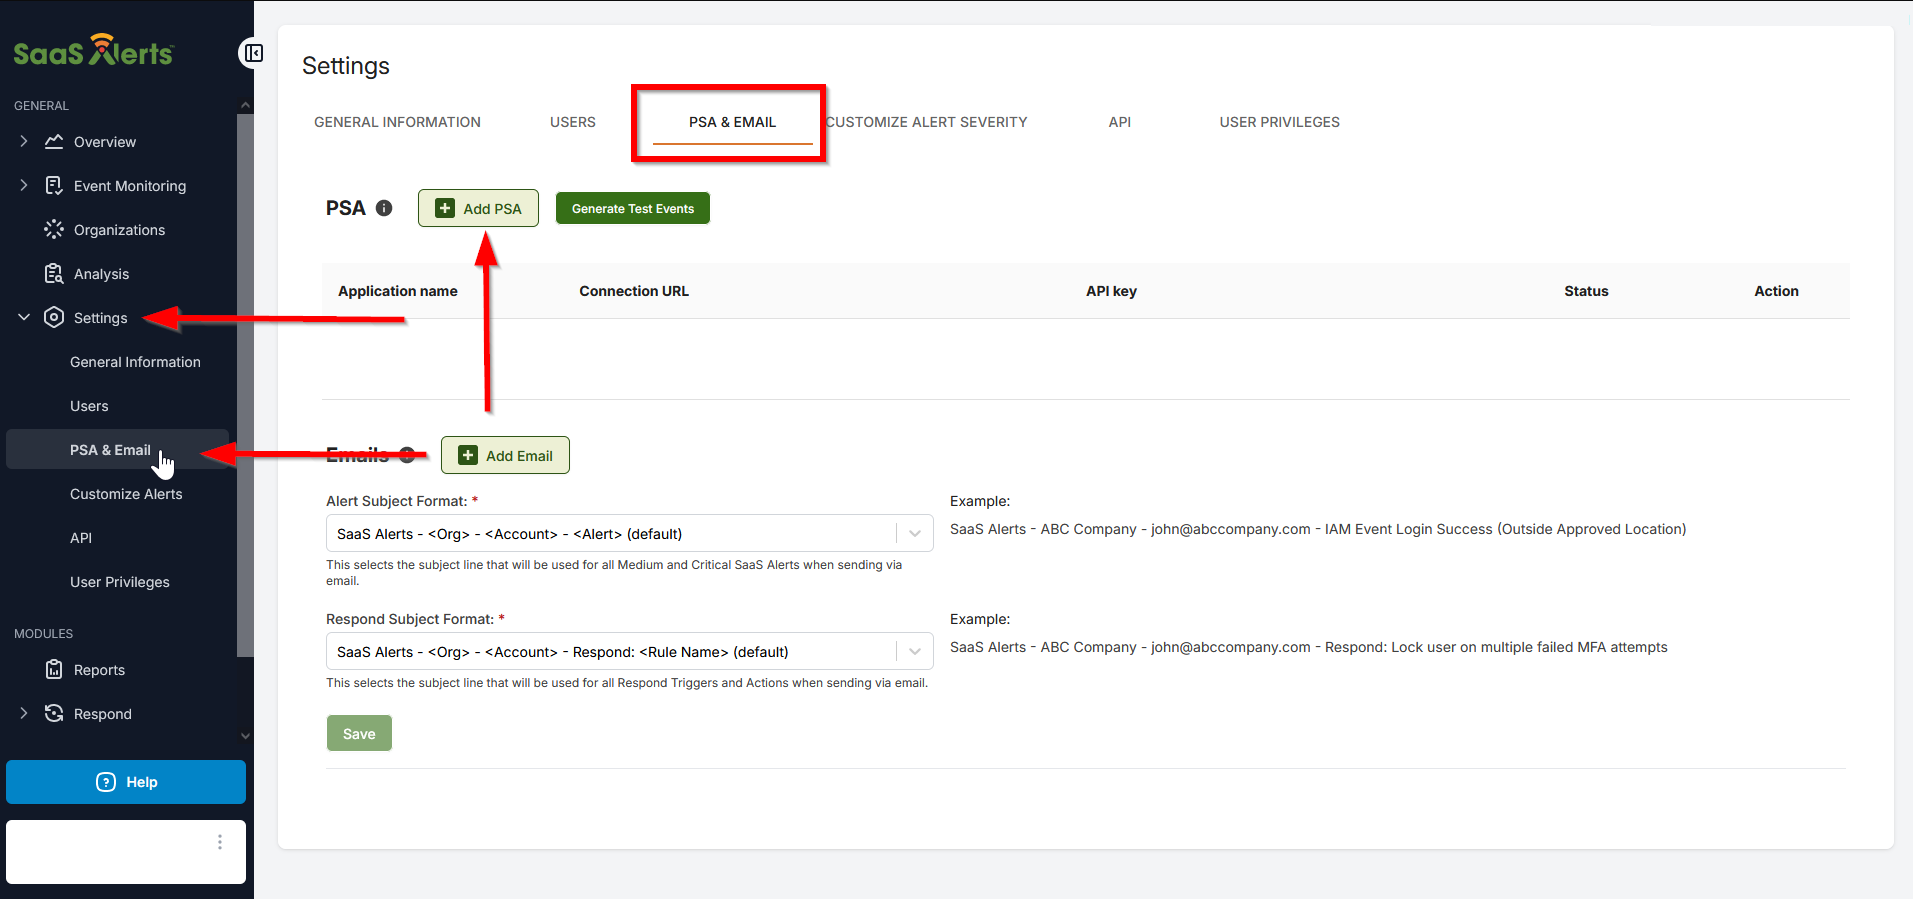
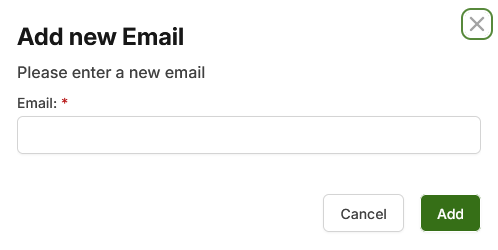
Adding PSA email
Complete the following steps for all alerts generated from SaaS Alerts to be sent to your PSA email address:
Using SaaS Alerts for prospecting
Many partners are successfully using SaaS Alerts as a prospecting tool by connecting to prospects' Microsoft 365/Google Workspace instances and showing them security vulnerabilities to immediately deliver value.
To start prospecting with SaaS Alerts, you should explain to your prospect that, as part of your service offering, you're going to monitor their SaaS applications and provide alerts when high-risk events take place.
To demonstrate this capability and to give the prospect a free (or paid) security assessment, you need to connect to their SaaS applications.
Connecting to prospect SaaS apps
NOTE To connect the prospect application(s) to SaaS Alerts, you don't need admin access. You can copy and paste a link to the prospect or choose to have SaaS Alerts send an email on your behalf. Refer to I do not have admin access (self-onboarding) for instructions.
Adding a customer to SaaS Alerts involves the same process as adding your own MSP, but you'll add your customers' SaaS apps instead of your own.
Refer to Adding your MSP to SaaS Alerts and What to do with data.
MSP Admin guide
For details of all features available from the left navigation menu, refer to SaaS Alerts MSP Admin guide.
