Autotask integration
When SaaS Alerts is integrated with Autotask, the following features are available:
- Map SaaS Alerts organizations to Autotask accounts
- Map ticket fields like Source, Queue, Priority, Issue Type, and Sub Issue Type
- Map specific SaaS Alerts alerts to a specific Issue Type and Sub Issue Type
- Map tickets to an account’s contract in Autotask
- Update an Autotask contract with the number of billable SaaS Alerts end users being monitored for that organization
For near real-time ticket status updates from Autotask, see Autotask webhook integration with SaaS Alerts.
Prerequisites and foundational information
Before starting the connection wizard, complete the following:
- Create an API user in Autotask and document the username and password
- Create and document (create a new customer/contact or use an existing customer/contact) a default (catch-all) customer and contact to assign tickets for unmapped organizations
- Ensure that any PSA account used with SaaS Alerts has at least one contact created
-
Define which PSA values you want to use for ticket creation
- Determine whether you will use Issue Type/Sub Issue Type fields, and what the default values should be
- Decide how alerts should be grouped (User or User+Alert)
- Determine whether you will use contract mapping and, if so, define the Default Contract Service name and pricing.
Creating an API user in Autotask
Follow the instructions in the Autotask Help system to create a dedicated API integration account.
-
Create a specific user for SaaS Alerts rather than sharing an existing API integration user
-
When adding the user, select New API User (from the drop-down arrow), not New, which creates a standard user.
Recommended settings:
| Setting | Value |
|---|---|
|
First Name |
SaaS Alerts |
|
Last Name |
API |
|
Security Level |
API User (system) or Saas Alerts API User (Minimal Permissions) |
|
Primary Internal Location |
Headquarters |
|
Email Address |
Your standard email address |
|
Username (Key) |
Click Generate Key |
|
Password (Secret) |
Click Generate Secret |
|
Integration Vendor |
SaaS Alerts - Network Security |
NOTE For security best practices, partners are encouraged to use the SaaS Alerts API User (Minimal Permissions) security level described later in this document.
Creating and documenting a catch-all customer and contact
When a ticket or note is created in Autotask, it must always be mapped to an account and a contact.
-
Ideally, each SaaS Alerts organization should map to a specific account
-
If no mapping exists, SaaS Alerts uses the default (catch-all) account and contact
Create a dedicated account (for example, Default Account) with a contact (Default Contact) rather than using your MSP account. This keeps your MSP account clean and separated from unmapped organizations’ tickets.
Ensuring that every account has a contact
-
SaaS Alerts attempts to map tickets to a contact using the email address from the alert
-
If no matching contact is found, the ticket is assigned to the default contact for that account
Create a generic contact per customer (for example, Alert Contact) to act as the fallback contact.
Ticket defaults for the Service Parameters page
For every ticket created, SaaS Alerts sets the following parameters:
- Ticket Type
- Ticket Source
- Ticket Status
- Ticket Queue
- Ticket Priority
Define and document these defaults in advance to simplify setup and reporting.
Issue type and Sub-issue type usage
Issue Type and Sub Issue Type fields on tickets can be used to organize and filter tickets and to drive workflows. Refer to The Workflow Rules page in the Autotask Help system for more information.
SaaS Alerts is very configurable in this area and supports the following combinations:
- No issue type/sub-issue type
- Default issue type assigned to all tickets
- Default issue type/sub-issue type assigned to all tickets
- No default issue type (or sub-issue type), with an override per specific alert
- Default issue (type and sub-issue type), with an override per specific alert
Create a SaaS Alerts-specific issue type and utilize this as the default issue type. This allows you to quickly use this value to find tickets and/or use them for workflows.
Advanced tip: Do the above, and then create a few sub-issue types based on different types of alerts (IAM, Data Leakage, etc, and so forth). Then, map an issue/sub-issue to specific alerts so that workflows can assign certain types of issues/sub-issues to different queues or adjust priority.
Determining how to group alerts
To reduce ticket volume, SaaS Alerts supports two grouping modes:
User
When User is selected, the first alert generated for a specific user will create a ticket. All subsequent alerts of any type for that specific user will be added as notes to that ticket until that ticket is closed.
Example logic
- user@domain.com triggers a Too Many Downloads alert.
- A ticket is created because this is the first alert that the user has ever triggered.
- Then, 15 minutes later, the same user triggers a Too Many Uploads alert.
- Since the user still has an open ticket in the system, the Too Many Uploads alert is added as a note to the initial ticket.
- A technician at your organization reviews the ticket, determines that it is not an issue, adjusts the file alert limits for this particular user up, and closes the ticket.
- Again, 15 minutes later, the same user triggers a Multiple MFA Failures alert.
- Because the original ticket was closed, a new ticket is created for the Multiple MFA Failures alert.
User+Alert
Selecting User+Alert will open a new ticket for each specific alert for a user. Subsequent alerts of the same type will be added as notes to the original ticket until that ticket is closed.
Example logic
- user@domain.com triggers a Too Many Downloads alert.
- A ticket is created because this is the first alert that the user has ever triggered.
- Then, 15 minutes later, the same user triggers a Too Many Uploads alert.
- Even though the user still has an open ticket in the system from the first alert, a new ticket is created for the Too Many Uploads alert because it is a different type of alert.
- A technician at your organization reviews the ticket, determines that it is not an issue, adjusts the file alert limits for this particular user up, and closes the ticket.
- Again, 15 minutes later, the same user uploads a larger set of files and triggers another Too Many Uploads alert.
- Because the Too Many Uploads ticket is still open, and the alert is identical, the Too Many Uploads alert is added as a note to the Too Many Uploads ticket.
Contract mapping
SaaS Alerts supports two levels of contract mapping:
- Contract Mapping enables the contract to be added to each ticket that is created for a particular organization.
- Adding a Contract Service line item to each mapped contract and updating the user quantity for billing purposes.
To use the User Count feature, a Default Contract Service will need to be created within Autotask. You can do so through the Autotask GUI by adding a new service.
Autotask PSA integration wizard
Starting the wizard
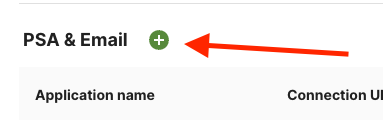
- From the side navigation menu in SaaS Alerts, go to Settings.
- Scroll down to PSA & Email, and click the add icon
 .
. - Select Autotask.
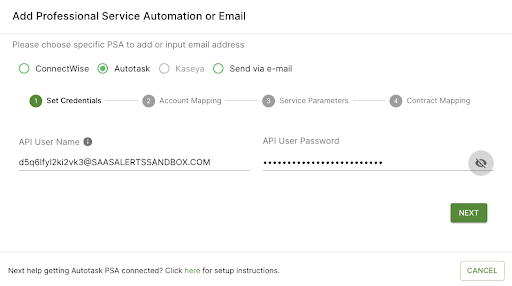
Step 1: Set credentials
- Enter the Autotask API username and password.
- Click Next.
If the credentials are valid, the Account Mappingstep appears. If not, a red notification indicates invalid credentials. You can use the eye icon to verify the password.
Step 2: Account mapping
- From the Account Types drop-down menu, select a value. Customer is a frequently used option. The other fields will populate with options.
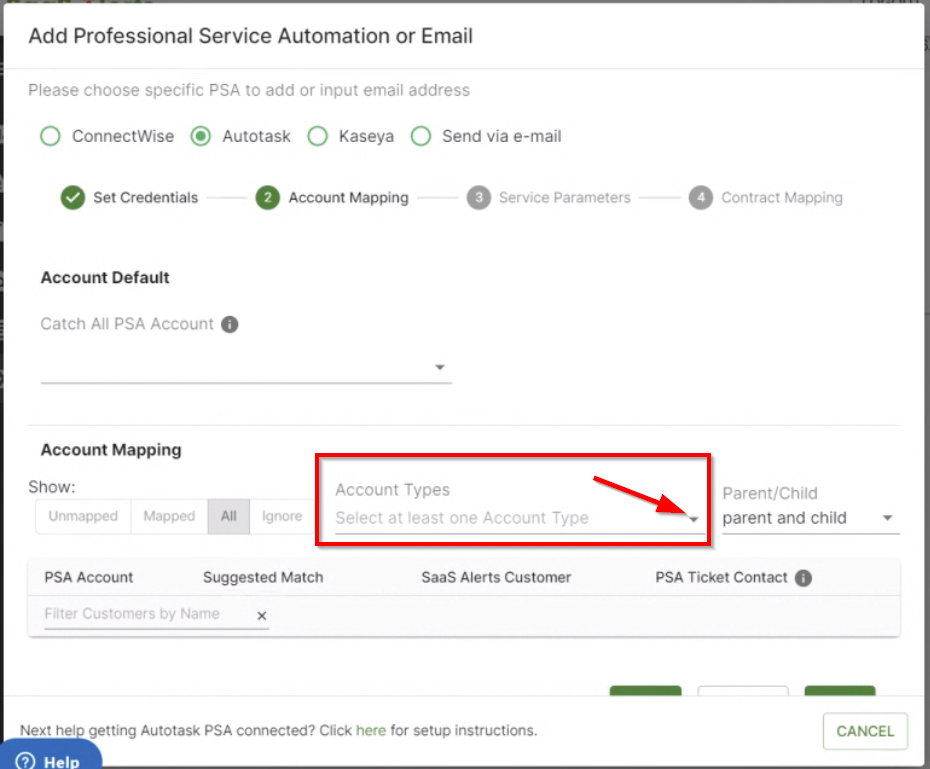
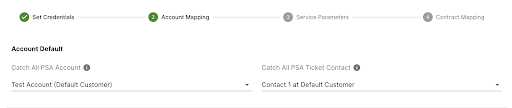
- In the Catch All PSA Account drop-down menu, select the account you want to assign unmapped organizations to.
- Select the Catch All PSA Ticket Contact from the drop-down menu that appears after selecting the PSA account.
To reduce the size of the list of PSA accounts, you may choose an account type and set the parent/child drop-down menu to the appropriate setting. - For each PSA customer, you need to map to a SaaS Alerts organization, find the PSA customer on the left, and then match the SaaS Alerts organization in the drop-down menu. You can use the search field to quickly drill down.
- Once a SaaS Alerts organization is selected in the drop-down, select the appropriate PSA Ticket Contact in the drop-down list that is displayed next to it.

- In the event that you have a PSA account that you would like to add/import to SaaS Alerts, and have it automatically mapped for you, select Create Organization from the Actions menu.

- If you would like to set a particular PSA account to not be displayed in the mapping list any longer, you can select Ignore and that account will no longer be listed in the Unmapped section.
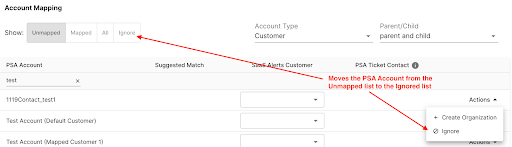
- Once all mappings are complete, click Next.
NOTE You can edit the Autotask connection any time in the future to adjust mappings or to add new ones.

Step 3: Service Parameters
- Use the ticket parameters you documented in the prerequisite/foundational steps to set each of the ticket defaults.
- From the Group alerts by drop-down menu, select User+Alert or User based on your earlier decision.
- Optionally, use the Issue Type/Sub Issue Type default mappings, as well, as adding specific alert mappings in the optional section.
- Once complete, click Next.

NOTE It's recommended to select to group alerts by the User+Alert setting. Doing so will display the alert details in the subject/summary of the Autotask ticket and also organize your tickets by username and alert.
Step 4: Contract Mapping
As mentioned in the prerequisites section, contract mapping supports two levels of functionality: ticket mapping and the ability to add the number of billable users for that organization to the account’s contract as a line item.
NOTE Contract Mapping functionality (for tickets) must be enabled to access the User Count functionality.
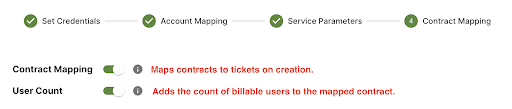
Contract mapping for tickets
- To enable Contract Mapping, turn on the toggle.
- For each account you would like to have the contract functionality for, choose to map that particular account to the proper contract.
You do not need to map all accounts. You can choose which accounts as well as which specific contract for that account.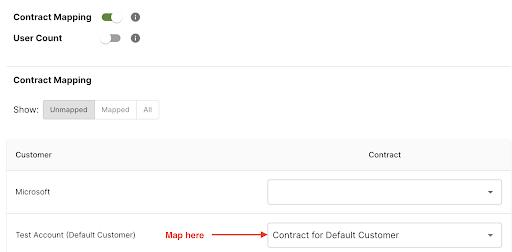
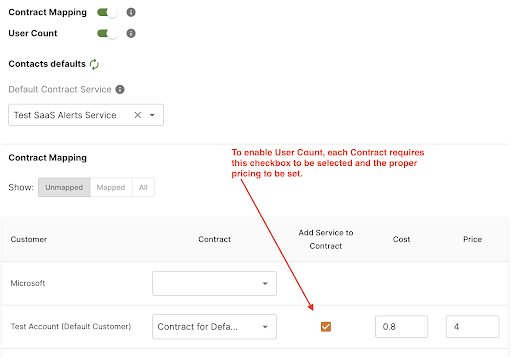
Contract mapping for user counts
- To enable the User Count functionality, turn on the toggle.
- Next, choose the Default Contract Service you created during the prerequisite section of this document.
- For each Autotask account, select the Add Service to Contract check box to enable user counts for that particular account.
- Then, make sure to place the proper cost and price (which will default from the PSA contract service) if you need to override the amounts for that particular account.
- Click Finish to complete the wizard.
NOTE This contract service cannot be used on any of the mapped contracts in the SaaS Alerts system. If you select a contract service that is already present, it will prevent you from moving forward. You will need to remove the contract service from the contract in Autotask or select a different contract service that is not currently in use.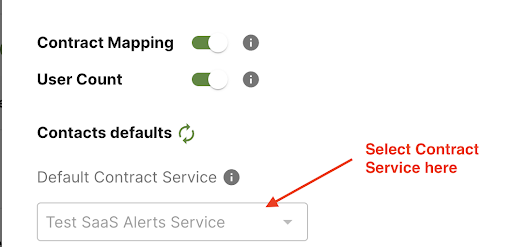
Minimal Permissions security level (recommended)
NOTE These permissions are optional. The integration works with full API access, but this approach follows the principle of least privilege and is the recommended configuration for partners.
System security levels in Autotask
On the Security Levels page in the Autotask UI, system security levels can be identified by:
-
The (system) label in the name
-
A checked System column
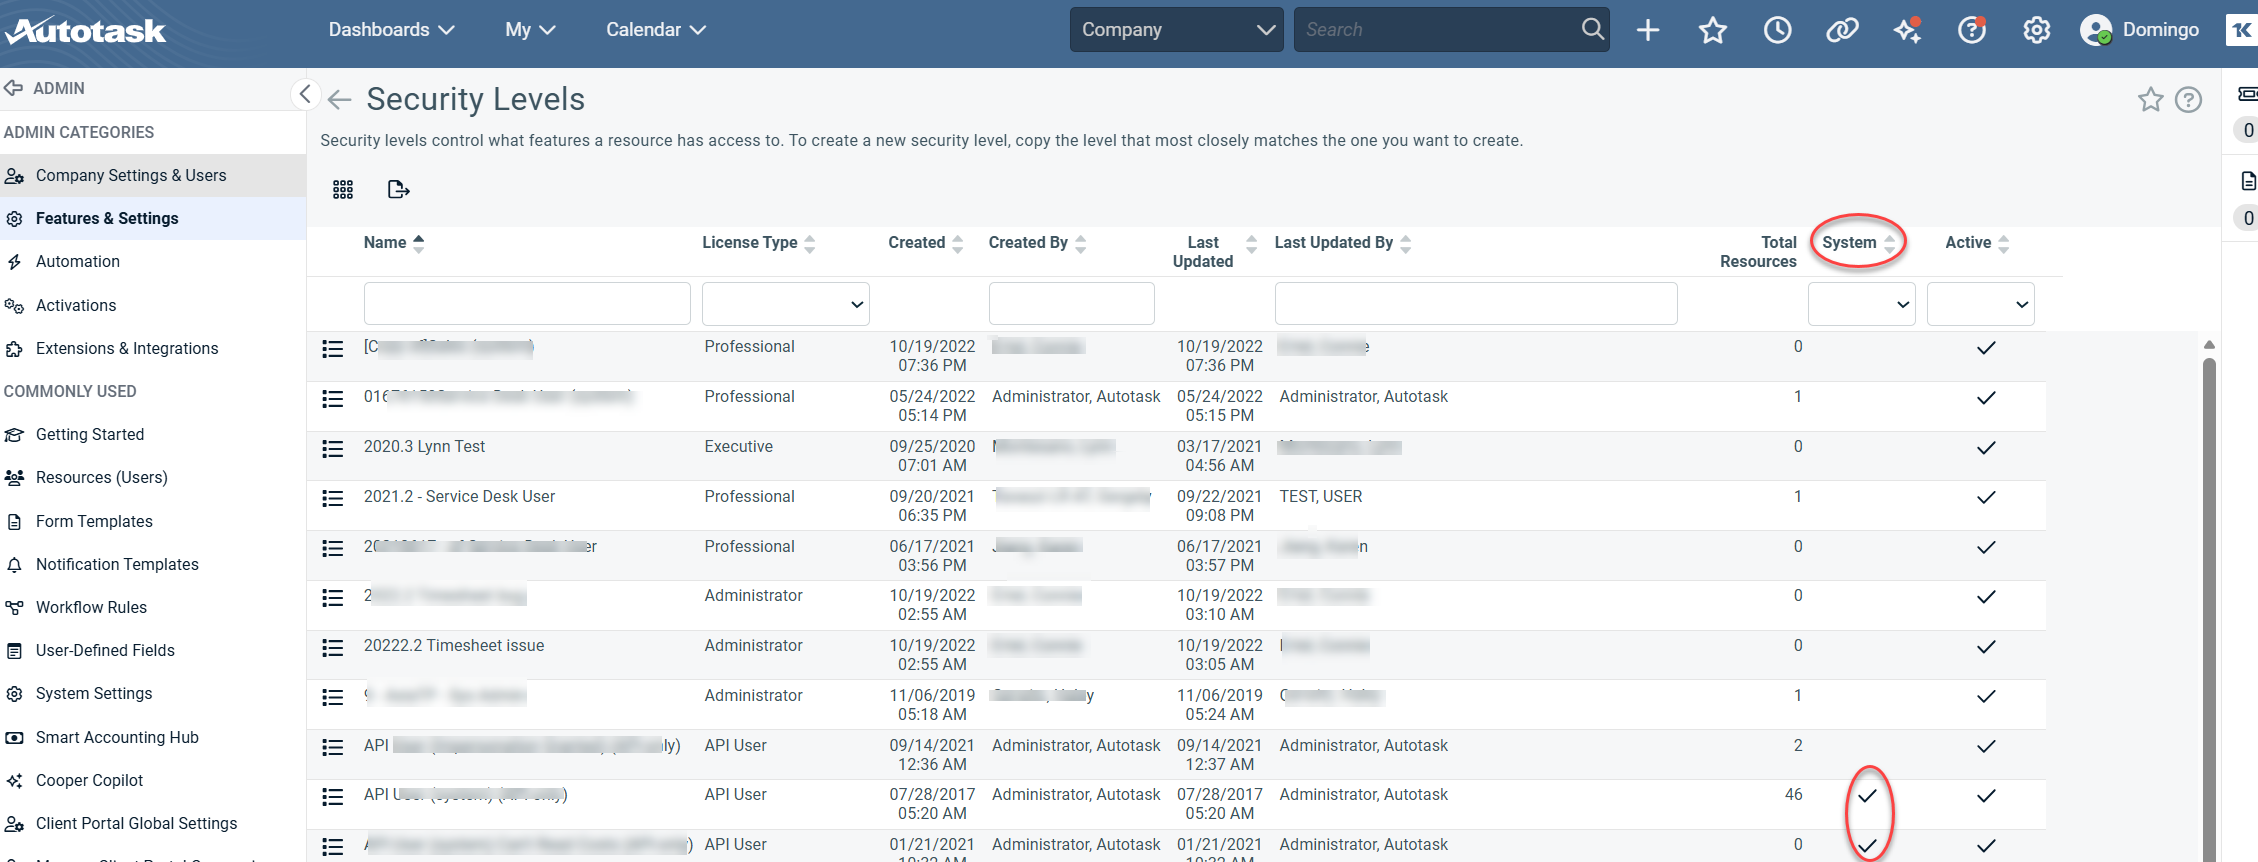
For detailed system security level descriptions, see here.
Creating the SaaS Alerts minimal-permissions security level
-
Locate the API User (system) security level.
-
Click the action (three‑line) menu to the left of API User (system) security level and select Copy.
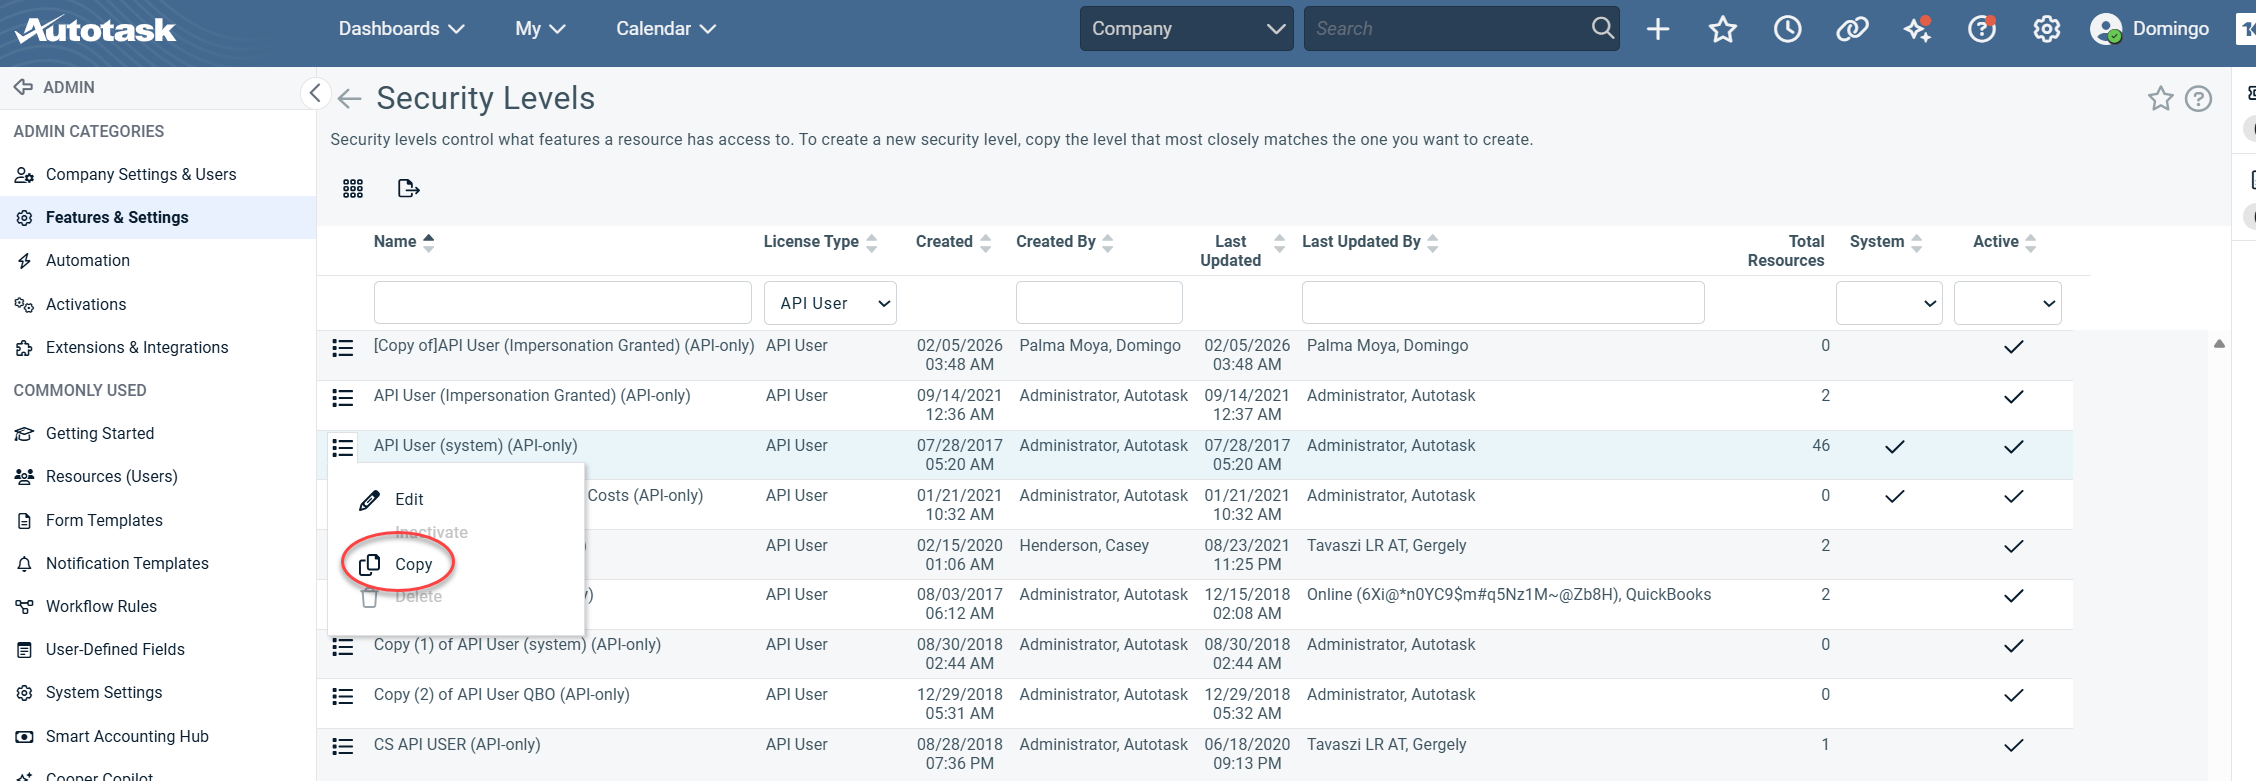
-
This creates a new, editable copy of the system security level while preserving the original system‑protected version.
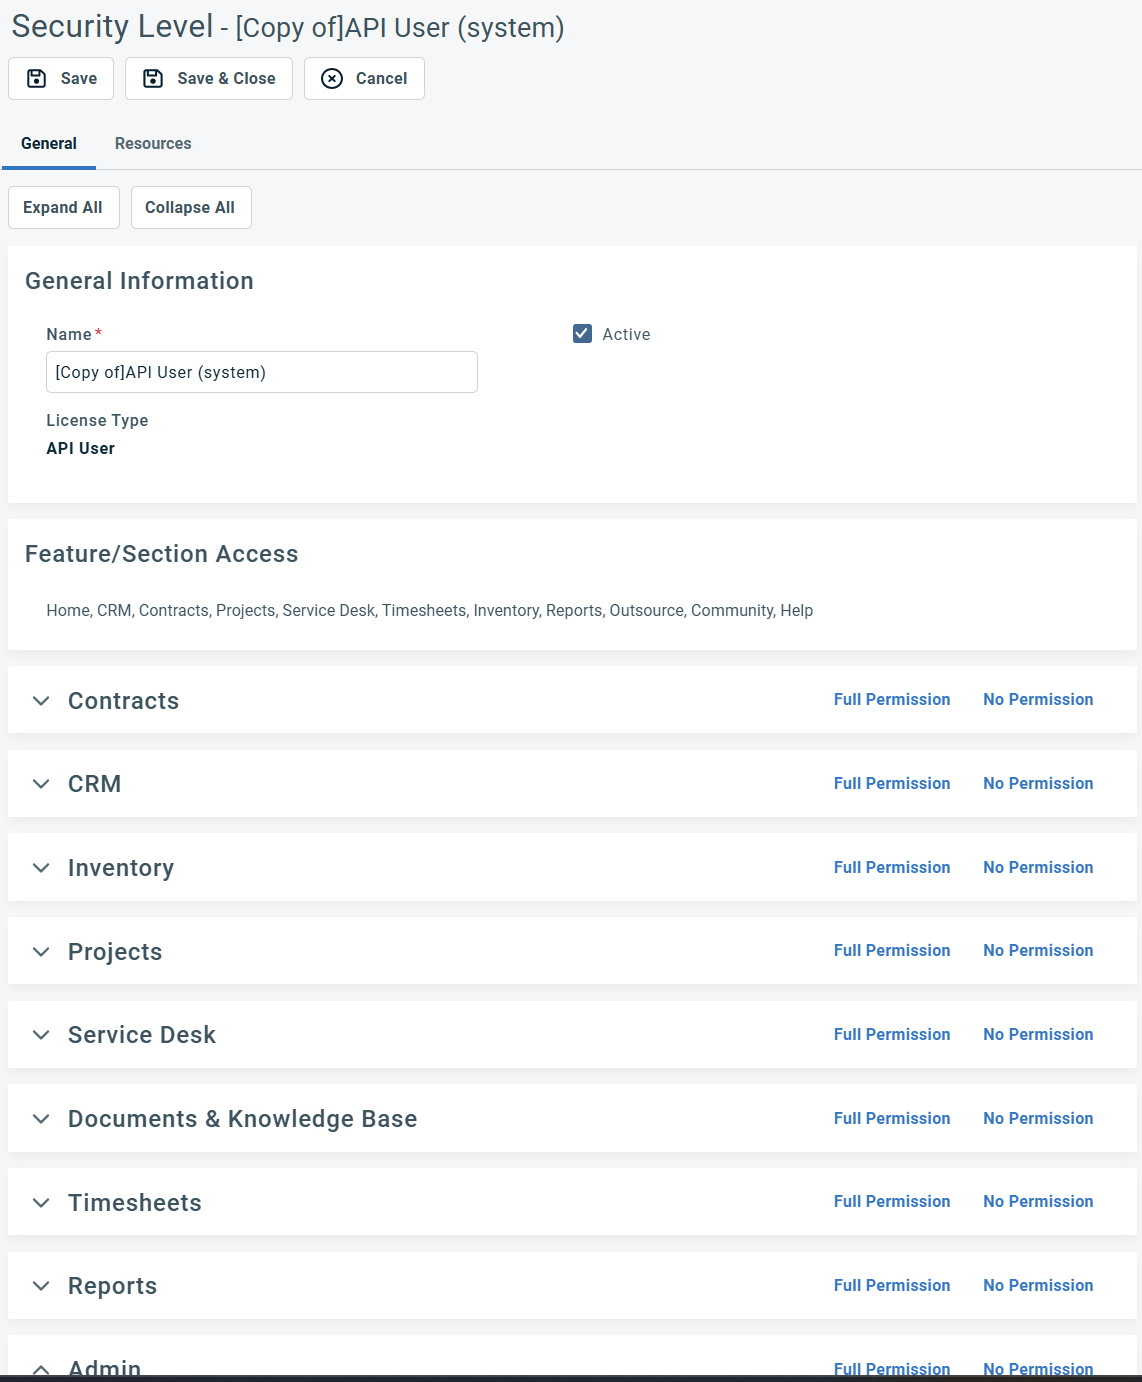
-
-
The copied security level opens automatically, allowing you to rename it and apply the required minimal‑permissions configuration.
-
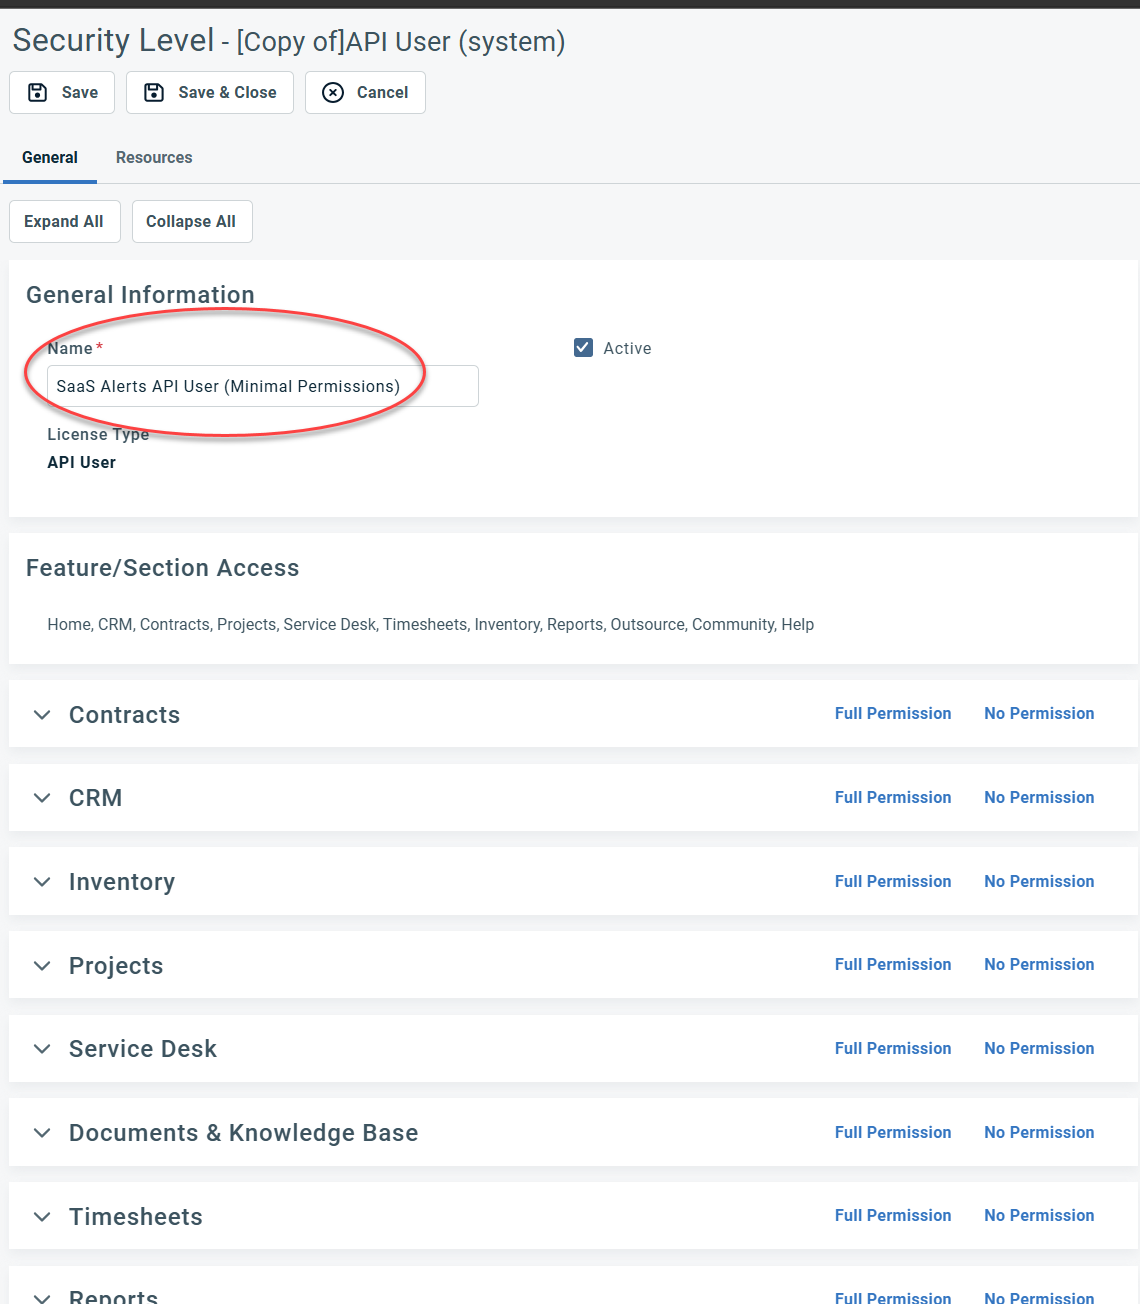
Set the name to: SaaS Alerts API User (Minimal Permissions)
-
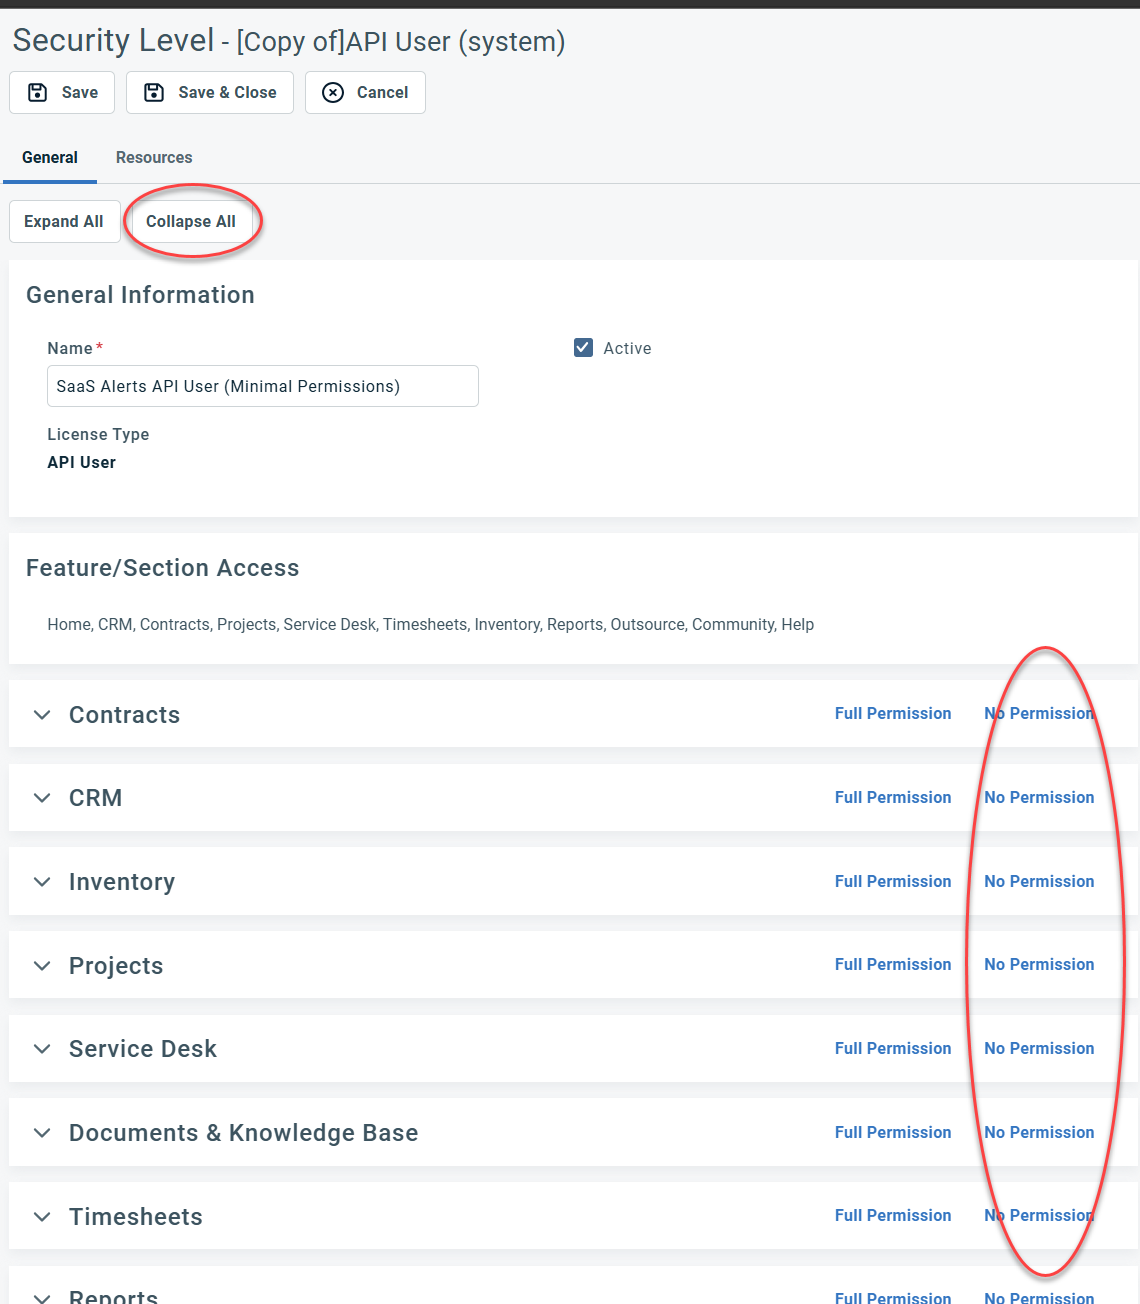
Click Collapse All and set No Permission for all sections.
-
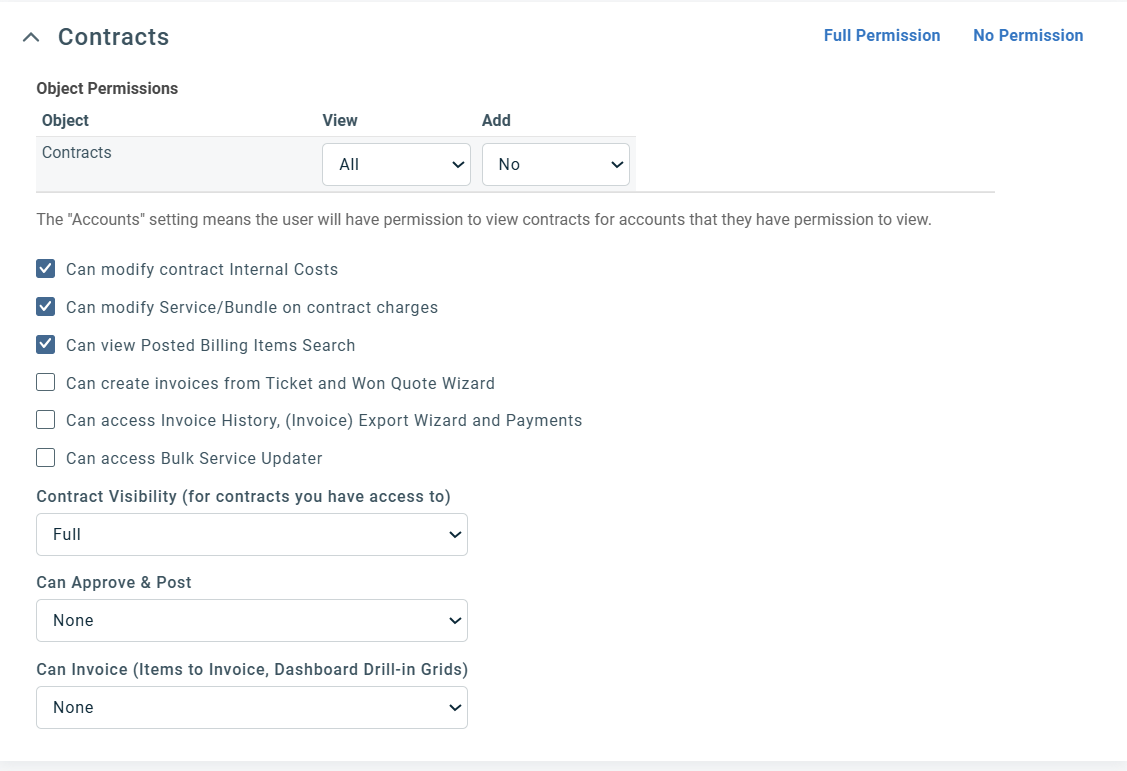
Contracts
-
View: All
-
Enable:
-
Can modify contract internal costs
-
Can modify Service/Bundle on contract charges
-
Can view Posted Billing Items Search
-
Contract Visibility (for contracts you have access to): Full
-
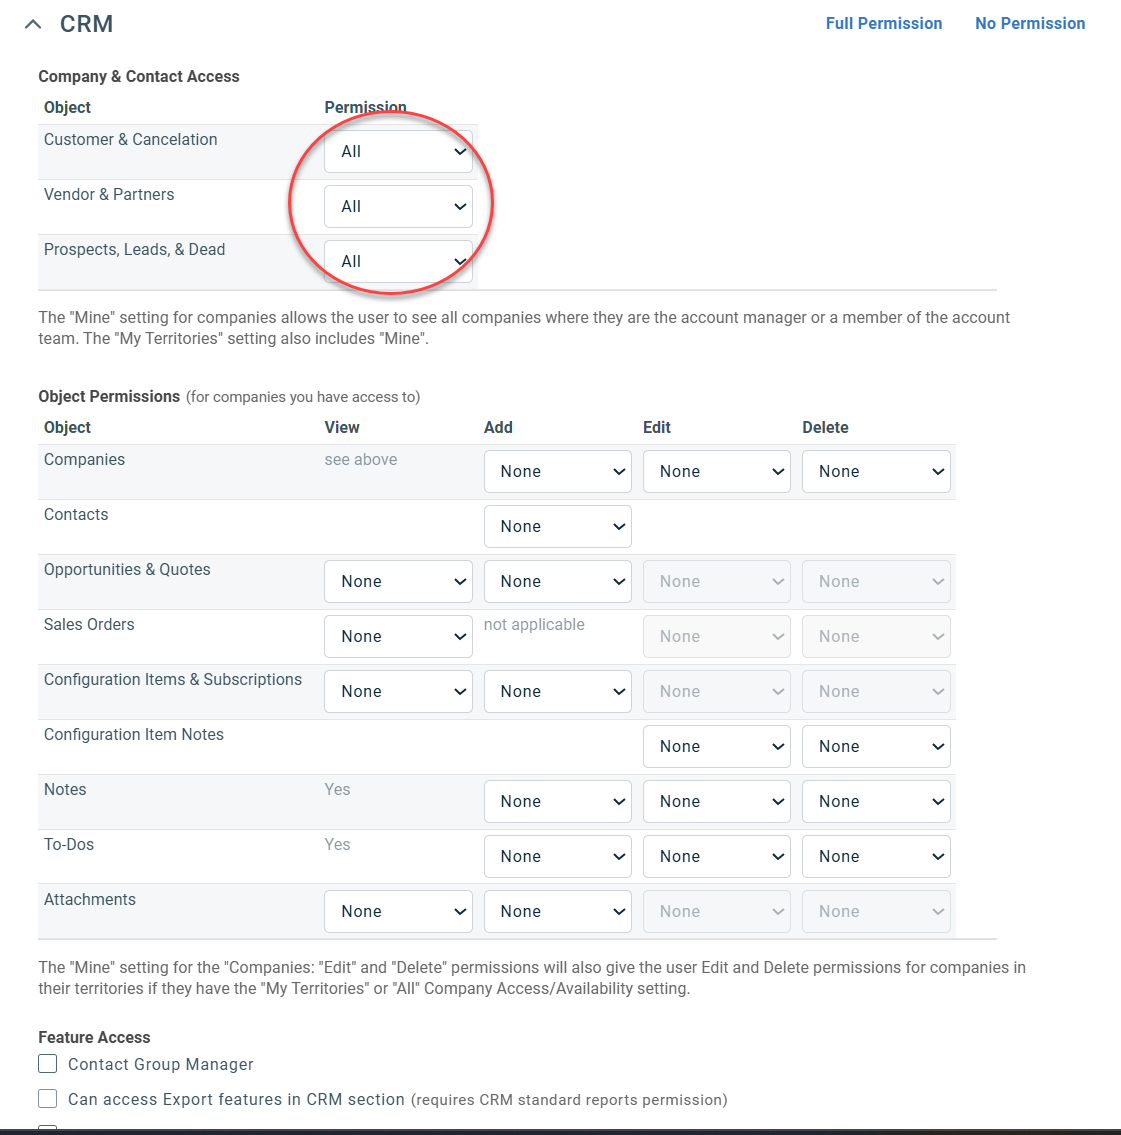
CRM
Set the following to All:
-
Customers & Cancellation
-
Vendors & Partners
-
Prospects, Leads, & Dead
Inventory
-
No Permission
Projects
-
No Permission
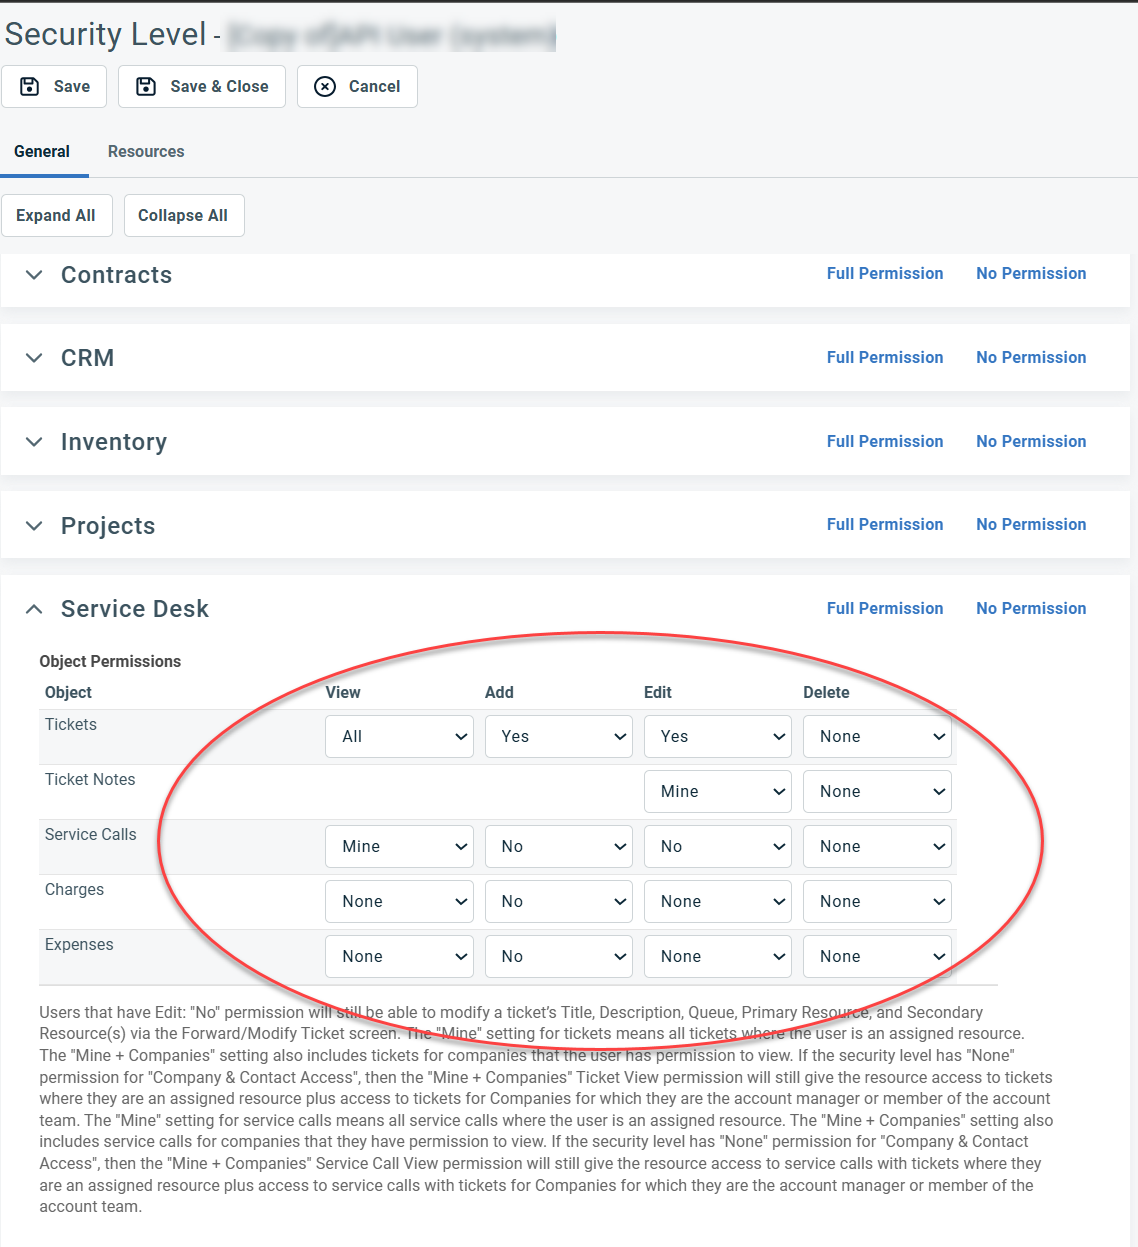
Service Desk
Tickets:
-
View: All
-
Add: Yes
-
Edit: Yes
Ticket Notes:
-
Edit: Mine
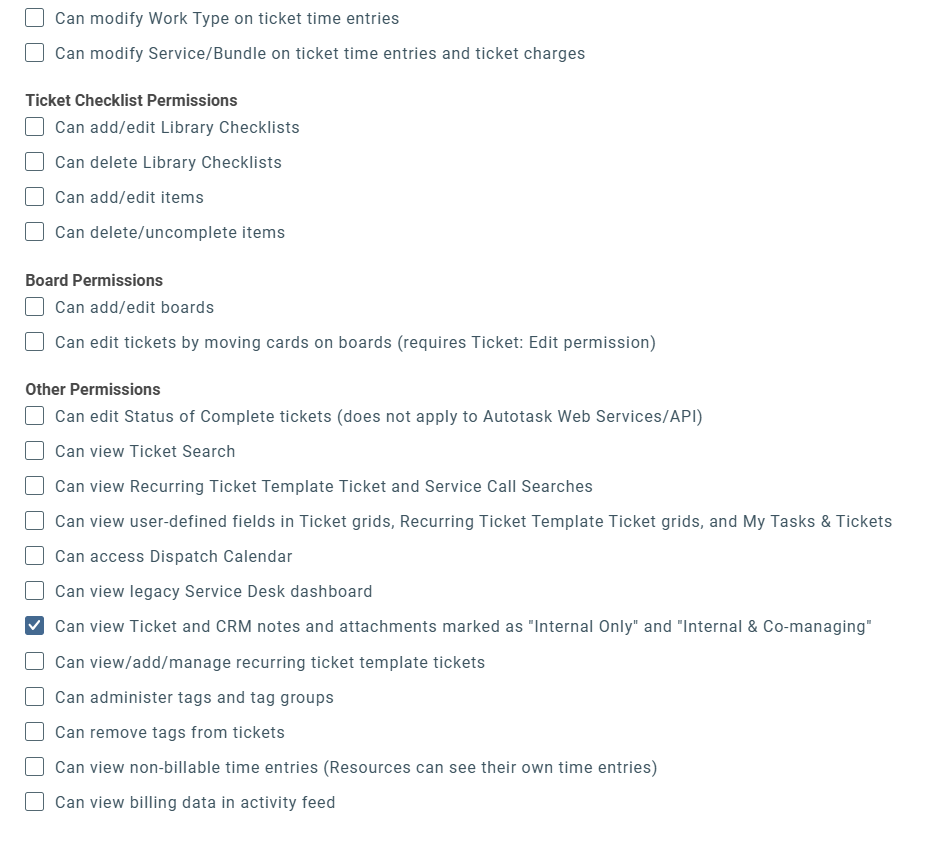
Under Other Permissions, enable:
-
Can view Ticket and CRM notes and attachments marked as "Internal Only" and "Internal & Co-managing"
Documents
-
No Permission
Timesheets
-
No Permission
Reports
-
No Permission
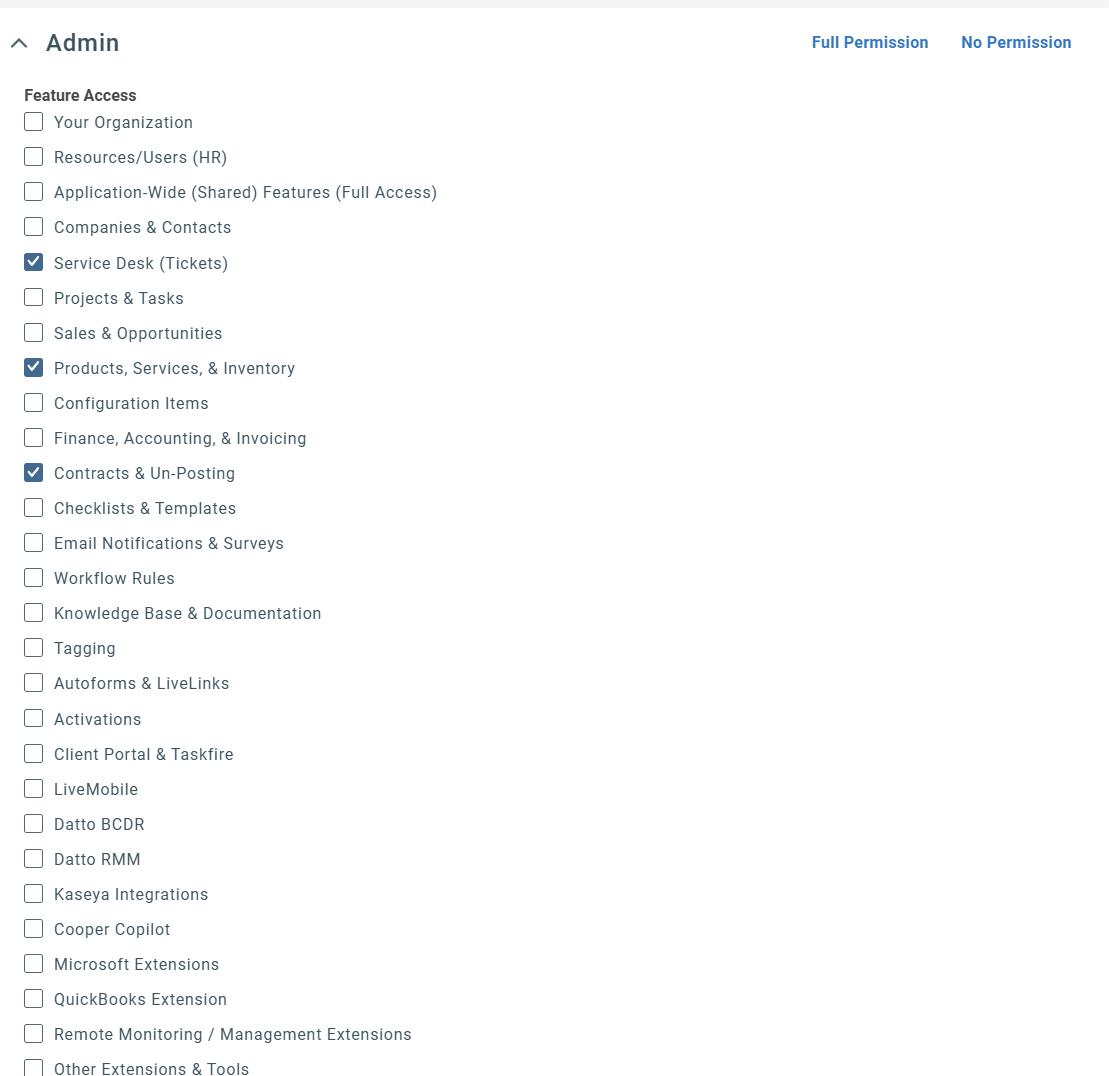
Admin
Enable:
-
Service Desk (Tickets)
-
Products, Services & Inventory
-
Contracts & Un-Posting
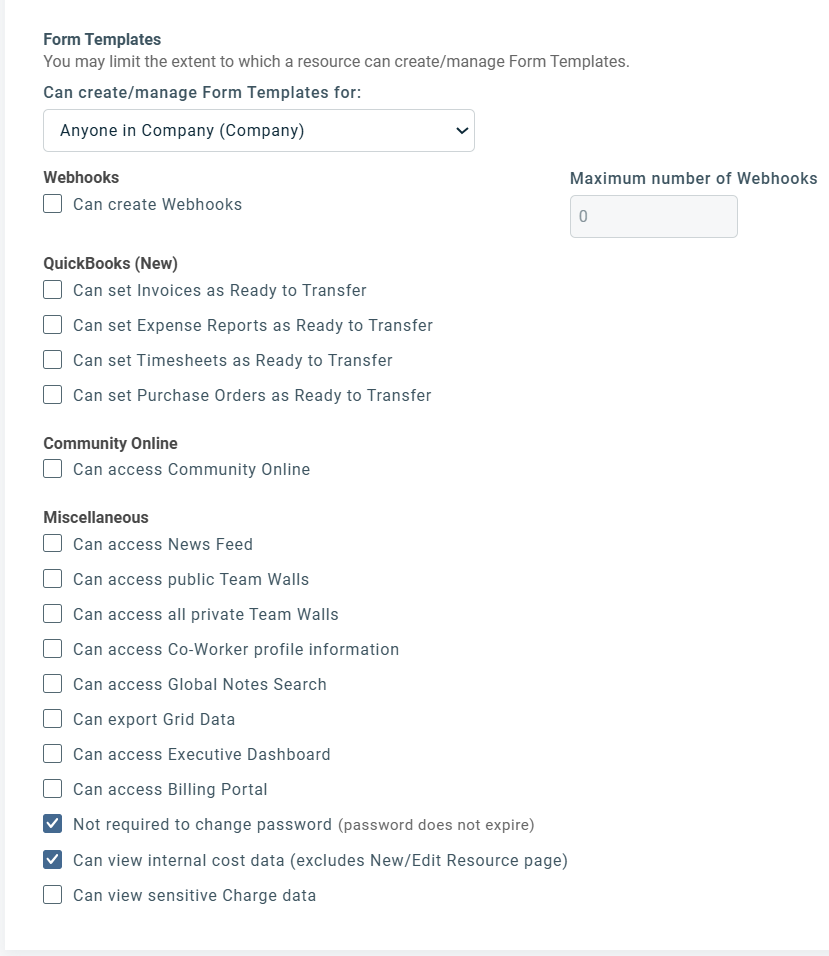
Other
Disable all permissions except:
-
Not required to change password (password does not expire)
-
Can view internal cost data (excludes New/Edit Resource page)
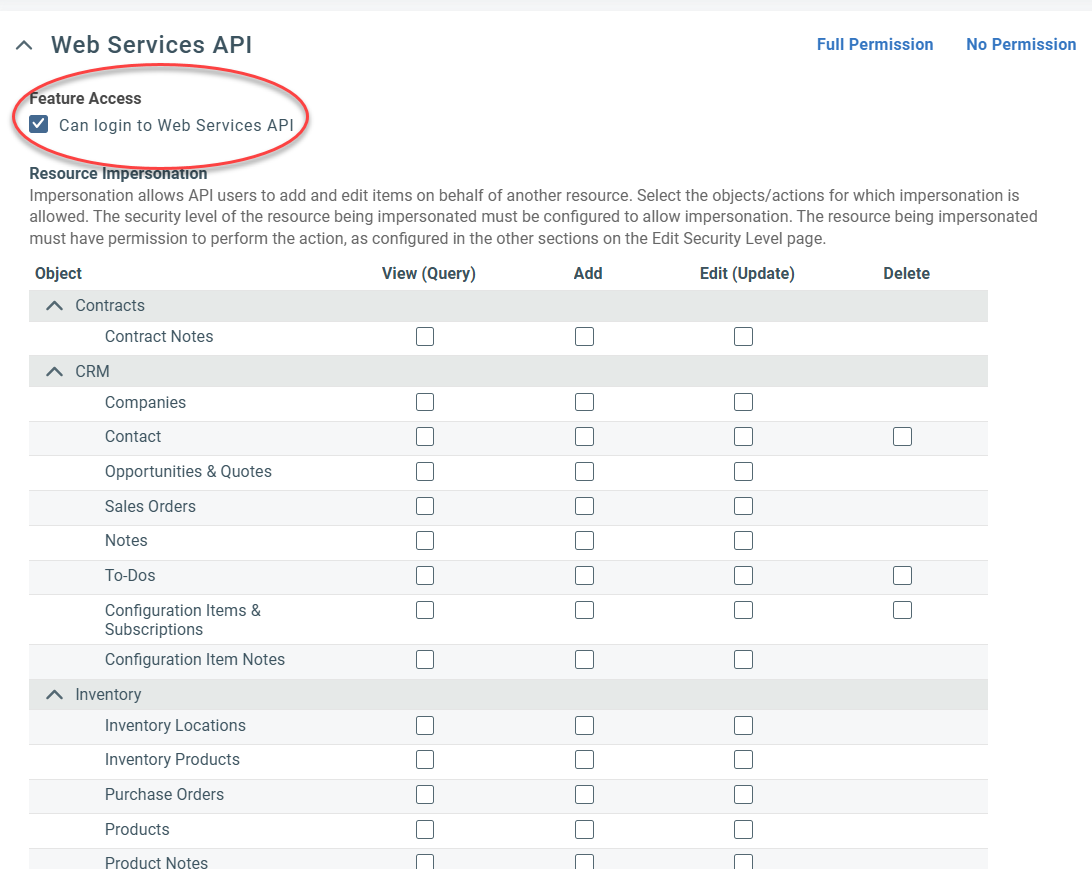
Web Services API
Enable:
-
Can login to Web Services API
-
Then, click Save & Close.
-
Assign the security level to the SaaS Alerts API user by editing the API user account in Autotask and selecting SaaS Alerts API User (Minimal Permissions) as the assigned security level. This ensures the integration runs with the intended least‑privilege permissions.
Related articles
-
Autotask Developer Help: Webhooks


